Security Policies
Security Policy Overview
Endpoint connectivity is determined by reachability (the correct forwarding state in the network) and security (connectivity must be permitted). Policies must be specified between L2 and L3 domains and between more granular L2/L3 IP endpoints. Security policies allow you to permit or deny traffic between the more granular endpoints. They control inter-virtual network traffic (ACLs on SVIs) and external-to-internal traffic (ACLs in border leaf devices, external endpoints only). ACLs are rendered in the appropriate device syntax and applied on enforcement points. Adding a new VXLAN Endpoint (for example, adding a rack or adding a leaf to a virtual network) automatically places the ACL on the virtual network interface. Adding a new generic system External Connectivity Point (ECP) (enforcement point) automatically places ACL for external endpoint groups. You can apply security policies to Layer 2 IPv4-enabled blueprints (IPv6 is not supported). For supported devices, refer to the Connectivity (from Leaf Layer) table in the Feature Matrix in the Reference section.
Security policies consist of a source point (subnet or IP address), a destination point (subnet or IP address), and rules to allow or deny traffic between those points based on protocol. Rules are stateless, meaning responses to allowed inbound traffic are subject to the rules for outbound traffic (and vice versa).
Rules can include traffic logging. The ACL is configured to log matches using whatever mechanism is supported on the device. Log configuration is local to the network device; It's not on the server. Parsing these logs is outside the scope of this document.
For a bi-directional security policy, you would create two instances of the policy, one for each direction.
You can apply more than one policy to each subnet/endpoint, which means the ordering of rules has an impact on behavior. An implicit hierarchy exists between routing zones, virtual networks, and IP endpoints, so you must consider how policies are applied at different levels of hierarchy. When one rule's match set contains the other's match set (full containment), the rules can conflict. You can set the rules to execute more specific rules first (“exception” focus/mode) or less specific first (“override” focus/mode).
Rules can also conflict when there is a full containment situation between the rules but the action is the same. In this case, there is potential for compression by using the less specific rule, and the more specific rule becomes a “shadow” rule. When conflicting rules are detected, you are alerted and shown the resolution.
A few cases where conflicting rules are identified are described below:
- Rules in policies between different pairs of IP endpoints (even if one is common to both pairs) are non-overlapping given that the pairs of IP addresses are different. This causes a disjoint match set from a source IP / destination IP perspective (different “IP signature”).
- Rules in policies between the same IP endpoints can overlap fields (such as destination port); the software checks for this.
- Rules in policies between different pairs of virtual networks (even if one virtual network is common to both pairs) are non-overlapping given that the pairs of subnets are different. This causes a disjoint match set from the source IP / destination IP perspective (different “IP signature”).
- Rules in policies between the same virtual networks can overlap fields (such as destination port); the software checks for this.
- When IP endpoint groups are used, they result in a set of IP endpoint pairs so the above discussion related to IP endpoint pairs applies.
- Rules in policies between a pair of IP endpoints and a pair of parent virtual networks have containment from an IP signature perspective. The software analyzes destination port / protocol overlap and classifies it as full-containment or non-full-containment conflict.
- Rules in policies between a pair of IP endpoints and a pair of virtual networks where at least one virtual network is not parent are non-conflicting (different "IP signature").
- Rules in policies between a pair of IP endpoints and an IP endpoint - virtual network pair where the virtual network is a parent have full containment from an IP signature perspective; the software analyzes the remaining fields.
- Rules in policies that contain external IP endpoints or endpoint groups must be analyzed from an IP signature perspective as external points are not bound by any hierarchical assumptions.
- A routing zone is a set of virtual networks and IP endpoints so the above discussions apply.
Endpoints are not supported in security policies when:
- Source point is an external endpoint or external endpoint group
- Destination point is internal (internal endpoint, internal endpoint group, virtual network, routing zone)
To make composition tractable, both from an analysis point of view as well as from comprehending the resulting composition it may be useful to limit the number of security policies that may apply to any given endpoint/group.
Security Policy Parameters
Security policies include the following details:
| Parameter | Description |
|---|---|
| Name | 32 characters or fewer, underscore, dash and alphanumeric characters only |
| Description | optional |
| IP Version |
|
| Enabled |
|
| Tags | optional |
| Source Point Type |
|
| Source Point |
|
| Destination Point Type | Source point (previously created) |
| Destination Point | Destination point (previously created) |
| Rule Actions |
|
| Rule Protocols |
|
| Source Port | For TCP and IP protocols |
| Destination Port | For TCP and IP protocols |
From the blueprint, navigate to Staged > Policies > Security Policies > Policies to go to security policies. You can create, clone, edit and delete security policies.
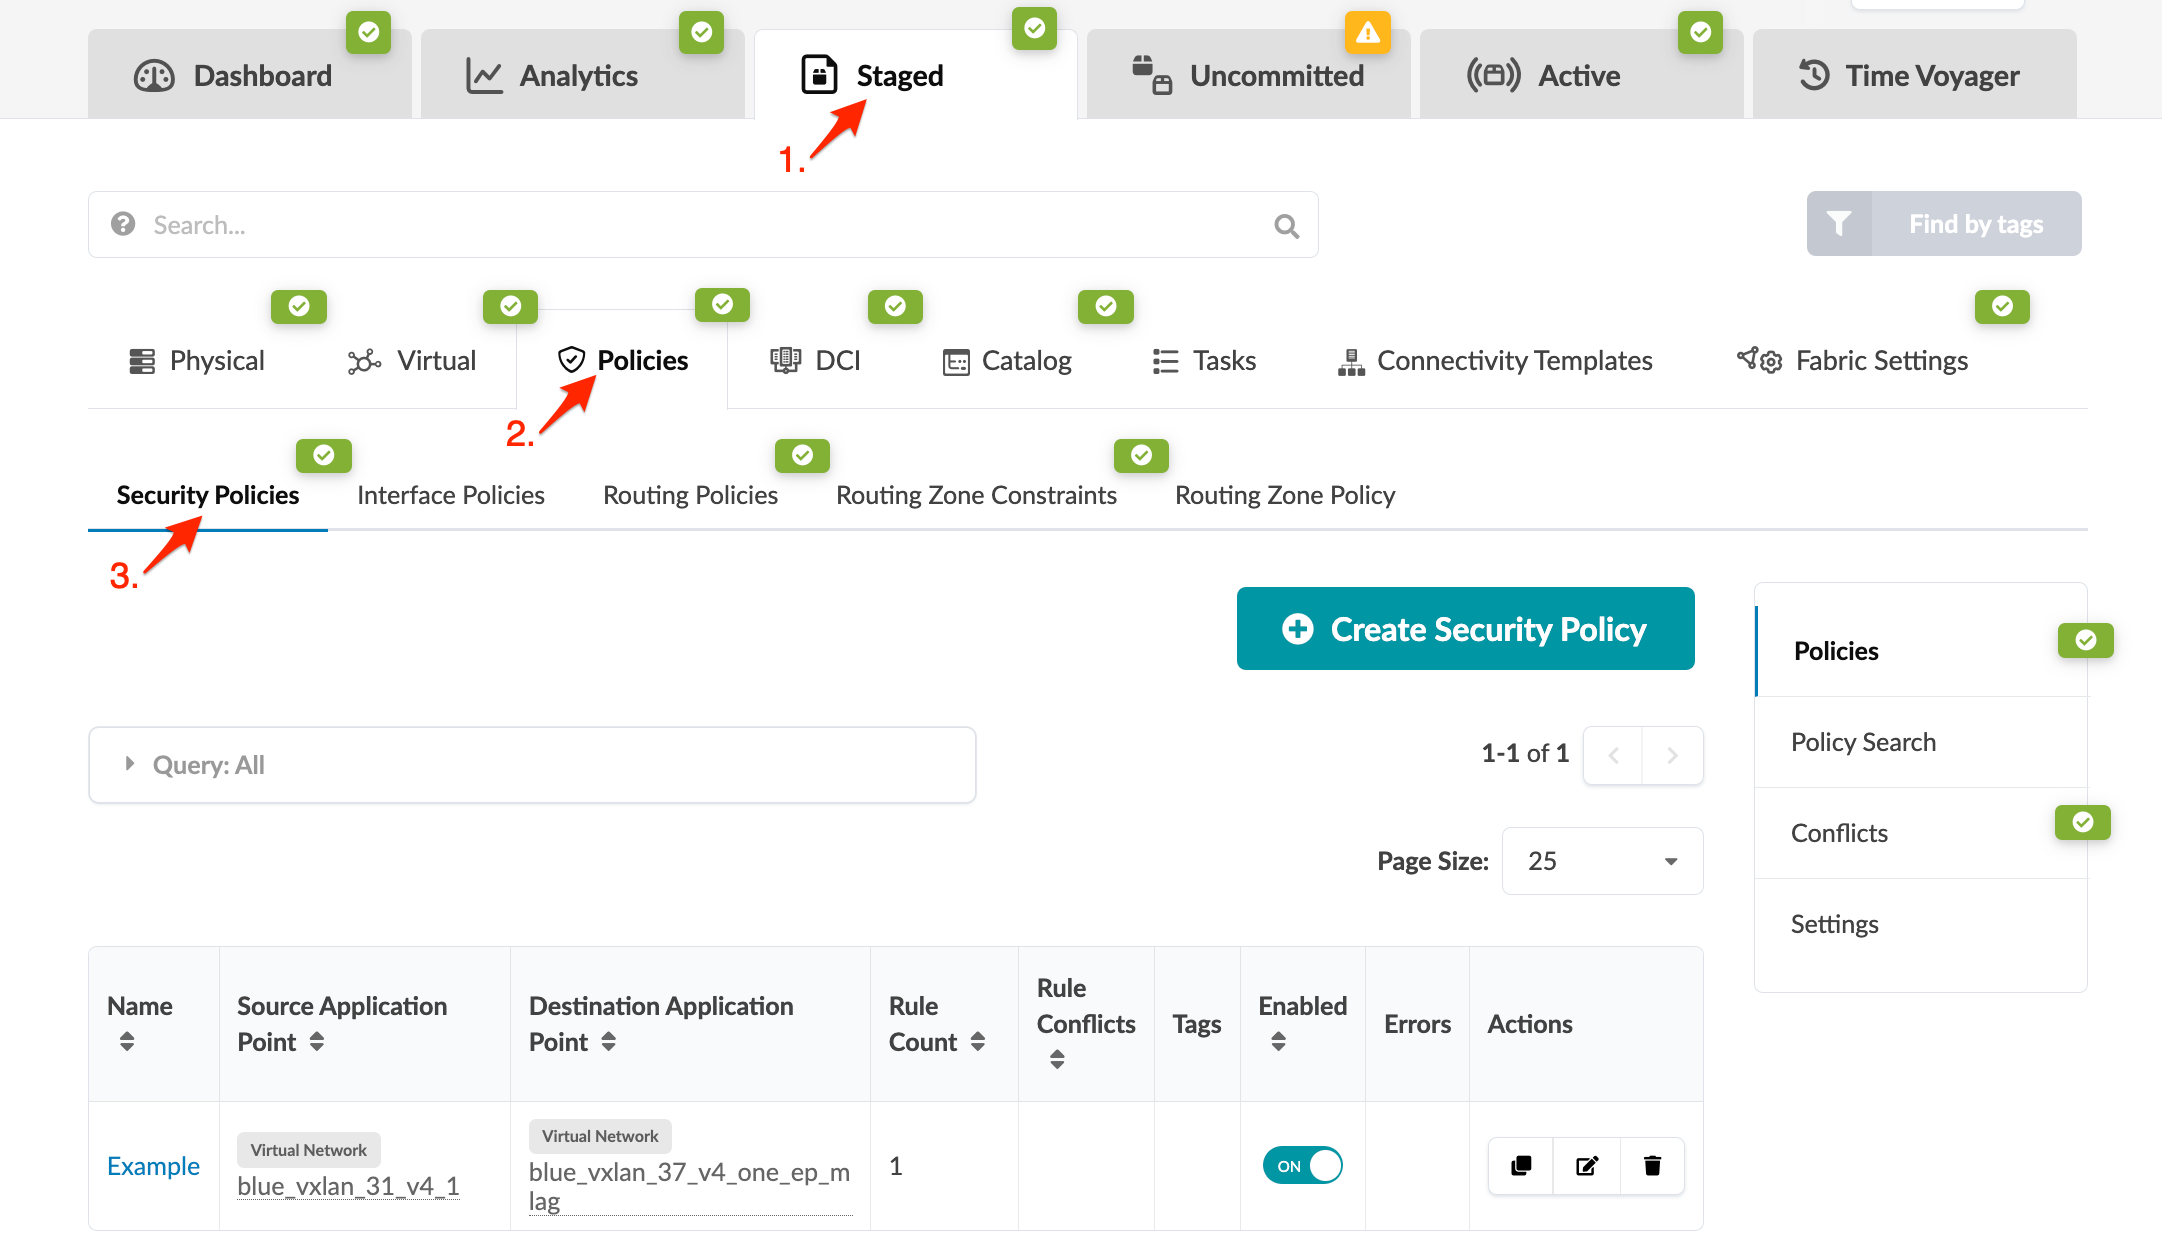
Create Security Policy
Before creating security policies, create routing zones, virtual networks, endpoints and endpoint groups, in that order. They are the basis for creating security policies.
To create security policies:
-
Starting in HPE Networking Apstra Data Center Director version 6.2.0, on
NX-OS, EOS, Junos OS, and Junos OS Evo devices, you can select the IP
version you want to use. You can choose one of the following types of IP
versions: IPv4, IPv6, or
IPv4-IPv6 Dual Stack.
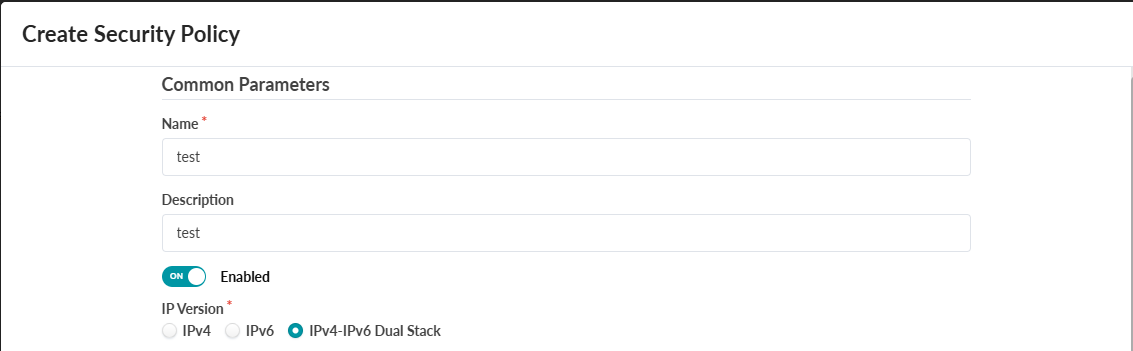
The sysem automatically filters and extracts only the relevant subnets that match the chosen IP version from the source and destination application points. The system then generates the appropriate Access Control List (ACL) rules.
If an application point doesn't have any configured objects for the selected IP version, a validation error is raised as a build error.

Policy Errors
-
Check the security policy in the table view for errors, which are
highlighted in red.

-
To see details, click the Show errors button.

-
When you resolve errors, the policy is no longer highlighted red and the
Errors field is blank.

To activate staged changes, commit them to the blueprint.
Edit Security Policy
- From the left navigation menu, navigate to Staged > Policies > Security Policies > Policies and click the Edit button for the policy to edit.
- Make your changes.
- Click Edit to stage the changes and return to the table view.
Delete Security Policy
- From the left navigation menu, navigate to Staged > Policies > Security Policies > Policies and click the Delete button for the policy to delete.
- Click Delete to stage the deletion and return to the table view.
Security Policy Search
You can find security policies that are applied to specific subnets or points.
- From the blueprint, navigate to Staged > Policies > Security Policies > Policy Search.
- Select a source point type and enter a subnet or source point, as applicable.
- Select a destination point type and enter a subnet or source point, as applicable.
-
Click Search to display associated security
policies.

Security Policy Conflicts
From the blueprint, navigate to Staged > Policies > Security
Policies > Conflicts to see any conflicts that have been detected
(Rule Conflicts column). Conflicts are resolved automatically whenever
possible. By default, more specific policies are applied before less specific ones,
but you can change these security policy settings. To see conflict details, click
the icon in the Rule Conflicts column. 
If the conflict was resolved automatically, Resolved by AOS appears in the
Status column. 
Security Policy Settings
You can configure how you want to resolve conflicts and whether to permit or deny traffic.
To activate staged changes, commit them to the blueprint.