Self-provisioning for IoT and Personal Devices
Automate client onboarding at scale, for personal devices and IoT, with secure self provisioning.
Wireless users in environments like dormitories can securely self-provision their personal devices such as Xboxes, Apple TV, and Roku. Likewise, unattended IoT devices can securely and automatically join a specified VLAN, or network segment. We call this the Personal Network Experience. And because it eliminates the need for client MAC address registration and IT intervention, it is an ideal solution for providing Wi-Fi access at scale.
Self provisioning with the Personal Network Experience works by connecting a SAML-compliant identity provider (IDP), for example, Microsoft Entra ID, to the Mist Active Assurance portal. Users log on to the WLAN, where they are redirected to the single-sign-on service for authentication and authorization. Mist assigns authenticated users a personal preshared key (PSK) that is specific to both the individual user and/or the SSID. Using personal PSKs also enables micro-segmentation, which means you can have users connect to a specific VLAN according to their role or profile. The same is true for IoT devices; they can be automatically connected to a specific VLAN, a best practice for protecting against IoT take-over attacks.
In the Mist console, you can configure both the complexity of the required passphrase, and the frequency of key rotation.

During self-provisioning, laptop users can generate a unique passphrase, then copy and paste it into the portal when prompted. Or, if working from a mobile device, they can have the passphrase emailed to them. Generated passphrases expire after 24 hours.
Before You Begin
- Obtain and activate a Juniper Mist™ Access Assurance subscription. For information about subscription management, see the Juniper Mist Management Guide.
- In your Juniper Mist organization, configure at least one organization-level WLAN with Multi-PSK enabled (either local or cloud PSK options are fine). For help with WLAN configuration, see the Juniper Mist Wireless Assurance Configuration Guide.
-
In your IdP admin console, configure a SAML 2.0 app integration. Your PSK portal will integrate with this application to enable Single Sign-On (SSO) access to your portal users. You can use a wide variety of IdPs (such as Okta and Microsoft Azure), as long as they support SAML 2.0. For help setting up a SAML 2.0 app integration, see your IdP documentation.
Copy the following information from your SAML 2.0 app integration, and save it so that you can use it to set up your PSK portal in Juniper Mist.
-
Signing Algorithm
-
Issuer ID (this key may vary, for example, in Okta, this value is called Identity Provider Issuer and in Azure, it's called Azure AD Identifier.
-
SSO URL (this key may vary, for example, in Okta, this value is called Identity Provider Single Sign-On URL and in Azure, it's called Login URL.
-
Certificate—Copy the full text of the certificate, from the BEGIN CERTIFICATE line through the END CERTIFICATE line.
-
Configure Self-Provisioning
To set up client onboarding with a BYOD PSK Portal:
-
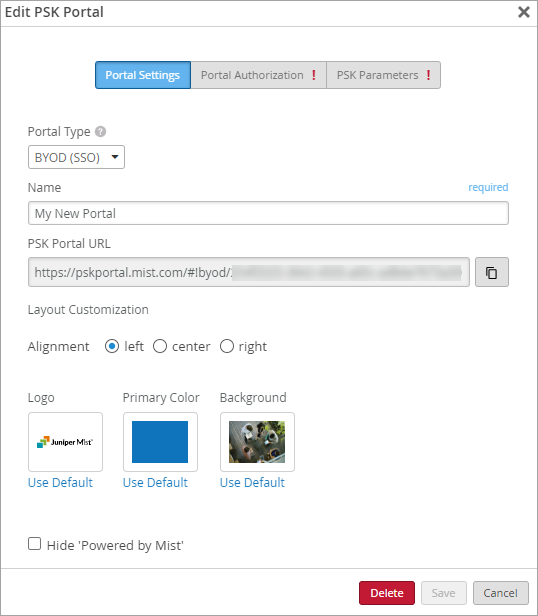
On the Portal Settings tab of the Edit PSK Portal window:
-
Keep the default layout options, or make changes to customize the sign-in screen.
-
Copy the PSK Portal URL so that you can provide it to your users.
-
-
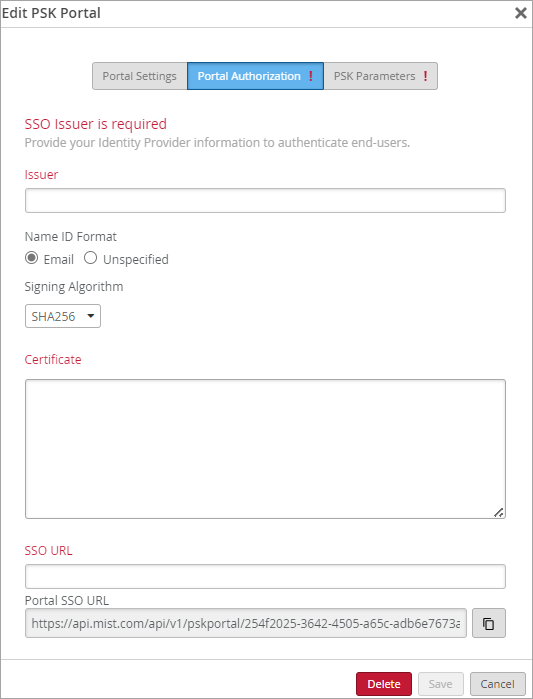
On the Portal Authorization tab of the Edit PSK Portal
window:
-
Enter the Issuer, Signing Algorithm, SSO URL, and Certificate that you copied from your app integration in your IdP admin console.
-
Select a Name ID Format. Most people use the e-mail address for the name ID. If you use a different identifier for your IdP user accounts, select Unspecified.
-
-
Open a separate browser window, and complete these steps to finalize your SAML 2.0 app
integration:
- Navigate to your IdP admin console.
- Go to the settings for your SAML 2.0 app integration.
- Enter the copied value into the appropriate field to identify your Juniper Mist PSK portal to your IdP. For help, see your IdP documentation.
- Save the changes.
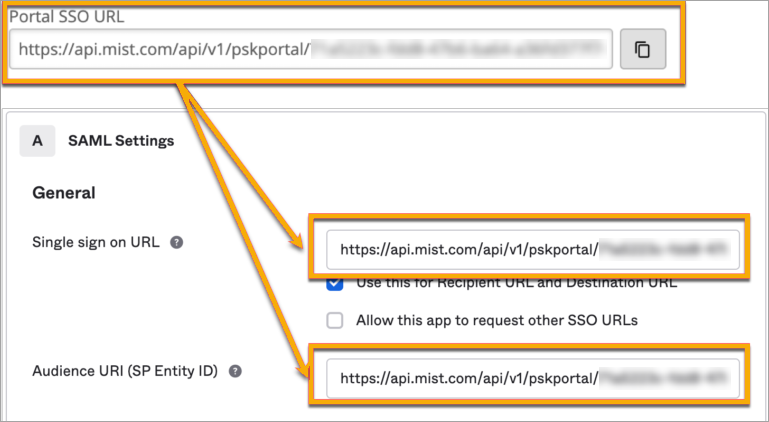
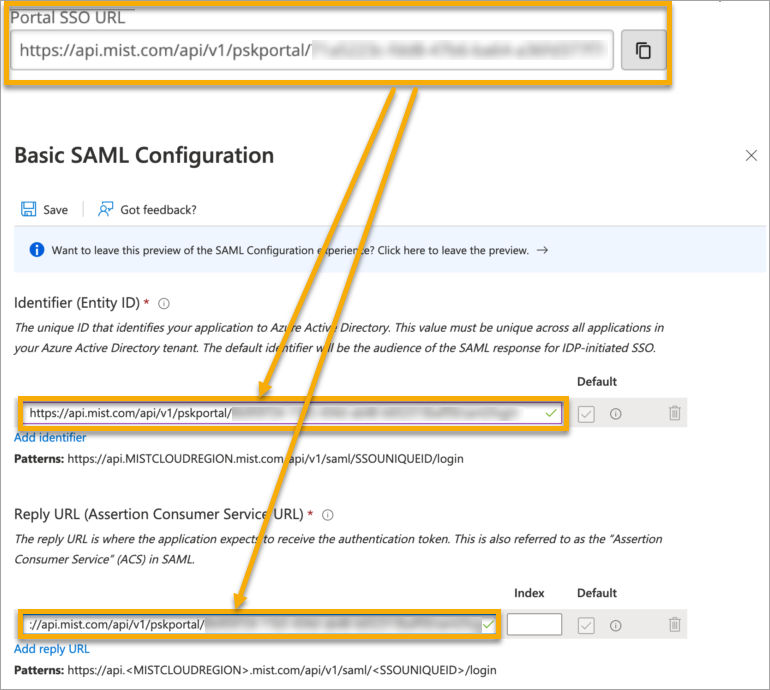
Your IdP might have different names for the field where you need to paste the Portal SSO URL. Consider the following examples, and see your IdP documentation for help.
Okta Example
In this example, the Portal SSO URL from Juniper Mist is copied into the appropriate fields in the Okta Admin Console.
Microsoft Azure Example
In this example, the Portal SSO URL from Juniper Mist is copied into the appropriate fields in the Azure Admin Console.
-
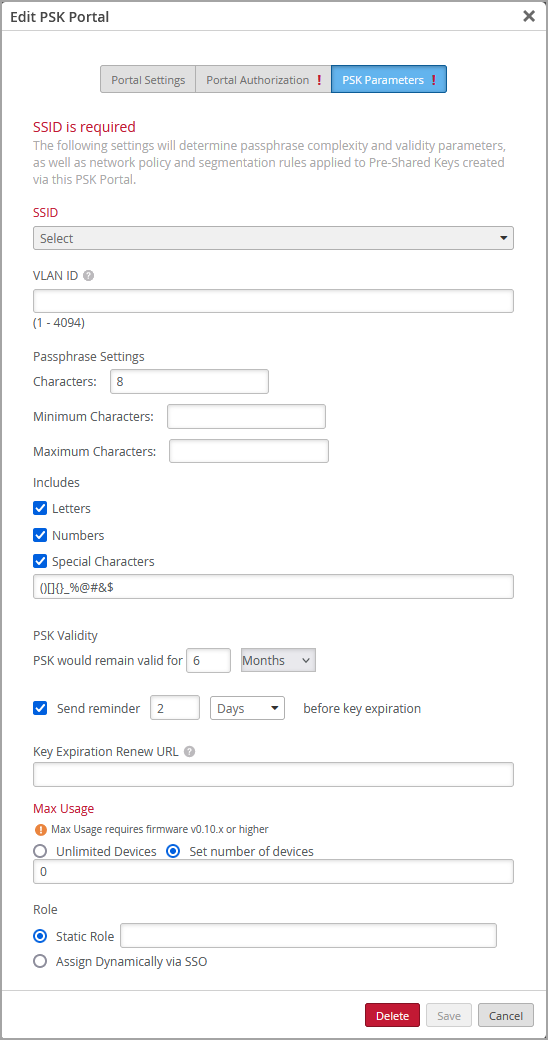
On the PSK Parameters tab of the Edit PSK Portal window:
-
Select the SSID (required).
Note:The list includes only SSIDs for organization-level WLANs that have Multi-PSK enabled.
-
Adjust the optional settings as needed.
Table 1: Optional Settings Option Description VLAN ID Specify a ID if you want to assign this portal's users to a particular VLAN. The ID must exist in the VLAN list for the WLAN.
Passphrase Settings Enter settings to enforce your policies for password complexity. PSK Validity You can set the key expiration period and send reminders before key expiration.
If you enable the option to send reminders, Juniper Mist sends users an email when their PSK is about to expire.
The email includes either the default reauthentication URL or your Key Expiration Renew URL (if you enter one). This is typically an single sign-on URL (for example, using your corporate identity provider URL through Okta or Microsoft Azure).
Max Usage Enter the maximum number of devices that can connect to your portal. Role If you want to limit access to certain types of user accounts, specify the roles that are allowed to use the portal. These needs to be roles that you've set up for your IdP user accounts.
-