Contracts
View information about the support contracts for the cloud-connected devices in your organization.
Requirements
As you start working with the Contracts page, be aware of these requirements.
- Access to contract information is based on your assigned user role.
- All organization-level users can view all cloud-connected devices in the organization.
- Site-restricted users can view the devices for their assigned sites.
- Contract details are available only for cloud-connected devices. To view contract information for non-cloud-connected devices, onboard the devices to the cloud.
Information On the Contracts Page
This page provides an organization-level view of the contract coverage for your devices. You can quickly access coverage information, monitor your overall support posture, identify devices that might require attention, and proactively plan renewals for your device inventory.
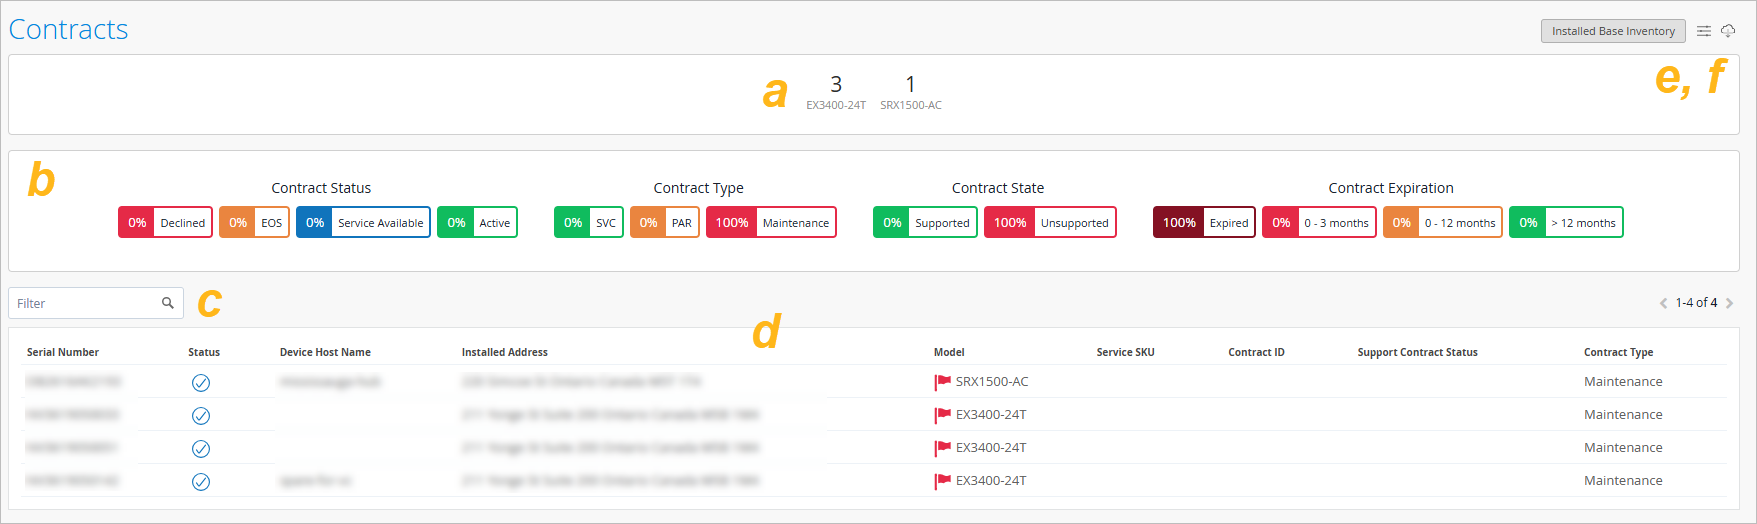
| Element | Description |
|---|---|
| a | Stats Panel: Device Model Buttons |
| b | Stats Panel: Contract Details Buttons |
| c | Keyword Filter Box |
| d | Contracts Table |
| e | Select Columns Button |
| f | Download to CSV Button |
Finding the Contracts Page
From the left menu, select Organization > Admin > Contracts.
Stats Panel
At the top of the Contracts page, use the stats panel to get a high-level view of the contract coverage across your organization.
In the stats panel, you’ll see these buttons:
- Device Model Buttons—These buttons show the number of devices per model in the organization.
If you click a button, the table shows only that device model. For more information, see Filter and Reorganize the Information.
- Contract Detail Buttons—These buttons show various contract details and the percentage of devices with each status. If you click a button, the table shows only devices with that status. For more information, see Filter and Reorganize the Information.
| Category | Button | Description |
|---|---|---|
| Contract Status | Declined | A support contract was declined for this device. |
| EOS | The purchased support contract for this device has reached End of Support. | |
| Service Available | A support contract is available to purchase for this device. | |
| Active | A support contract is active for this device. | |
| Contract Type | SVC | Juniper provides service for this device. |
| PAR | An authorized Juniper partner provides service for this device. | |
| Maintenance | This device has active support service. | |
| Contract State | Supported | This device has an active support contract in the Juniper support database. Its contract status is Active, and it is eligible for JTAC support. |
| Unsupported | This device is not covered by an active support contract in
the Juniper support database. Their contract status is Declined,
EOS, or Service Available. JTAC support might not be available
for these devices until the contract is purchased or
renewed. Even though a device is unsupported, you can onboard and manage it within your Mist organization. If you notice any data discrepancy, contact Customer Care for resolution. Once resolved, the data will be updated during the next data refresh cycle. |
|
| Contract Expiration | Expired | The support contract is no longer active. |
| 0 - 3 months | The support contract expires within the next 3 months. | |
| 0 - 12 months | The support contract expires within the next 12 months. | |
| > 12 months | The support contract expires more than 12 months from now. |
Contracts Table
The Contracts table provides detailed contract insights for the devices, allowing you to perform deeper analysis and troubleshooting.
The table contents change based on the buttons you’ve clicked in the Stats Panel and the keywords that you’ve entered in the Filter box above the table.
Use the Stats Panel to quickly identify areas of concern, then explore the Contracts Table for further investigation.
| Field | Description |
|---|---|
| Model |
The device model. A red flag indicates Unsupported devices. You can hover over the flag to see more information. If you notice any data discrepancy, contact Customer Care for resolution. Once resolved, the data will be updated during the next data refresh cycle. |
| Serial Number | Unique ID mapped to the device. |
| Status |
Service level to which the device is onboarded. A blue check mark indicates that the device is onboarded to the Assured service level. This service level includes access to the JSI experience. If the device is not onboarded to the organization, this field is empty. |
| Device Host Name | Hostname of the device. |
| Installed Address | Location where the device is installed. |
| Service SKU |
Stock Keeping Unit (SKU) number assigned to the support contract. Types of SKUs:
|
| Contract ID | Support contract number assigned to the device. |
| Support Contracts Status |
Status of the support contract for the device.
|
| Contract Type |
Type of support service provided to the customer for the device.
|
| Contract Start Date | Support contract start date for the device. |
| Contract End Date | Support contract end date for the device. |
| Warranty Type | The warranty type associated with the device. Example: Standard Hardware Warranty. |
| Warranty Start Date | Start date of warranty for the device. |
| Warranty End Date | End date of warranty for the device. |
| Reseller | Juniper authorized reseller of the device. |
| Distributor | Juniper authorized distributor of the device. |
Filter and Reorganize the Information
-
Filter Buttons—In the Stats Panel, click a button to show only matching devices in the table. To clear a filter, click the button again.
You can apply multiple filters to narrow down your search.
- Single Filter Example—Click the MX480 device model button. The table shows only MX480 devices.
- Batch Filters Example—Click the SRX4200 device model button. Then, in the Contract State category, click Unsupported. The table shows only unsupported SRX4200 devices.
Note:The button colors change as you apply filters. If no filter buttons are selected, they all appear in a bright color. After you click a filter button, the unselected buttons appear in a paler color. This way, you can see at a glance which filters you’ve applied.
-
Keyword Filters—In the Filter box at the top-left corner of the table, start typing a model name or number. As you type, matching entries appear in a drop-down list. Click the model that you want to show in the table. You can apply multiple filters to narrow down your search.
To clear a single filter, click X. To clear all keyword filters, click Clear All.
Column Settings—At the top-right corner of the Contracts page, click the column settings button.
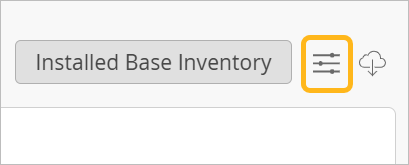
In the pop-up window, adjust the columns as needed.
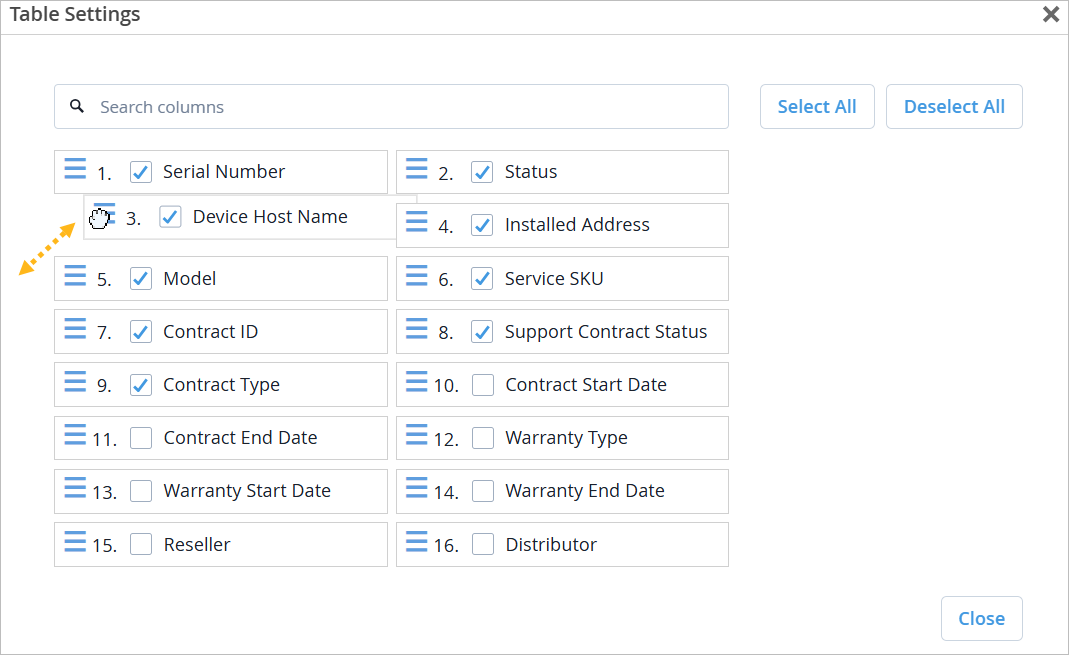
- To show or hide columns—Select or clear the check boxes.
- To reorder columns—Position your mouse pointer over the three-bars button, and then drag the column to a higher or lower numbered position.
- To quickly find a column in the list—Start typing in the search box above the column icons.
- To select or deselect all columns—Use the buttons at the top-right corner of the pop-up window.
- To apply the changes—Click Close.
Export the Contracts Information
You can export the contracts information to a CSV (Comma Separated Values) file, which you can then open in a text editor, spreadsheet program, or other application.
To export the information, click the Downloads button at the top-right corner of the Contracts page.
The file includes all information for all your cloud-connected devices.
Troubleshooting
After you download the file, if you see any issues with non-English characters appearing as special characters, take these steps to correct the issue:
-
- Select the file, and then click Get Data.
- In the Text Import Wizard, select Unicode (UTF-8) as the File Origin.
- Click Finish.