Source NAT Pool
Learn how Source NAT pools provide translated IP addresses for source NAT operations. Understand address pool configuration, one-to-one and many-to-one (PAT) translation methods, port allocation options, and efficient utilization of public IP addresses for scalable outbound connectivity.
Source NAT Pools
A NAT pool is a user-defined set of IP addresses that are used for translation. Unlike static NAT, where there is a one-to-one mapping that includes destination IP address translation in one direction and source IP address translation in the reverse direction, with source NAT, you translate the original source IP address to an IP address in the address pool.
For source Network Address Translation (NAT) address pools, specify the following:
-
Name of the source NAT address pool.
-
Up to 64 address ranges.
Do not overlap NAT addresses for source NAT, destination NAT, and static NAT within one routing instance.
-
Routing instance—Routing instance to which the pool belongs (the default is the main inet.0 routing instance).
-
Port —The Port Address Translation (PAT) for a source pool. By default, PAT is performed with source NAT. If you specify the no-translation option, the number of hosts that the source NAT pool can support is limited to the number of addresses in the pool. If you specify
block-allocation, a block of ports is allocated for translation, instead of individual ports being allocated. If you specifydeterministic, an incoming (source) IP address and port always map to the specific destination address and port block, based on predefined, deterministic NAT algorithm. If you specifyport-overloading, you can configure the port overloading capacity in source NAT. If you specifyrange, you can provide the port number range attached to each address in the pool, and the twin port range for source NAT pools. -
Overflow pool (optional)—Packets are dropped if there are no addresses available in the designated source NAT pool. To prevent that from happening when the port no-translation option is configured, you can specify an overflow pool. Once addresses from the original source NAT pool are exhausted, IP addresses and port numbers are allocated from the overflow pool. A user-defined source NAT pool or an egress interface can be used as the overflow pool. (When the overflow pool is used, the pool ID is returned with the address.)
-
IP address shifting (optional)—A range of original source IP addresses can be mapped to another range of IP addresses, or to a single IP address, by shifting the IP addresses. Specify the host-address-base option with the base address of the original source IP address range.
-
Address sharing (optional)—Multiple internal IP addresses can be mapped to the same external IP address. This option can be used only when the source NAT pool is configured with no port translation. Specify the
address-sharedoption when a source NAT pool has few external IP addresses available, or only one external IP address. With a many-to-one mapping, use of this option increases NAT resources and improves traffic. -
Address pooling (optional)— Address pooling can be configured as paired or no-paired. Specify
address-pooling pairedfor applications that require all sessions associated with one internal IP address to be mapped to the same external IP address for the duration of a session. This differs from thepersistent-addressoption, in which the same internal address is translated to the same external address every time. Specifyaddress-pooling no-pairedfor applications that can be can be assigned IP addresses in a round-robin fashion. If eitheraddress-pooling pairedoraddress-pooling no-pairedis configured for a source NAT pool with PAT, the persistent address option is disabled. Ifaddress-sharedis configured on a source NAT pool without PAT, then thepersistent-addressoption is enabled. Bothaddress-sharedandaddress-pooling pairedcan be configured on the same source NAT pool without PAT. -
Pool utilization alarm (optional)— When the raise-threshold option is configured for source NAT, an SNMP trap is triggered if the source NAT pool utilization rises above this threshold. If the optional clear-threshold option is configured, an SNMP trap is triggered if the source NAT pool utilization drops below this threshold. If clear-threshold is not configured, it is set by default to 80 percent of the raise-threshold value.
You can use the show security nat resource usage source pool command to view address use in a source NAT pool without PAT, and to view port use in a source NAT pool with PAT.
- Understand NAT Session Persistence
- Understand Shared Addresses in Source NAT Pools without PAT
- Source NAT Pools Without PAT
Understand NAT Session Persistence
Network Address Translation (NAT) session persistence provides a means to retain existing sessions, instead of clearing them, when there changes in the NAT configuration. If session persistence is enabled, the retained sessions continue to process and forward packets as time and resources are optimally used to rebuild the impacted sessions. Thus, packet forwarding does not stop even if the NAT configuration is changed for some or all sessions.
From Junos OS Release 18.3R1 onward, with the support for NAT session persistence, the Packet Forwarding Engine scans the sessions and decides whether to keep the sessions or clear the sessions. In releases before Junos OS Release 18.3R1, the NAT sessions are cleared if there is a change in the NAT configuration.
The Packet Forwarding Engine performs the following two types of scans to decide whether to retain or drop sessions:
-
Source NAT pool session persistence scan—The Packet Forwarding Engine compares the existing session IP address with source pool address range. If the existing session IP address is in the specified source pool address range, the session is kept alive, otherwise the session is cleared.
-
Source NAT rule session persistence scan—The Packet Forwarding Engine uses the rule ID to compare the source IP address, source port, destination IP address, and destination port between the old and new configurations. If the new and old configurations are the same, then the session is kept alive, otherwise the session is cleared.
NAT session persistence is not supported for static NAT and destination NAT.
NAT session persistence is not supported if the PAT pool is configured with the address persistent, address pooling paired, source address-persistent, port block allocation, port deterministic, persistent nat, and port overloading factor fields.
NAT session persistence is supported only for source NAT in the following scenarios:
-
Source pool—Change in an address range in a Port Address Translation (PAT) pool.
-
Source rule—Change in match conditions for the address book, application, destination IP address, destination port, source IP address, and destination port information.
To enable the NAT session persistence scanning, include the
session-persistence-scan statement at the [edit
security nat source] hierarchy level.
You can also configure a timeout value to retain the sessions for the specified time
period by using the set security nat source session-drop-hold-down
CLI command. The value of the session-drop-hold-down option ranges
from 30 through 28,800 seconds (eight hours). The session expires after the
configured timeout period.
Limitations of NAT Session Persistence
-
When there is a change in IP addresses in the NAT source pool, the newly configured IP addresses are appended to the NAT source pool. After the NAT source pool is rebuilt, the new IP addresses are not the same as the existing IP addresses. The differences in the IP addresses in the NAT source pool impacts the round-robin mode of picking IP addresses from the NAT source pool.
-
If the scan types identify sessions that will never be timed out (that is, the sessions for which the
session-drop-hold-downvalue is not configured or is configured as 8 hours), then the Packet Forwarding Engine ignores those sessions, and the sessions are retained.
Understand Shared Addresses in Source NAT Pools without PAT
Source NAT pools with no port address translation perform static, one-to-one mappings
from one source IP address to one external IP address. When there is only one
external IP address, or very few available in a source no-pat pool , the
address-shared option enables you to map many source IP
addresses to one external IP address as long as the traffic comes from different
source ports.
For example, if there is a source NAT pool with no port translation containing only two IP addresses, IP 1 and IP 2, when a packet arrives from
Source IP 1, port 1, it is translated to IP 1, port 1.
Source IP 2, port 2, it is translated to IP 2, port 2.
Source IP 3, port 1, it is translated to IP 2, port 1. (It cannot be translated to IP 1 port 1 because that port is already used.
However, if another packet arrives from Source IP 3, port 1 for a different destination IP and port, it cannot be translated to IP 1, port 1 or IP 2, port 1 because port 1 is already used for both available IP addresses. The session will fail.
This option increases NAT resources and improves the possibility of setting up successful translated traffic. It cannot be used on source NAT pools with port address translation because address sharing is already their default behavior.
Source NAT Pools Without PAT
When you define a source pool, Junos OS enables PAT by default. To disable PAT, you must specify no port translation when you are defining a source pool.
When using a source pool without PAT, Junos OS performs source Network Address Translation for the IP address without performing PAT for the source port number. For applications that require that a particular source port number remain fixed, you must use source pool without PAT.
The source pool can contain multiple IP addresses, multiple IP address ranges, or both. For source pool without PAT, Junos OS assigns one translated source address to the same host for all its concurrent sessions unless the address-pooling no-paired option is enabled.
The number of hosts that a source NAT pool without PAT can support is limited to the number of addresses in the pool. When you have a pool with a single IP address, only one host can be supported, and traffic from other hosts is blocked because there are no resources available. If a single IP address is configured for a source NAT pool without PAT when NAT resource assignment is not in active-backup mode in a chassis cluster, traffic through node 1 will be blocked.
Pool utilization for each source pool without PAT is computed. You can turn on pool utilization alarm by configuring alarm thresholds. An SNMP trap is triggered every time pool utilization rises above a threshold and goes below a threshold.
If a static NAT rule is for one-to-one IP translation, avoid dividing the rule into a destination rule and a source rule when source no-pat pool without address sharing is used. If you choose to divide the rule, you will then have to use source pat-pool with single IP or source no-pat pool with multiple IP.
Monitor Subscriber Port Utilization Using Carrier Grade NAT
Before you begin:
-
Understand the guidelines for monitoring subscriber port utilization. Read Configure Port Block Allocation Size.
You can configure threshold limits to monitor port utilization, by receiving notifications when port or port block usage is exceeded. Both Port Block Allocation (PBA) and Deterministic NAT (DetNAT) modes of deployment are supported.
The SNMP MIB objects are:
-
jnxJsSrcNatSubThresholdStatus–The Source NAT subscriber threshold status trap
-
jnxJsNatSubscriberIp–Subscriber IP address
-
jnxJsNAT–NAT MIB
The system log messages are:
- RT_SRC_NAT_SUBS_POOL_ALARM_DAMPENING
RT_NAT: RT_SRC_NAT_SUBS_POOL_ALARM_RAISE: Subscriber ip: 10.0.0.1, Source NAT pool: pool-name, Pool type: PBA, threshold: 90%, current: 100% - RT_SRC_NAT_SUBS_POOL_ALARM_CLEAR
RT_NAT: RT_SRC_NAT_SUBS_POOL_ALARM_CLEAR: Subscriber ip: 10.0.0.1, Source NAT pool: pool-name, Pool type: PBA, threshold: 50%, current: 25% - RT_SRC_NAT_SUBS_POOL_ALARM_RAISE
RT_NAT: RT_SRC_NAT_SUBS_POOL_ALARM_DAMPENING: Subscriber IP: 10.1.1.2, NAT pool: pool-name, threshold alarm [raise, clear] suppressed for 2 times in last 10 seconds
Example: Configure MAP-E on SRX Series Firewalls
Use this configuration example to configure Mapping of Address and Port with Encapsulation (MAP-E) functionality on SRX Series Firewalls.
|
Reading Time |
Less than an hour |
|
Configuration Time |
Less than an hour |
- Example Prerequisites
- Before You Begin
- Functional Overview
- Topology Overview
- Topology Illustration
- Step-By-Step Configuration on SRX Series Firewall as a MAP-E CE Device
- Step-By-Step Configuration on MX Series Device as a BR Device
- Verification
- Appendix 1: Set Commands on All Devices
- Appendix 2: Show Configuration Output on All Devices
Example Prerequisites
|
Hardware requirements |
Juniper Networks® SRX1500 Firewall or lower-numbered device models or Juniper Networks® vSRX Virtual Firewall (vSRX3.0) |
|
Software requirements |
Junos OS Release 19.4R1 or later. |
Before You Begin
|
Benefits |
|
|
Know more |
Understanding Mapping of Address and Port with Encapsulation (MAP-E) |
|
Hands-on experience |
vLab Sandbox: NAT - Source & Destination |
|
Learn more |
Configuring MAP-E on NFX Series DevicesUnderstanding Mapping of Address and Port with Encapsulation (MAP-E)Mapping of Address and Port with Encapsulation (MAP-E) for Next Gen Services |
Functional Overview
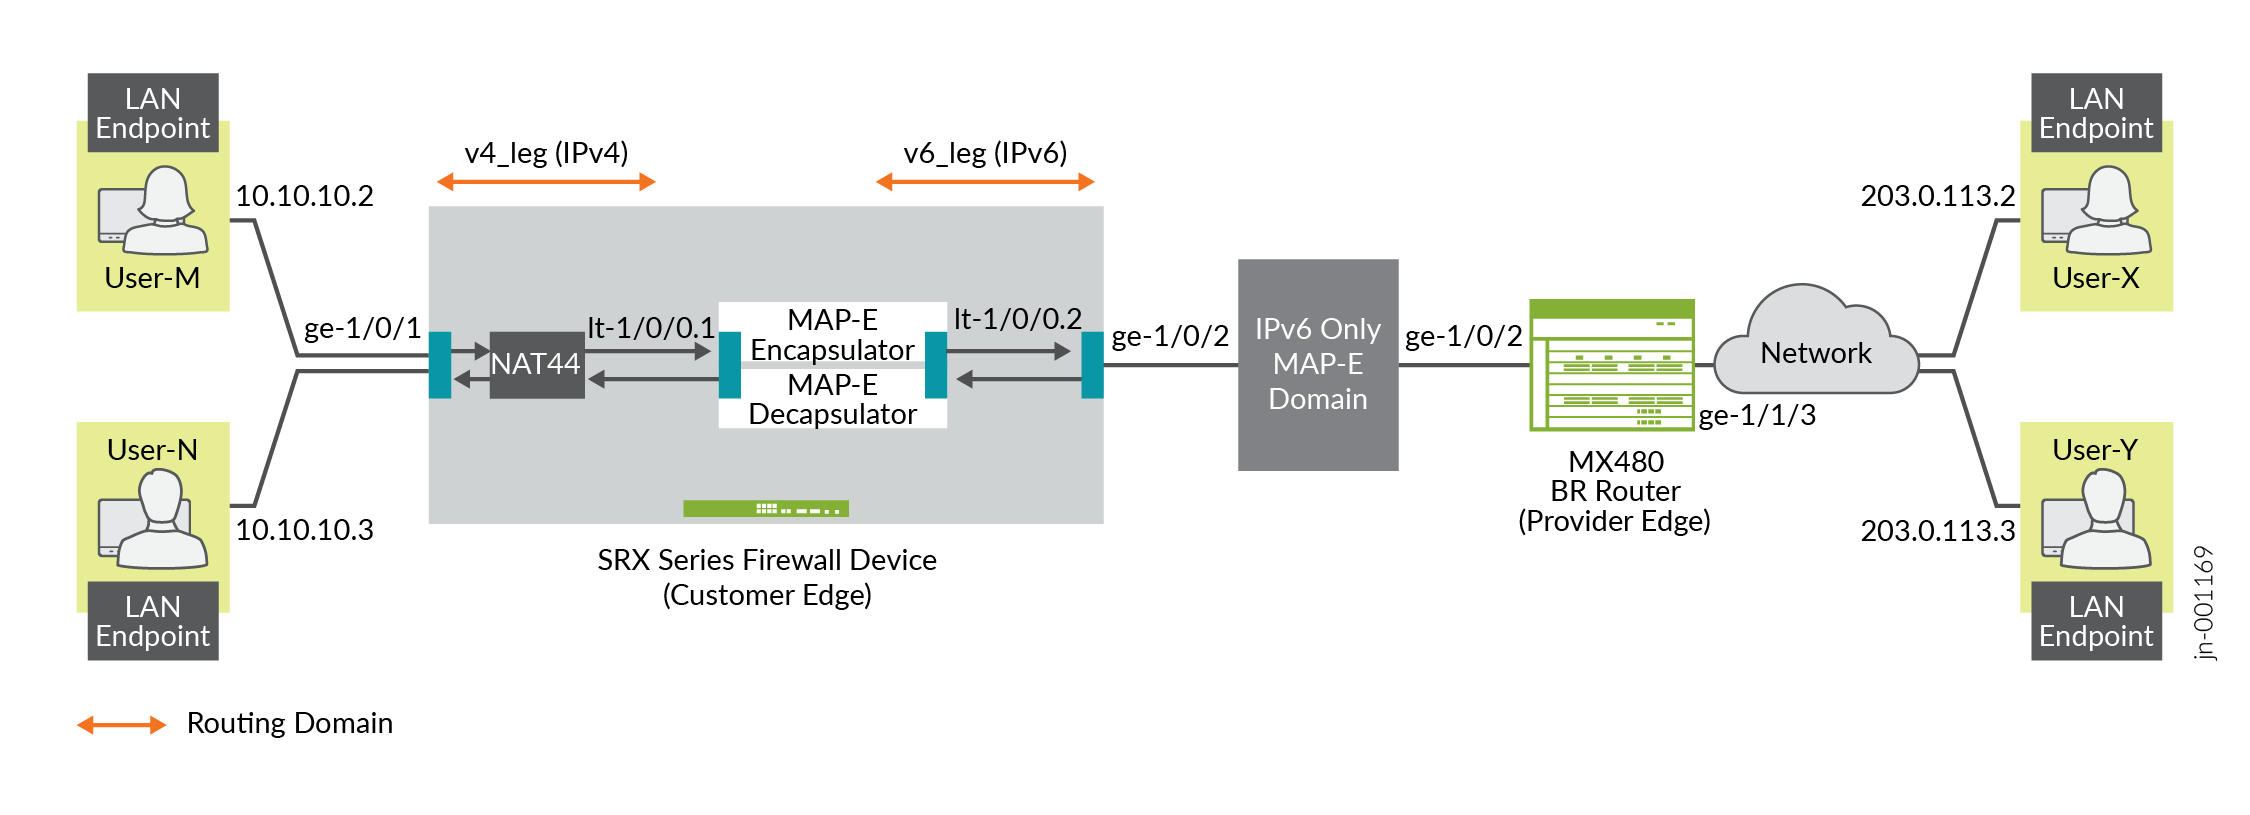
MAP-E transports IPv4 packets across an IPv6 network. A MAP-E network contains two types of devices:
-
MAP-E Customer Edge (CE): These dual-stacked CE devices support both IPv4 and IPv6. They can also perform Network Address Port Translation (NAPT).
-
MAP-E Border Relay (BR): The CE device connects a private IPv4 host and a BR device across an IPv6-only network domain.
Table 4 provides a quick summary of the configuration components deployed in this example.
|
Technologies used |
|
|
Primary verification tasks |
After completing the MAP-E configuration on an SRX Series Firewall, you can verify the status of the MAP-E configuration. |
Topology Overview
This topology presents the configuration process for MAP-E CE functionality on SRX Series Firewall devices. It also depicts the encapsulation and transport of IPv4 packets originating from MAP-E CE devices. The configuration moves these packets through an IPv4-over-IPv6 tunnel to MAP-E PE and BR devices. The packets then undergo detunneling in an IPv6 routing topology for further processing. A dual-stack MX Series device, connected to both a public IPv4 network and an IPv6 MAP-E network, serves as the MAP-E BR device.
|
Hostname |
Role |
Function |
|---|---|---|
|
LAN end-point |
End-user network devices. |
Connects to the IPv4 network. |
|
SRX Series Firewall |
Connects the BR router and end user network devices. |
Supports connectivity to a large number of IPv4 subscribers over the ISP IPv6 access network. |
|
BR router |
Connects the IPv4 network and SRX Series Firewall device. |
A BR device has at least an IPv6-enabled interface and an IPv4 interface connected to the native IPv4 network. |
Topology Illustration
Step-By-Step Configuration on SRX Series Firewall as a MAP-E CE Device
For complete sample configurations on the DUT, see:
Step-By-Step Configuration on MX Series Device as a BR Device
To configure an MX Series device as a BR device:
Verification
This section provides a list of show commands that you can use to verify the feature in this example.
You must establish an SSH session on end devices to generate CLI output.
|
Command |
Verification Task |
|---|---|
show security flow session |
|
show security softwires map-e domain
mapce1 |
Verify the MAP-E Domain |
show security nat source rule all |
|
show security nat source pool all |
|
show security nat source summary |
|
show security nat source persistent-nat-table
all
|
|
show services inline softwire statistics
mape |
- Verify the Flow Session
- Verify the MAP-E Domain
- Verify the NAT Source Rule
- Verify the NAT Source Pool
- Verify the NAT Source Summary
- Verify the Persistent NAT Table
- Verify the Softwire Statistics on the MX Series Device
Verify the Flow Session
Purpose
Verify the packet flow session.
Action
From operational mode, enter the show security flow session
command to view the packet flow.
user@srx> show security flow session Session ID: 134218806, Policy name: my_ce/4, Timeout: 1800, Valid In: 10.10.10.2/57630 --> 203.0.113.2/22;tcp, Conn Tag: 0x0, If: ge-1/0/1.0, Pkts: 50, Bytes: 5797, Out: 203.0.113.2/22 --> 192.0.2.18/20691;tcp, Conn Tag: 0x0, If: lt-1/0/0.1, Pkts: 33, Bytes: 5697, Session ID: 134218807, Policy name: my_ce/4, Timeout: 1800, Valid In: 2001:db8:12:3400:c0:2:1200:3400/1 --> 2001:db8::a/1;ipip, Conn Tag: 0x0, If: lt-1/0/0.2, Pkts: 50, Bytes: 7797, Out: 2001:db8::a/1 --> 2001:db8:12:3400:c0:2:1200:3400/1;ipip, Conn Tag: 0x0, If: ge-1/0/2.0, Pkts: 33, Bytes: 7017, Total sessions: 2
Meaning
The sample output confirms the packet flow session are up.
Verify the MAP-E Domain
Purpose
Verify whether the IPv4 and IPv6 addresses are configured correctly.
Action
From operational mode, enter the show security softwires map-e domain
mapce1 command to view the IPv4 and IPv6 addresses.
user@srx> show security softwires map-e domain mapce1
Role : CE
Version : 3
Domain Name : mapce1
BR Address : 2001:db8::a/128
End User Ipv6 prefix : 2001:db8:12:3400::/56
BMR Mapping Rule :
Rule Name : bmr
Rule Ipv4 Prefix : 192.0.2.0/24
Rule Ipv6 Prefix : 2001:db8::/40
PSID offset : 6
PSID length : 8
EA bit length : 16
Port SetID : 0x34
MAP-E Ipv4 address : 192.0.2.18/32
MAP-E Ipv6 address : 2001:db8:12:3400:c0:2:1200:3400
Meaning
The sample output displays the configured IPv4 and IPv6 addresses.
Verify the NAT Source Rule
Purpose
View details of the NAT source rule.
Action
From operational mode, enter the show security nat source rule
all command to view the NAT source rules.
user@srx> show security nat source rule all
Total rules: 1
Total referenced IPv4/IPv6 ip-prefixes: 5/0
source NAT rule: r1
Rule-set : mape
Rule-Id : 1
Rule position : 1
From zone : v4zone
To interface : lt-1/0/0.1
: ge-1/0/1.0
Match
Source addresses : 10.10.10.0 - 10.10.10.255
Destination addresses : 10.10.10.0 - 10.10.10.255
198.51.100.0 - 198.51.100.255
203.0.113.0 - 203.0.113.255
192.0.2.0 - 192.0.2.255
Action : my_mape
Persistent NAT type : any-remote-host
Persistent NAT mapping type : address-port-mapping
Inactivity timeout : 300
Max session number : 30
Translation hits : 1
Successful sessions : 1
Failed sessions : 0
Number of sessions : 1
Meaning
The sample output displays the configured NAT source rules.
Verify the NAT Source Pool
Purpose
View details of the NAT source pool.
Action
From operational mode, enter the show security nat source pool
all command to view the NAT source pool.
user@srx> show security nat source pool all
Total pools: 1
Pool name : my_mape
Pool id : 4
Routing instance : default
Host address base : 0.0.0.0
Map-e domain name : mapce1
Map-e rule name : bmr
PSID offset : 6
PSID length : 8
PSID : 0x34
Port overloading : 1
Address assignment : no-paired
Total addresses : 1
Translation hits : 1
Address range Single Ports Twin Ports
192.0.2.18 - 192.0.2.18 1 0
Total used ports : 1 0
Meaning
The sample output displays the configured NAT source pool.
Verify the NAT Source Summary
Purpose
View the NAT source summary.
Action
From operational mode, enter the show security nat source
summary command to view the NAT source details.
user@srx> show security nat source summary
show security nat source summary
Total port number usage for port translation pool: 252
Maximum port number for port translation pool: 134217728
Total pools: 1
Pool Address Routing PAT Total
Name Range Instance Address
my_mape 192.0.2.18-192.0.2.18 default yes 1
Total rules: 1
Rule name : r1
Rule set : mape
Action : my_mape
From : v4zone To : lt-0/0/0.1
Rule name : r1
To : ge-0/0/7.0Meaning
The sample output displays the configured NAT source details.
Verify the Persistent NAT Table
Purpose
View the persistent NAT table.
Action
From operational mode, enter the show security nat source
persistent-nat-table all command to view the persistent NAT
table.
user@srx> show security nat source persistent-nat-table all Internal Reflective Source Type Left_time/ Curr_Sess_Num/ Source In_IP In_Port I_Proto Ref_IP Ref_Port R_Proto NAT Pool Conf_time Max_Sess_Num NAT Rule 10.10.10.2 57630 tcp 192.0.2.18 20691 tcp my_mape any-remote-host -/300 1/30 r1
Meaning
The sample output displays the persistent NAT table.
Verify the Softwire Statistics on the MX Series Device
Purpose
View the softwire statistics on the MX Series device.
Action
From operational mode, enter the show services inline softwire
statistics mape command to view the softwire statistics on the
MX Series device.
user@host> show services inline softwire statistics mape
Service PIC Name si-1/0/0
Control Plane Statistics
MAPE ICMPv6 echo requests to softwire concentrator 0
MAPE ICMPv6 echo responses from softwire concentrator 0
MAPE Dropped ICMPv6 packets to softwire concentrator 0
Data Plane Statistics (v6-to-v4) Packets Bytes
MAPE decaps 15034 1388760
MAPE ICMP decap errors 0 0
MAPE decap spoof errors 0 0
MAPE v6 reassembled 0 0
MAPE dropped v6 fragments 0 0
MAPE v6 unsupp protocol drops 0 0
Data Plane Statistics (v4-to-v6) Packets Bytes
MAPE encaps 149544 223527457
MAPE ICMP encap errors 0 0
MAPE v6 mtu errors 0 0
MAPE v4 reassembled 0 0
MAPE dropped v4 fragments 0 0
Meaning
The sample output displays the softwire statistics on the MX Series device.
Appendix 1: Set Commands on All Devices
Set command output on all devices.
Set Commands on MAP-E CE Device
set security policies global policy my_ce match source-address any set security policies global policy my_ce match destination-address any set security policies global policy my_ce match application any set security policies global policy my_ce then permit set security policies default-policy permit-all set security zones security-zone v4zone host-inbound-traffic system-services all set security zones security-zone v4zone host-inbound-traffic protocols all set security zones security-zone v4zone interfaces ge-1/0/1.0 set security zones security-zone v4zone interfaces lt-1/0/0.1 set security zones security-zone v6zone host-inbound-traffic system-services all set security zones security-zone v6zone host-inbound-traffic protocols all set security zones security-zone v6zone interfaces ge-1/0/2.0 set security zones security-zone v6zone interfaces lt-1/0/0.2 set interfaces ge-1/0/1 unit 0 family inet address 10.10.10.1/24 set interfaces ge-1/0/2 mtu 9192 set interfaces ge-1/0/2 unit 0 family inet6 address 2001:db8:ffff::1/64 set interfaces lt-1/0/0 mtu 9192 set interfaces lt-1/0/0 unit 1 encapsulation ethernet set interfaces lt-1/0/0 unit 1 peer-unit 2 set interfaces lt-1/0/0 unit 1 family inet address 172.16.100.1/24 set interfaces lt-1/0/0 unit 1 family inet6 address 2001:db8:fffe::1/64 set interfaces lt-1/0/0 unit 2 encapsulation ethernet set interfaces lt-1/0/0 unit 2 peer-unit 1 set interfaces lt-1/0/0 unit 2 family inet address 172.16.100.2/24 set interfaces lt-1/0/0 unit 2 family inet6 address 2001:db8:fffe::2/64 set routing-instances v4_leg routing-options rib v4_leg.inet.0 static route 198.51.100.0/24 next-hop 172.16.100.2 set routing-instances v4_leg routing-options rib v4_leg.inet.0 static route 203.0.113.0/24 next-hop 172.16.100.2 set routing-instances v4_leg routing-options rib v4_leg.inet.0 static route 192.0.2.0/24 next-hop 172.16.100.2 set routing-instances v4_leg instance-type virtual-router set routing-instances v4_leg interface lt-1/0/0.1 set routing-instances v4_leg interface ge-1/0/1.0 set routing-instances v6_leg routing-options rib v6_leg.inet.0 static route 10.10.10.0/24 next-hop 172.16.100.1 set routing-instances v6_leg routing-options rib v6_leg.inet6.0 static route 2001:db8::a/128 next-hop 2001:db8:ffff::9 set routing-instances v6_leg routing-options rib v6_leg.inet6.0 static route 2001:db8:0012:3500::/56 next-hop 2001:db8:ffff::2 set routing-instances v6_leg routing-options rib v6_leg.inet6.0 static route 2001:db8:0012:3400::/56 next-hop 2001:db8:fffe::1 set routing-instances v6_leg instance-type virtual-router set routing-instances v6_leg interface lt-1/0/0.2 set routing-instances v6_leg interface ge-1/0/2.0 set security softwires map-e mapce1 br-address 2001:db8::a/128 set security softwires map-e mapce1 end-user-prefix 2001:db8:0012:3400::/56 set security softwires map-e mapce1 rule bmr rule-type BMR set security softwires map-e mapce1 rule bmr ipv4-prefix 192.0.2.0/24 set security softwires map-e mapce1 rule bmr ipv6-prefix 2001:db8::/40 set security softwires map-e mapce1 rule bmr ea-bits-length 16 set security softwires map-e mapce1 rule bmr psid-offset 6 set security softwires map-e mapce1 role CE set security softwires map-e mapce1 version 3 set security nat source pool my_mape allocation-domain mapce1 set security nat source pool my_mape allocation-domain allocation-rule bmr set security nat source rule-set mape from zone v4zone set security nat source rule-set mape to interface lt-1/0/0.1 set security nat source rule-set mape to interface ge-1/0/1.0 set security nat source rule-set mape rule r1 match source-address 10.10.10.0/24 set security nat source rule-set mape rule r1 match destination-address 10.10.10.0/24 set security nat source rule-set mape rule r1 match destination-address 198.51.100.0/24 set security nat source rule-set mape rule r1 match destination-address 203.0.113.0/24 set security nat source rule-set mape rule r1 match destination-address 192.0.2.0/24 set security nat source rule-set mape rule r1 then source-nat pool my_mape set security nat source rule-set mape rule r1 then source-nat pool persistent-nat permit any-remote-host
Set Commands on BR Device
set services service-set ss1 softwire-rules sw-rule1 set services service-set ss1 next-hop-service inside-service-interface si-1/0/0.1 set services service-set ss1 next-hop-service outside-service-interface si-1/0/0.2 set services softwire softwire-concentrator map-e mape-domain-1 softwire-address 2001:db8::a set services softwire softwire-concentrator map-e mape-domain-1 ipv4-prefix 192.0.2.0/24 set services softwire softwire-concentrator map-e mape-domain-1 mape-prefix 2001:db8::/40 set services softwire softwire-concentrator map-e mape-domain-1 ea-bits-len 16 set services softwire softwire-concentrator map-e mape-domain-1 psid-offset 6 set services softwire softwire-concentrator map-e mape-domain-1 psid-length 8 set services softwire softwire-concentrator map-e mape-domain-1 mtu-v6 9192 set services softwire softwire-concentrator map-e mape-domain-1 version-03 set services softwire softwire-concentrator map-e mape-domain-1 v4-reassembly set services softwire softwire-concentrator map-e mape-domain-1 v6-reassembly set services softwire softwire-concentrator map-e mape-domain-1 disable-auto-route set services softwire rule sw-rule1 match-direction input set services softwire rule sw-rule1 term t1 then map-e mape-domain-1 set interfaces si-1/0/0 unit 1 family inet6 set interfaces si-1/0/0 unit 1 service-domain inside set interfaces si-1/0/0 unit 2 family inet set interfaces si-1/0/0 unit 2 service-domain outside set interfaces ge-1/1/2 mtu 9192 set interfaces ge-1/1/2 unit 0 family inet6 address 2001:db8:ffff::9/64 set interfaces ge-1/1/3 unit 0 family inet address 203.0.113.1/24 set routing-options rib inet6.0 static route 2001:db8::/40 next-hop si-1/0/0.1 set routing-options rib inet6.0 static route 2001:db8:0012:3400::/56 next-hop 2001:db8:ffff::1 set routing-options rib inet6.0 static route 2001:db8:0012:3500::/56 next-hop 2001:db8:ffff::2 set routing-options static route 192.0.2.0/24 next-hop si-1/0/0.2 set routing-options static route 198.51.100.0/24 next-hop si-1/0/0.2 set routing-options static route 203.0.113.0/24 next-hop si-1/0/0.2
Appendix 2: Show Configuration Output on All Devices
Show command output on all devices.
Show Commands on MAP-E CE Device
From configuration mode, confirm your configuration by entering the show
security policies, show security zones,
show interfaces, show routing-instances,
show security softwires, and show security nat
source commands. If the output does not display the intended
configuration, repeat the configuration instructions in this example to correct
it.
user@srx# show security policies
global {
policy my_ce {
match {
source-address any;
destination-address any;
application any;
}
then {
permit;
}
}
}
default-policy {
permit-all;
}user@srx# show security zones
security-zone v4zone {
host-inbound-traffic {
system-services {
all;
}
protocols {
all;
}
}
interfaces {
ge-1/0/1.0;
lt-1/0/0.1;
}
}
security-zone v6zone {
host-inbound-traffic {
system-services {
all;
}
protocols {
all;
}
}
interfaces {
ge-1/0/2.0;
lt-1/0/0.2;
}
}
user@srx# show interfaces
lt-1/0/0 {
mtu 9192;
unit 1 {
encapsulation ethernet;
peer-unit 2;
family inet {
address 172.16.100.1/24;
}
family inet6 {
address 2001:db8:fffe::1/64;
}
}
unit 2 {
encapsulation ethernet;
peer-unit 1;
family inet {
address 172.16.100.2/24;
}
family inet6 {
address 2001:db8:fffe::2/64;
}
}
}
ge-1/0/1 {
unit 0 {
family inet {
address 10.10.10.1/24;
}
}
}
ge-1/0/2 {
mtu 9192;
unit 0 {
family inet6 {
address 2001:db8:ffff::1/64;
}
}
}
user@srx# show routing-instances
v4_leg {
instance-type virtual-router;
routing-options {
rib v4_leg.inet.0 {
static {
route 192.0.2.0/24 next-hop 172.16.100.2;
route 198.51.100.0/24 next-hop 172.16.100.2;
route 203.0.113.0/24 next-hop 172.16.100.2;
}
}
}
interface lt-1/0/0.1;
interface ge-1/0/1.0;
}
v6_leg {
instance-type virtual-router;
routing-options {
rib v6_leg.inet.0 {
static {
route 10.10.10.0/24 next-hop 172.16.100.1;
}
}
rib v6_leg.inet6.0 {
static {
route 2001:db8::a/128 next-hop 2001:db8:ffff::9;
route 2001:db8:0012:3400::/56 next-hop 2001:db8:fffe::1;
route 2001:db8:0012:3500::/56 next-hop 2001:db8:ffff::2;
}
}
}
interface lt-1/0/0.2;
interface ge-1/0/2.0;
}
user@srx# show security softwires
map-e mapce1 {
br-address "$9$AodDuIEhSrlvWB1Yg4aiH.P5T/CEcyeWLz3EcyrvMaZGU.P"; ## SECRET-DATA
end-user-prefix {
2001:db8:0012:3400::/56;
}
rule bmr {
rule-type BMR;
ipv4-prefix "$9$WVnL-VJGDH.PY2P5z6CAvW8xdbwYgDikY2QF"; ## SECRET-DATA
ipv6-prefix "$9$O4LbISrlKMWX7hcaZGDmPTz3np0rev87-hcs2g4ZG"; ## SECRET-DATA
ea-bits-length 16; ## SECRET-DATA
psid-offset "$9$y8NeLx"; ## SECRET-DATA
}
role CE;
version 3;
}
user@srx# show security nat source
pool my_mape {
allocation-domain mapce1 allocation-rule bmr;
}
rule-set mape {
from zone v4zone;
to interface [ lt-1/0/0.1 ge-1/0/1.0 ];
rule r1 {
match {
source-address 10.10.10.0/24;
destination-address [ 10.10.10.0/24 198.51.100.0/24 203.0.113.0/24 192.0.2.0/24 ];
}
then {
source-nat {
pool {
my_mape;
persistent-nat {
permit any-remote-host;
}
}
}
}
}
}
Show Commands on BR Device
From configuration mode, confirm your configuration by entering the show
services, show interfaces, and show
routing-options commands. If the output does not display the
intended configuration, repeat the configuration instructions in this example to
correct it.
user@router# show services
service-set ss1 {
softwire-rules sw-rule1;
next-hop-service {
inside-service-interface si-1/0/0.1;
outside-service-interface si-1/0/0.2;
}
}
softwire {
softwire-concentrator {
map-e mape-domain-1 {
softwire-address 2001:db8::a;
ipv4-prefix 192.0.2.0/24;
mape-prefix 2001:db8::/40;
ea-bits-len 16;
psid-offset 6;
psid-length 8;
mtu-v6 9192;
version-03;
v4-reassembly;
v6-reassembly;
disable-auto-route;
}
}
rule sw-rule1 {
match-direction input;
term t1 {
then {
map-e mape-domain-1;
}
}
}
}user@router# show interfaces
lt-0/0/10 {
unit 0 {
encapsulation vlan-bridge;
vlan-id 10;
peer-unit 1;
}
}
si-1/0/0 {
unit 1 {
family inet6;
service-domain inside;
}
unit 2 {
family inet;
service-domain outside;
}
}
ge-1/1/2 {
mtu 9192;
unit 0 {
family inet6 {
address 2001:db8:ffff::9/64;
}
}
}
ge-1/1/3 {
unit 0 {
family inet {
address 203.0.113.1/24;
}
}
}
ge-1/3/11 {
unit 0 {
family inet {
address 10.0.1.2/30;
}
family mpls;
}
}
irb {
unit 0 {
family inet {
address 192.0.2.1/24;
}
}
}
lo0 {
apply-groups-except global;
unit 0 {
family inet {
address 10.255.0.2/32;
}
}
}user@router# show routing-options
rib inet6.0 {
static {
route 2001:db8::/40 next-hop si-1/0/0.1;
route 2001:db8:0012:3400::/56 next-hop 2001:db8:ffff::1;
route 2001:db8:0012:3500::/56 next-hop 2001:db8:ffff::2;
}
}
router-id 10.255.0.2;
autonomous-system 100;
static {
route 0.0.0.0/0 next-hop [ 10.102.70.254 10.10.0.0 ];
route 192.0.2.0/24 next-hop si-1/0/0.2;
route 198.51.100.0/24 next-hop si-1/0/0.2;
route 203.0.113.0/24 next-hop si-1/0/0.2;
}
forwarding-table {
chained-composite-next-hop {
ingress {
evpn;
}
}
}Example: Configure Source and Destination NAT Translations
This example describes how to configure both source and destination NAT mappings.
Requirements
Before you begin:
Configure network interfaces on the device. See Interfaces User Guide for Security Devices.
Create security zones and assign interfaces to them. See Understanding Security Zones.
Overview
This example uses the trust security zone for the private address space and the untrust security zone for the public address space. In Figure 2, the following translations are performed on the Juniper Networks security device:
The source IP address in packets sent by the device with the private address 192.168.1.200 in the trust zone to any address in the untrust zone is translated to a public address in the range from 203.0.113.10 through 203.0.113.14.
The destination IP address 203.0.113.100/32 in packets sent from the trust zone to the untrust zone is translated to the address 10.1.1.200/32.
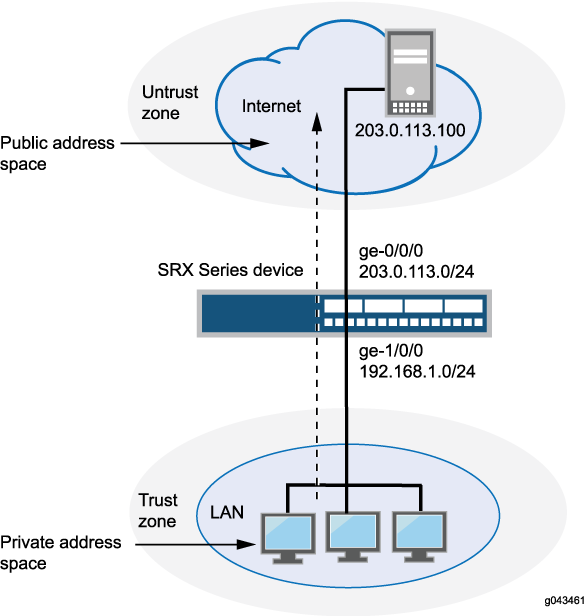
This example describes the following configurations:
Source NAT pool
src-nat-pool-1that contains the IP address range 203.0.113.10 through 203.0.113.14.Source NAT rule set
rs1with ruler1to match any packets from the trust zone to the untrust zone. For matching packets, the source address is translated to an IP address in thesrc-nat-pool-1pool.Destination NAT pool
dst-nat-pool-1that contains the IP address 10.1.1.200/32.Destination NAT rule set
rs1with ruler1to match packets from the trust zone with the destination IP address 203.0.113.100. For matching packets, the destination address is translated to the IP address in thedst-nat-pool-1pool.Proxy ARP for the addresses 203.0.113.10 through 203.0.113.14 and 203.0.113.100/32 on interface ge-0/0/0.0. This allows the Juniper Networks security device to respond to ARP requests received on the interface for those addresses.
Security policy to permit traffic from the trust zone to the untrust zone.
Security policy to permit traffic from the untrust zone to the translated destination IP addresses in the trust zone.
Configuration
Procedure
CLI Quick Configuration
To quickly configure this example, copy the
following commands, paste them into a text file, remove any line breaks,
change any details necessary to match your network configuration,
copy and paste the commands into the CLI at the [edit] hierarchy
level, and then enter commit from configuration mode.
set security nat source pool src-nat-pool-1 address 203.0.113.10/32 to 203.0.113.14/32 set security nat source rule-set rs1 from zone trust set security nat source rule-set rs1 to zone untrust set security nat source rule-set rs1 rule r1 match source-address 0.0.0.0/0 set security nat source rule-set rs1 rule r1 match destination-address 0.0.0.0/0 set security nat source rule-set rs1 rule r1 then source-nat pool src-nat-pool-1 set security nat destination pool dst-nat-pool-1 address 10.1.1.200/32 set security nat destination rule-set rs1 from zone untrust set security nat destination rule-set rs1 rule r1 match destination-address 203.0.113.100/32 set security nat destination rule-set rs1 rule r1 then destination-nat pool dst-nat-pool-1 set security nat proxy-arp interface ge-0/0/0.0 address 203.0.113.10/32 to 203.0.113.24/32 set security nat proxy-arp interface ge-0/0/0.0 address 203.0.113.100/32 set security policies from-zone trust to-zone untrust policy internet-access match source-address any set security policies from-zone trust to-zone untrust policy internet-access match destination-address any set security policies from-zone trust to-zone untrust policy internet-access match application any set security policies from-zone trust to-zone untrust policy internet-access then permit set security address-book global address dst-nat-pool-1 10.1.1.200/32 set security policies from-zone untrust to-zone trust policy dst-nat-pool-1-access match source-address any set security policies from-zone untrust to-zone trust policy dst-nat-pool-1-access match destination-address dst-nat-pool-1 set security policies from-zone untrust to-zone trust policy dst-nat-pool-1-access match application any set security policies from-zone untrust to-zone trust policy dst-nat-pool-1-access then permit
Step-by-Step Procedure
The following example requires you to navigate throughout various levels in the configuration hierarchy. For instructions on how to do that, see Using the CLI Editor in Configuration Mode.
To configure the source and destination NAT translations:
Create a source NAT pool.
[edit security nat source] user@host# set pool src-nat-pool-1 address 203.0.113.10 to 203.0.113.14
Create a source NAT rule set.
[edit security nat source]
user@host# set rule-set rs1 from zone trust
user@host# set rule-set rs1 to zone untrust
Configure a rule that matches packets and translates the source address to an address in the source NAT pool.
[edit security nat source]
user@host# set rule-set rs1 rule r1 match source-address 0.0.0.0/0
user@host# set rule-set rs1 rule r1 match destination-address 0.0.0.0/0
user@host# set rule-set rs1 rule r1 then source-nat pool src-nat-pool-1
Create a destination NAT pool.
[edit security nat destination]
user@host# set pool dst-nat-pool-1 address 10.1.1.200/32
Create a destination NAT rule set.
[edit security nat destination]
user@host# set rule-set rs1 from zone untrust
Configure a rule that matches packets and translates the destination address to the address in the destination NAT pool.
[edit security nat destination]
user@host# set rule-set rs1 rule r1 match destination-address 203.0.113.100/32
user@host# set rule-set rs1 rule r1 then destination-nat pool dst-nat-pool-1
Configure proxy ARP.
[edit security nat]
user@host# set proxy-arp interface ge-0/0/0.0 address 203.0.113.10 to 203.0.113.14
user@host# set proxy-arp interface ge-0/0/0.0 address 203.0.113.100
Configure a security policy that allows traffic from the trust zone to the untrust zone.
[edit security policies from-zone trust to-zone untrust]
user@host# set policy internet-access match source-address any destination-address any application any
user@host# set policy internet-access then permit
Configure an address in the global address book.
[edit security address-book global]
user@host# set address dst-nat-pool-1 10.1.1.200/32
Configure a security policy that allows traffic from the untrust zone to the trust zone.
[edit security policies from-zone untrust to-zone trust]
user@host# set policy dst-nat-pool-1-access match source-address any destination-address dst-nat-pool-1 application any
user@host# set policy dst-nat-pool-1-access then permit
Results
From configuration mode, confirm your configuration
by entering the show security nat and show security
policies commands. If the output does not display the intended
configuration, repeat the configuration instructions in this example
to correct it.
[edit]
user@host# show security nat
source {
    pool src-nat-pool-1 {
        address {
            203.0.113.10/32 to 203.0.113.14/32;
        }
    }
    rule-set rs1 {
        to zone untrust;
        rule r1 {
            match {
                source-address 0.0.0.0/0;
                destination-address 0.0.0.0/0;
            }
            then {
                source-nat {
                    pool {
                        src-nat-pool-1;
                    }
                }
            }
        }
    }
}
    destination {
        pool dst-nat-pool-1 {
            address 10.1.1.200/32;
        }
        rule-set rs1 {
            from zone untrust;
            rule r1 {
                match {
                    destination-address 203.0.113.100/32;
                }
                then {
                    destination-nat pool dst-nat-pool-1;
                }
            }
        }
    }
    proxy-arp {
        interface ge-0/0/0.0 {
            address {
                203.0.113.10/32 to 203.0.113.14/32;
                203.0.113.100/32;
            }
        }
    }
user@host# show security policies
from-zone trust to-zone untrust {
    policy internet-access {
        match {
            source-address any;
            destination-address any;
            application any;
        }
    }
    policy internet-access {
        then {
            permit;
        }

    }
}
    from-zone untrust to-zone trust {
        policy dst-nat-pool-1-access {
            match {
                source-address any;
                destination-address dst-nat-pool-1;
                application any;
            }
            then {
                permit;
            }
        }
    }
If you are done configuring the device, enter commit from configuration mode.
Verification
To confirm that the configuration is working properly, perform these tasks:
- Verifying Source NAT Pool Usage
- Verifying Source NAT Rule Usage
- Verifying Destination NAT Pool Usage
- Verifying Destination NAT Rule Usage
- Verifying NAT Application to Traffic
Verifying Source NAT Pool Usage
Purpose
Verify that there is traffic using IP addresses from the source NAT pool.
Action
From operational mode, enter the show security nat source
pool all command. View the Translation hits field to check for
traffic using IP addresses from the pool.
Verifying Source NAT Rule Usage
Purpose
Verify that there is traffic matching the source NAT rule.
Action
From operational mode, enter the show security nat source
rule all command. View the Translation hits field to check for
traffic that matches the rule.
Verifying Destination NAT Pool Usage
Purpose
Verify that there is traffic using IP addresses from the destination NAT pool.
Action
From operational mode, enter the show security nat destination
pool all command. View the Translation hits field to check for
traffic using IP addresses from the pool.
Verifying Destination NAT Rule Usage
Purpose
Verify that there is traffic matching the destination NAT rule.
Action
From operational mode, enter the show security nat destination
rule all command. View the Translation hits field to check for
traffic that matches the rule.
Example: Configure Single IP Address in a Source NAT Pool Without PAT
This example describes how to configure a private address block to a single public address in a source NAT pool without Port Address Translation.
PAT is enabled by default for source NAT pools. When PAT is disabled, the number of
translations that the source NAT pool can concurrently support is limited to the number
of addresses in the pool. Packets are dropped if there are no addresses available in the
source NAT pool. However, using the address-shared option, you can map
more that one private IP address to a single public IP address as long as the traffic is
from different source ports.
Requirements
Before you begin:
Configure network interfaces on the device. See Interfaces User Guide for Security Devices.
Create security zones and assign interfaces to them. See Understanding Security Zones.
Overview
This example uses the trust security zone for the private address space and the untrust security zone for the public address space. The source IP address of packets sent from the trust zone to the untrust zone are mapped to a single public address.
This example describes the following configurations:
Source NAT pool
src-nat-pool-1that contains the IP address 203.0.113.1/30. Theport no-translationoption and theaddress sharedoption are specified for the pool.Source NAT rule set
rs1to match all packets from the trust zone to the untrust zone. For matching packets, the source IP address is translated to an IP address in thesrc-nat-pool-1pool.Security policies to permit traffic from the trust zone to the untrust zone.
Configuration
Procedure
CLI Quick Configuration
To quickly configure this example, copy the
following commands, paste them into a text file, remove any line breaks,
change any details necessary to match your network configuration,
copy and paste the commands into the CLI at the [edit] hierarchy
level, and then enter commit from configuration mode.
set security nat source pool src-nat-pool-1 address 203.0.113.1/30
set security nat source pool src-nat-pool-1 port no-translation
set security nat source pool-src-nat-pool-1 address-shared
set security nat source rule-set rs1 from zone trust
set security nat source rule-set rs1 to zone untrust
set security nat source rule-set rs1 rule1 match source address 192.0.2.0/24
set security nat source rule-set rs1 rule r1 then source src-nat-pool-1
Step-by-Step Procedure
The following example requires you to navigate throughout various levels in the configuration hierarchy. For instructions on how to do that, see Using the CLI Editor in Configuration Mode.
To configure a source NAT mapping from a private address block to a single public address without PAT:
Create a source NAT pool with a single IP address for the shared address.
[edit security nat source]
user@host# set pool src-nat-pool-1 address 203.0.113.1/30
Specify the
port no-translationoption.[edit security nat source] user@host# set pool src-nat-pool-1 port no-translation
Specify the
address-sharedoption.[edit security nat source] user@host# set pool pool-src-nat-pool-1 address-shared
Create a source NAT rule set.
[edit security nat source]
user@host# set rule-set rs1 from zone trust
user@host# set rule-set rs1 to zone untrust
Configure a rule that matches packets and translates the source address to an address in the pool.
[edit security nat source]
user@host# set rule-set rs1 rule r1 match source-address 192.0.2.0/24
user@host# set rule-set rs1 rule r1 then source-nat pool src-nat-pool-1
Configure a security policy that allows traffic from the trust zone to the untrust zone.
[edit security policies from-zone trust to-zone untrust]
user@host# set policy internet-access match source-address any destination-address any application any
user@host# set policy internet-access then permit
Results
From configuration mode, confirm your configuration
by entering the show security nat source pool and show security policies commands. If the output does not display
the intended configuration, repeat the configuration instructions
in this example to correct it.
[edit]
user@host# show security nat
source {
    pool src-nat-pool-1 {
        address {
            203.0.113.1/30
        }
        port no-translation;
    }
    address-shared;
    rule-set rs1 {
        from zone trust;
        to zone untrust;
        rule r1 {
            match {
                source-address [192.0.2.0/24]
            }
            then {
                source-nat {
                    pool {
                        src-nat-pool-1;
                    }
                }
            }
        }
    }
}
user@host# show security policies
from-zone trust to-zone untrust {
    policy internet-access {
        match {
            source-address any;
            destination-address any;
            application any;
        }
        then {
            permit;
        }
    }
}
If you are done configuring the device, enter commit from configuration mode.
Verification
To confirm that the configuration is working properly, perform these tasks:
Verifying Shared Address
Purpose
Verify that two internal IP addresses, with different source ports, share one external IP address.
Action
From operational mode, enter the show security
nat source pool command. View the Address assignment field to verify that it is shared.
Example: Configure Multiple Addresses in a Source NAT Pool Without PAT
This example describes how to configure a source NAT mapping of a private address block to a smaller public address block without port address translation.
Port address translation is enabled by default for source NAT pools. When port address translation is disabled, the number of translations that the source NAT pool can concurrently support is limited to the number of addresses in the pool. Packets are dropped if there are no addresses available in the source NAT pool. You can optionally specify an overflow pool from which IP addresses and port numbers are allocated when there are no addresses available in the original source NAT pool.
Requirements
Before you begin:
Configure network interfaces on the device. See Interfaces User Guide for Security Devices.
Create security zones and assign interfaces to them. See Understanding Security Zones.
Overview
This example uses the trust security zone for the private address space and the untrust security zone for the public address space. In Figure 3, the source IP address in packets sent from the trust zone to the untrust zone is mapped to a smaller block of public addresses in the range from 203.0.113.1/32 through 203.0.113.24/32.
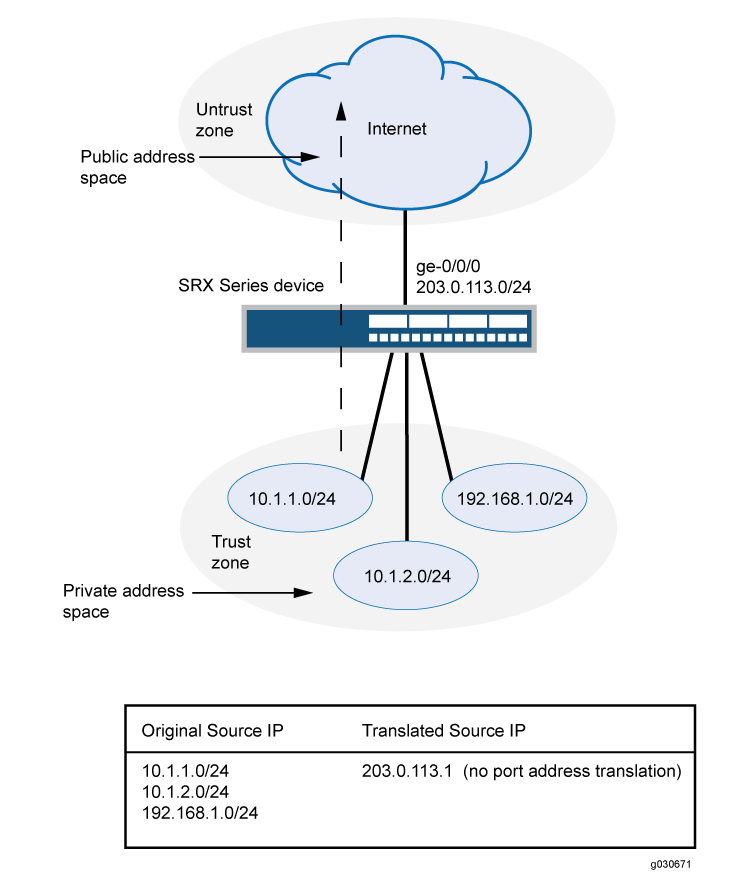
This example describes the following configurations:
Source NAT pool
src-nat-pool-1that contains the IP address range 203.0.113.1/32 through 203.0.113.24/32. Theport no-translationoption is specified for the pool.Source NAT rule set
rs1to match all packets from the trust zone to the untrust zone. For matching packets, the source IP address is translated to an IP address in thesrc-nat-pool-1pool.Proxy ARP for the addresses 203.0.113.1/32 through 203.0.113.24/32 on interface ge-0/0/0.0. This allows the Juniper Networks security device to respond to ARP requests received on the interface for those addresses.
Security policies to permit traffic from the trust zone to the untrust zone.
Configuration
Procedure
CLI Quick Configuration
To quickly configure this example, copy the
following commands, paste them into a text file, remove any line breaks,
change any details necessary to match your network configuration,
copy and paste the commands into the CLI at the [edit] hierarchy
level, and then enter commit from configuration mode.
set security nat source pool src-nat-pool-1 address 203.0.113.1/32 to 203.0.113.24/32
set security nat source pool src-nat-pool-1 port no-translation
set security nat source rule-set rs1 from zone trust
set security nat source rule-set rs1 to zone untrust
set security nat source rule-set rs1 rule r1 match source-address 0.0.0.0/0
set security nat source rule-set rs1 rule r1 match destination-address 0.0.0.0/0
set security nat source rule-set rs1 rule r1 then source-nat pool src-nat-pool-1
set security nat proxy-arp interface ge-0/0/0.0 address 203.0.113.1/32 to 203.0.113.24/32
set security policies from-zone trust to-zone untrust policy internet-access match source-address any
set security policies from-zone trust to-zone untrust policy internet-access match destination-address any
set security policies from-zone trust to-zone untrust policy internet-access match application any
set security policies from-zone trust to-zone untrust policy internet-access then permit
Step-by-Step Procedure
The following example requires you to navigate throughout various levels in the configuration hierarchy. For instructions on how to do that, see Using the CLI Editor in Configuration Mode.
To configure a source NAT mapping from a private address block to a smaller public address block without PAT:
Create a source NAT pool.
[edit security nat source]
user@host# set pool src-nat-pool-1 address 203.0.113.1 to 203.0.113.24
Specify the
port no-translationoption.[edit security nat source] user@host# set pool src-nat-pool-1 port no-translation
Create a source NAT rule set.
[edit security nat source]
user@host# set rule-set rs1 from zone trust
user@host# set rule-set rs1 to zone untrust
Configure a rule that matches packets and translates the source address to an address in the pool.
[edit security nat source]
user@host# set rule-set rs1 rule r1 match source-address 0.0.0.0/0
user@host# set rule-set rs1 rule r1 match destination-address 0.0.0.0/0
user@host# set rule-set rs1 rule r1 then source-nat pool src-nat-pool-1
Configure proxy ARP.
[edit security nat]
user@host# set proxy-arp interface ge-0/0/0.0 address 203.0.113.1 to 203.0.113.24
Configure a security policy that allows traffic from the trust zone to the untrust zone.
[edit security policies from-zone trust to-zone untrust]
user@host# set policy internet-access match source-address any destination-address any application any
user@host# set policy internet-access then permit
Results
From configuration mode, confirm your configuration
by entering the show security nat and show security
policies commands. If the output does not display the intended
configuration, repeat the configuration instructions in this example
to correct it.
[edit]
user@host# show security nat
source {
    pool src-nat-pool-1 {
        address {
            203.0.113.1/32 to 203.0.113.24/32;
        }
        port no-translation;
    }
    rule-set rs1 {
        from zone trust;
        to zone untrust;
        rule r1 {
            match {
                source-address 0.0.0.0/0;
                destination-address 0.0.0.0/0;
            }
            then {
                source-nat {
                    pool {
                        src-nat-pool-1;
                    }
                }
            }
        }
    }
}
    proxy-arp {
        interface ge-0/0/0.0 {
            address {
                203.0.113.1/32 to 203.0.113.24/32;
            }
        }
    }
user@host# show security policies
from-zone trust to-zone untrust {
    policy internet-access {
        match {
            source-address any;
            destination-address any;
            application any;
        }
        then {
            permit;
        }
    }
}
If you are done configuring the device, enter commit from configuration mode.
Verification
To confirm that the configuration is working properly, perform these tasks:
- Verifying Source NAT Pool Usage
- Verifying Source NAT Rule Usage
- Verifying NAT Application to Traffic
Verifying Source NAT Pool Usage
Purpose
Verify that there is traffic using IP addresses from the source NAT pool.
Action
From operational mode, enter the show security nat source
pool all command. View the Translation hits field to check for
traffic using IP addresses from the pool.
Verifying Source NAT Rule Usage
Purpose
Verify that there is traffic matching the source NAT rule.
Action
From operational mode, enter the show security nat source
rule all command. View the Translation hits field to check for
traffic that matches the rule.
Configure the NAT Session Hold Timeout and NAT Session Persistence Scan
This configuration shows how to configure the NAT session hold timeout and NAT session persistence.
Configuring NAT Session Hold Timeout
The following configuration shows how to configure the NAT session hold timeout.
To set the NAT session hold timeout period:
[edit security nat source]
user@host# set session-drop-hold-down time;
The value of the time variable ranges from 30 through 28,800 seconds (eight hours). The session expires after the configured timeout period.
Results
From configuration mode, confirm your configuration by entering
the show security command. If the output does not display
the intended configuration, repeat the configuration instructions
in this example to correct it.
[edit]
user@host# show security
    nat {
        source {
            session-drop-hold-down 28800;
        }
    }
Configuring NAT Session Persistence Scan
The following configuration shows how to configure the NAT session persistence scan.
To enable the NAT session persistence scan:
[edit security nat source]
user@host# set session-persistence-scan
Results
From configuration mode, confirm your configuration by entering
the show security command. If the output does not display
the intended configuration, repeat the configuration instructions
in this example to correct it.
[edit]
user@host# show security
    nat {
        source {
            session-persistence-scan;
        }
    }
NAT Configuration Check on Egress Interfaces after Reroute
The Network Address Translation (NAT) configuration often changes
to accommodate more users and to enhance shortest route to transfer
the traffic. If there is a change in egress interface because of rerouting
of traffic, you can use the set security flow enable-reroute-uniform-link-check
nat command to retain the existing NAT configuration and rule.
When the enable-reroute-uniform-link-check nat command
is enabled:
The session is retained with the existing NAT rule, if the new egress interface and the previous egress interface are in the same security zone, and there is no change in the matched NAT rule or if no rule is applied before and after rerouting.
The session expires if the new egress interface and the previous egress interface are in the same security zone and the matched NAT rule is changed.
When the enable-reroute-uniform-link-check nat command
is disabled:
The traffic is forwarded to the new egress interface if the new egress interface and the previous egress interface are in the same security zone.
Configuration
To enable the NAT configuration for an existing session when there is a change in egress interface because of rerouting, use the following command:
[edit] user@host# set security
flow enable-reroute-uniform-link-check natThe
new configuration is applied when you commit the configuration changes.
The enable-reroute-uniform-link-check nat command is disabled by default.
Limitations
Retaining the NAT configuration using the set security
flow enable-reroute-uniform-link-check nat command has the following
limitations:
The TCP synchronization does not allow the new session to transfer the traffic. You must disable the TCP synchronization to allow the transfer of traffic in new sessions.
The packet information might lost if reroute is initiated after a three-way handshake to initialize communication. You must disable the Junos OS Services Framework (JSF) like Application Layer Gateway (ALG) to allow the transfer of traffic in new sessions.
Additional Platform Information
Use Feature Explorer to confirm platform and release support for specific features. Additional platforms may be supported.
| Pool/PAT Maximum Address Capacity | SRX300SRX320SRX650 | SRX340SRX345 | SRX400 | SRX440SRX440-2AC |
SRX1400SRX1500 |
SRX3400SRX3600SRX4100SRX4200 |
SRX4700 |
SRX5400SRX5600SRX5800 |
|---|---|---|---|---|---|---|---|---|
|
Source NAT pools |
2048 |
2048 |
1280 | 1536 |
8192 |
10,240 |
30720 |
12,288 |
|
IP addresses supporting port translation |
2048 |
2048 |
1280 | 1536 |
8192 |
12,288 |
1048576 |
1M |
|
PAT port number |
64M |
64M |
64M | 64M |
256M |
384M |
2576M |
384M |