ON THIS PAGE
NAT for VRF
Learn how Network Address Translation (NAT) supports address translation between VRF groups and routing instances in an SD-WAN deployment. Understand source NAT, destination NAT, and static NAT for translating private and public IP addresses across VRF groups and routing instances.
NAT for VRF Group and Routing Instance
NAT modifies or translates network address information in packet headers. RFC 1631 describes NAT as a solution for IPv4 address depletion. NAT supports firewall deployments, traffic redirection, load sharing, and network migrations.
In an SD-WAN deployment, you deploy firewalls at hub-and-spoke locations. Sites connect to spoke firewalls and send packets to public Internet servers or remote sites. After security processing at the hub, the device evaluates each packet to determine whether the destination is a public Internet server or an MPLS next-hop device. If the destination is a public Internet server, NAT translates the private IP address in the VRF instance to a public IP address and establishes a session. NAT is also required for traffic from public Internet servers to reach a private network in a VRF instance.
The following types of NAT are supported:
-
Static NAT
-
Destination NAT
-
Source NAT
In an SD-WAN network, you use NAT to translate private IP addresses in a VRF group to IP addresses in different VRF instances. You can configure the following VRF group NAT types:
-
VRF group destination NAT
-
VRF group source NAT
-
VRF group static NAT
Example: Configure Source NAT to Convert the Private IP Address of a VRF Group to the Private IP Address of a Different VRF Instance
This example describes how to configure a source NAT between two MPLS networks.
Requirements
-
Understand how Firewalls work in an SD-WAN deployment for NAT.
-
Understand Virtual-Group in NAT, VRF Instances. See Virtual Routing and Forwarding Instances in SD-WAN Deployments.
Overview
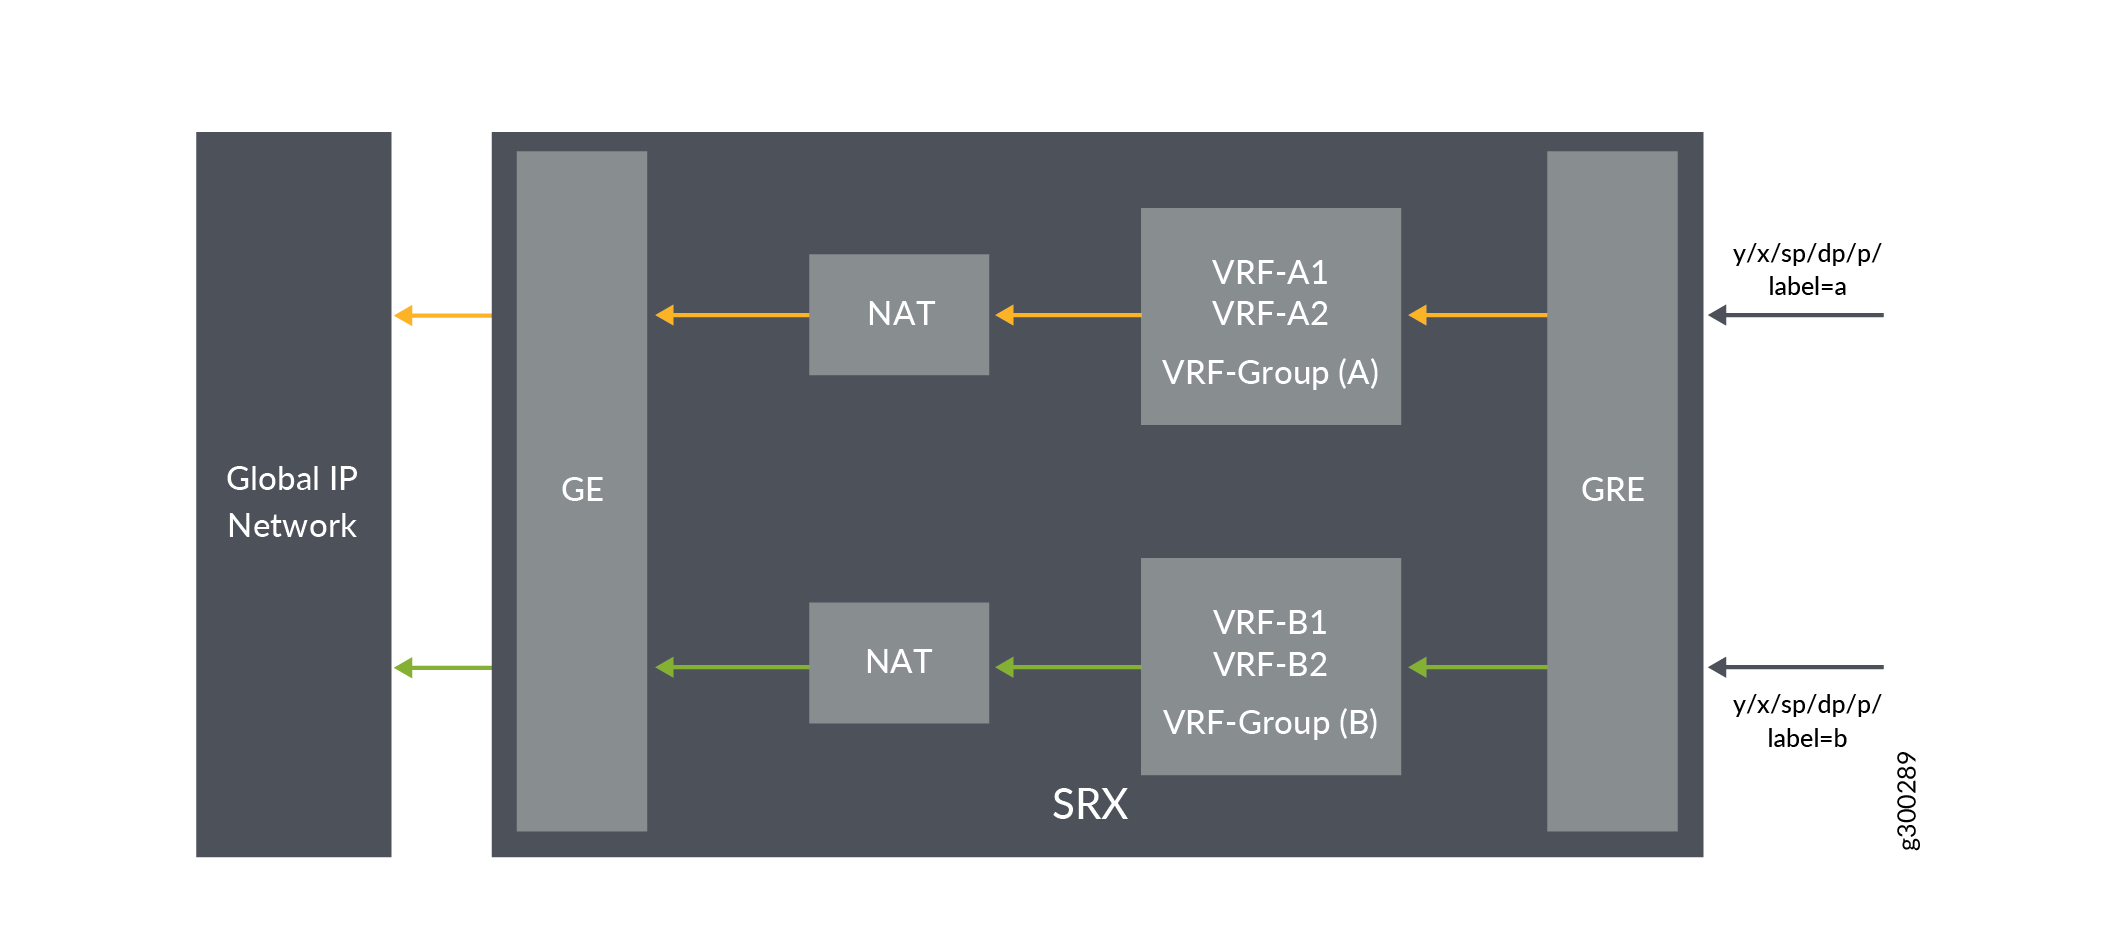
Source NAT is used to allow hosts with private IP addresses to access a public network.
In Figure 1, Firewall is configured with VRF group vpn-A and vpn-B, which are connected to the interfaces ge-0/0/1.0 and ge-0/0/1.1 on Firewall. In the hub firewall, the source IP addresses 192.168.1.200 and 192.168.1.201 from VRF group vpn-A and vpn-B are translated to 203.0.113.200 and 203.0.113.201.
Configuration
Procedure
CLI Quick Configuration
To quickly configure this example, copy the following commands, paste the
commands into a text file, remove any line breaks, change any details
necessary to match your network configuration, copy and paste the
commands into the CLI at the [edit] hierarchy level,
and then enter commit from configuration mode.
set security l3vpn vrf-group vpn-A vrf VRF-A1
set security l3vpn vrf-group vpn-A vrf VRF-A2
set security l3vpn vrf-group vpn-B vrf VRF-B1
set security l3vpn vrf-group vpn-B vrf VRF-B2
set security nat source pool vrf-a_p address 203.0.113.200
set security nat source rule-set vrf-a_rs from routing-group vpn-A
set security nat source rule-set vrf-a_rs to interface ge-0/0/1.0
set security nat source rule-set vrf-a_rs rule rule1 match source-address 192.168.1.200
set security nat source rule-set vrf-a_rs rule rule1 then source-nat pool vrf-a_p
set security nat source pool vrf-b_p address 203.0.113.201
set security nat source rule-set vrf-b_rs from routing-group vpn-B
set security nat source rule-set vrf-b_rs to interface ge-0/0/1.1
set security nat source rule-set vrf-b_rs rule rule2 match source-address 192.168.1.201
set security nat source rule-set vrf-b_rs rule rule2 then source-nat pool vrf-b_p
Step-by-Step Procedure
The following example requires you to navigate various levels in the configuration hierarchy.
To configure source NAT mapping:
In L3VPN create a VRF group vpn-A with VRF instances A1 and A2.
[edit security]
user@host#set l3vpn vrf-group vpn-A vrf VRF-A1
user@host#set l3vpn vrf-group vpn-A vrf VRF-A2
Create another VRF group vpn-B with VRF instances B1 and B2.
[edit security]
user@host#set l3vpn vrf-group vpn-B vrf VRF-B1
user@host#set l3vpn vrf-group vpn-B vrf VRF-B2
Create a source NAT pool.
[edit security nat source pool]
user@host#set vrf-a_p address 203.0.113.200
user@host#set vrf-b_p address 203.0.113.201
Create a source NAT rule set.
[edit security nat source]
user@host#set rule-set vrf-a_rs from routing-group vpn-A
user@host#set rule-set vrf-a_rs to interface ge-0/0/1.0
user@host#set rule-set vrf-b_rs from routing-group vpn-B
user@host#set rule-set vrf-b_rs to interface ge-0/0/1.1
Configure a rule that matches packets and translates the source IP address to an IP address in the source NAT pool.
[edit security nat source]
user@host# set rule-set vrf-a_rs rule rule1 match source-address 192.168.1.200
user@host# set rule-set vrf-a_rs rule rule1 then source-nat pool vrf-a_p
user@host# set rule-set vrf-b_rs rule rule2 match source-address 192.168.1.201
user@host# set rule-set vrf-b_rs rule rule2 then source-nat pool vrf-b_p
Results
From configuration mode, confirm your configuration by entering the
show security nat command. If the output does not
display the intended configuration, repeat the configuration
instructions in this example to correct it.
[edit]
user@host# show security nat
    source {
        pool vrf-a_p {
            address {
                203.0.113.200/32;
            }
        }
        pool vrf-b_p {
            address {
                203.0.113.201/32;
            }
        }
        rule-set vrf-a_rs {
            from routing-group vpn-A;
            to interface ge-0/0/1.0;
            rule rule1 {
                match {
                    source-address 192.168.1.200/32;
                }
                then {
                    source-nat {
                        pool {
                            vrf-a_p;
                        }
                    }
                }
            }
        }
        rule-set vrf-b_rs {
            from routing-group vpn-B;
            to interface ge-0/0/1.1;
            rule rule2 {
                match {
                    source-address 192.168.1.201/32;
                }
                then {
                    source-nat {
                        pool {
                            vrf-b_p;
                        }
                    }
                }
            }
        }
    }
If you are done configuring the device, enter commit
from configuration mode.
Verification
Verifying Source NAT Rule Usage
Purpose
Verify the traffic matching the source NAT rule.
Action
From operational mode, enter the show security nat source
rule all command. In the Translation hits field, verify
whether the traffic matches the source NAT rules.
user@host>show security nat source rule all
Total rules: 2
Total referenced IPv4/IPv6 ip-prefixes: 2/0
rule: rule1                  Rule-set: vrf-a_rs
  Rule-Id                    : 1
  Rule position              : 1
  From routing-Group         : vpn-A
  To interface			         : ge-0/0/1.0
  Match
    Source addresses         : 192.168.1.200   - 192.168.1.200
  Action                        : vrf-a_p
    Persistent NAT type         : N/A
    Persistent NAT mapping type : address-port-mapping
    Inactivity timeout          : 0
    Max session number          : 0
  Translation hits           : 0
    Successful sessions      : 0
    Failed sessions          : 0
  Number of sessions         : 0
rule: rule2                  Rule-set: vrf-b_rs
  Rule-Id                    : 2
  Rule position              : 2
  From routing-Group         : vpn-B
  To interface			         : ge-0/0/1.1
  Match
    Source addresses         : 192.168.1.201   - 192.168.1.201
  Action                        : vrf-b_p
    Persistent NAT type         : N/A
    Persistent NAT mapping type : address-port-mapping
    Inactivity timeout          : 0
    Max session number          : 0
  Translation hits           : 0
    Successful sessions      : 0
    Failed sessions          : 0
  Number of sessions         : 0
Example: Configure Destination NAT to Convert a Public IP Address of a VRF Group to the Private IP Address of a Different VRF Instance
This example describes how to configure the destination NAT mapping of a public IP address of a VRF group to the single VRF’s private address for directing the packets to the correct VRF instance.
Requirements
-
Understand how Firewalls work in an SD-WAN deployment for NAT.
-
Understand VRF Instances. See Virtual Routing and Forwarding Instances in SD-WAN Deployments.
Overview
Destination NAT is the translation of the destination IP address of a packet entering the Juniper Networks device. Destination NAT is used to redirect traffic destined to a virtual host (identified by the original destination IP address) to the real host (identified by the translated destination IP address).
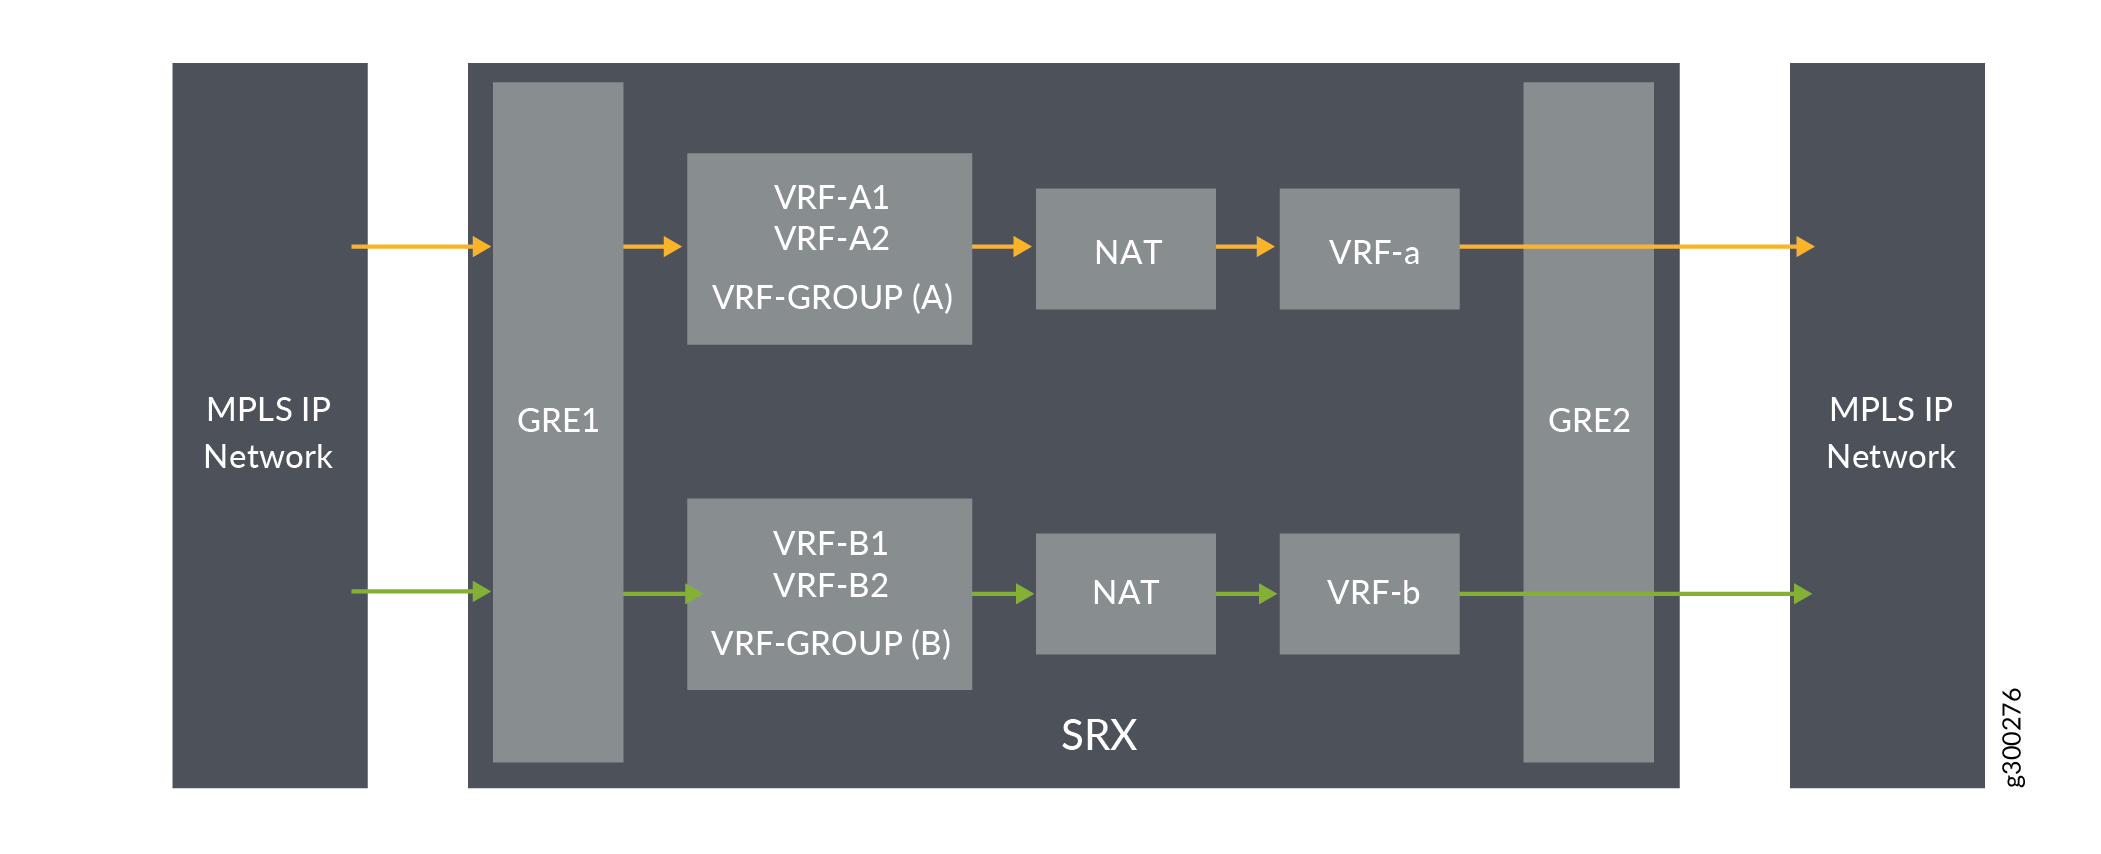
In Figure 2, the Firewall is configured destination NAT to convert from IP’s that belong to different VRF groups, to different set of IP’s with routing instance pointing to different VRF. After the destination NAT rule search, NAT updates the destination routing table to point to right VRF instance for flow to do destination route look-up in right table.
Configuration
Procedure
CLI Quick Configuration
To quickly configure this example, copy the following commands, paste the
commands into a text file, remove any line breaks, change any details
necessary to match your network configuration, copy and paste the
commands into the CLI at the [edit] hierarchy level,
and then enter commit from configuration mode.
set security l3vpn vrf-group vpn-A vrf VRF-A1
set security l3vpn vrf-group vpn-A vrf VRF-A2
set security l3vpn vrf-group vpn-B vrf VRF-B1
set security l3vpn vrf-group vpn-B vrf VRF-B2
set security nat destination pool vrf-a_p routing-instance VRF-a
set security nat destination pool vrf-a_p address 192.168.1.200
set security nat destination rule-set rs from routing-group vpn-A
set security nat destination rule-set rs rule vrf-a_r match destination-address 203.0.113.200
set security nat destination rule-set rs rule vrf-a_r then destination-nat pool vrf-a_p
set security nat destination pool vrf-b_p routing-instance VRF-b
set security nat destination pool vrf-b_p address 192.168.1.201
set security nat destination rule-set rs from routing-group vpn-B
set security nat destination rule-set rs rule vrf-b_r match destination-address 203.0.113.201
set security nat destination rule-set rs rule vrf-b_r then destination-nat pool vrf-b_p
Step-by-Step Procedure
The following example requires you to navigate various levels in the configuration hierarchy.
To configure destination NAT mapping for a single VRF:
In L3VPN create a VRF group vpn-A with VRF instances A1 and A2.
[edit security]
user@host#set l3vpn vrf-group vpn-A vrf VRF-A1
user@host#set l3vpn vrf-group vpn-A vrf VRF-A2
Create another VRF group vpn-B with VRF instances B1 and B2.
[edit security]
user@host#set l3vpn vrf-group vpn-B vrf VRF-B1
user@host#set l3vpn vrf-group vpn-B vrf VRF-B2
Specify a destination NAT IP address pool.
[edit security nat destination]
user@host# set pool vrf-a_p address 192.168.1.200
user@host# set pool vrf-b_p address 192.168.1.201
Assign the routing instance to the destination pool.
[edit security nat destination]
user@host# set pool vrf-a_p routing-instance VRF-a
user@host# set pool vrf-b_p routing-instance VRF-b
Create a destination NAT rule set.
[edit security nat destination]
user@host# set rule-set rs from routing-group vpn-A
user@host# set rule-set rs from routing-group vpn-B
Configure a rule that matches packets and translates the destination IP address to an IP address in the destination NAT IP address pool.
[edit security nat destination]
user@host# set rule-set rs rule vrf-a_r match destination-address 203.0.113.200
user@host# set rule-set rs rule vrf-a_r then destination-nat pool vrf-a_p
user@host# set rule-set rs rule vrf-b_r match destination-address 203.0.113.201
user@host# set rule-set rs rule vrf-b_r then destination-nat pool vrf-b_p
Results
From configuration mode, confirm your configuration by entering the
show security nat command. If the output does not
display the intended configuration, repeat the configuration instructions in
this example to correct it.
[edit]
user@host# show security nat
    destination {
        pool vrf-a_p {
            routing-instance {
                VRF-a;
            }
            address 192.168.1.200/32;
        }
        pool vrf-b_p {
            routing-instance {
                VRF-b;
            }
            address 192.168.1.201/32;
        }
        rule-set rs {
            from routing-group [ vpn-A vpn-B ];
            rule vrf-a_r {
                match {
                    destination-address 203.0.113.200/32;
                }
                then {
                    destination-nat {
                        pool {
                            vrf-a_p;
                        }
                    }
                }
            }
            rule vrf-b_r {
                match {
                    destination-address 203.0.113.201/32;
                }
                then {
                    destination-nat {
                        pool {
                            vrf-b_p;
                        }
                    }
                }
            }
        }
    }
If you are done configuring the device, enter commit from
configuration mode.
Verification
Verifying Destination NAT Rule Usage
Purpose
Verify the traffic matching the destination NAT rule.
Action
From operational mode, enter the show security nat destination
rule all command. In the Translation hits field, verify
whether the traffic matches the destination NAT rules.
user@host> show security nat destination rule all
Total destination-nat rules: 2
Total referenced IPv4/IPv6 ip-prefixes: 2/0
Destination NAT rule: vrf-a_r                Rule-set: rs
  Rule-Id                    : 1
  Rule position              : 1
  From routing-group         : vpn-A
  Destination addresses      : 203.0.113.200   - 203.0.113.200
  Action                     : vrf-a_p
  Translation hits           : 0
    Successful sessions      : 0
    Failed sessions          : 0
  Number of sessions         : 0
Destination NAT rule: vrf-b_r                Rule-set: rs
  Rule-Id                    : 2
  Rule position              : 2
  From routing-group         : vpn-A
  Destination addresses      : 203.0.113.201   - 203.0.113.201
  Action                     : vrf-b_p
  Translation hits           : 0
    Successful sessions      : 0
    Failed sessions          : 0
  Number of sessions         : 0
Example: Configure Source NAT to Convert the Private IP Address of a VRF Instance to the Private IP Address of Another VRF Instance
This example describes how to configure a source NAT between two MPLS networks.
Requirements
Before you Begin
-
Understand VRF Instances. See Virtual Routing and Forwarding Instances in SD-WAN Deployments.
Example Prerequisites
-
Software requirements: Any supported Junos release.
-
Hardware requirements: On supported devices.
Overview
Source NAT is used to allow hosts with private IP addresses to access a public network.
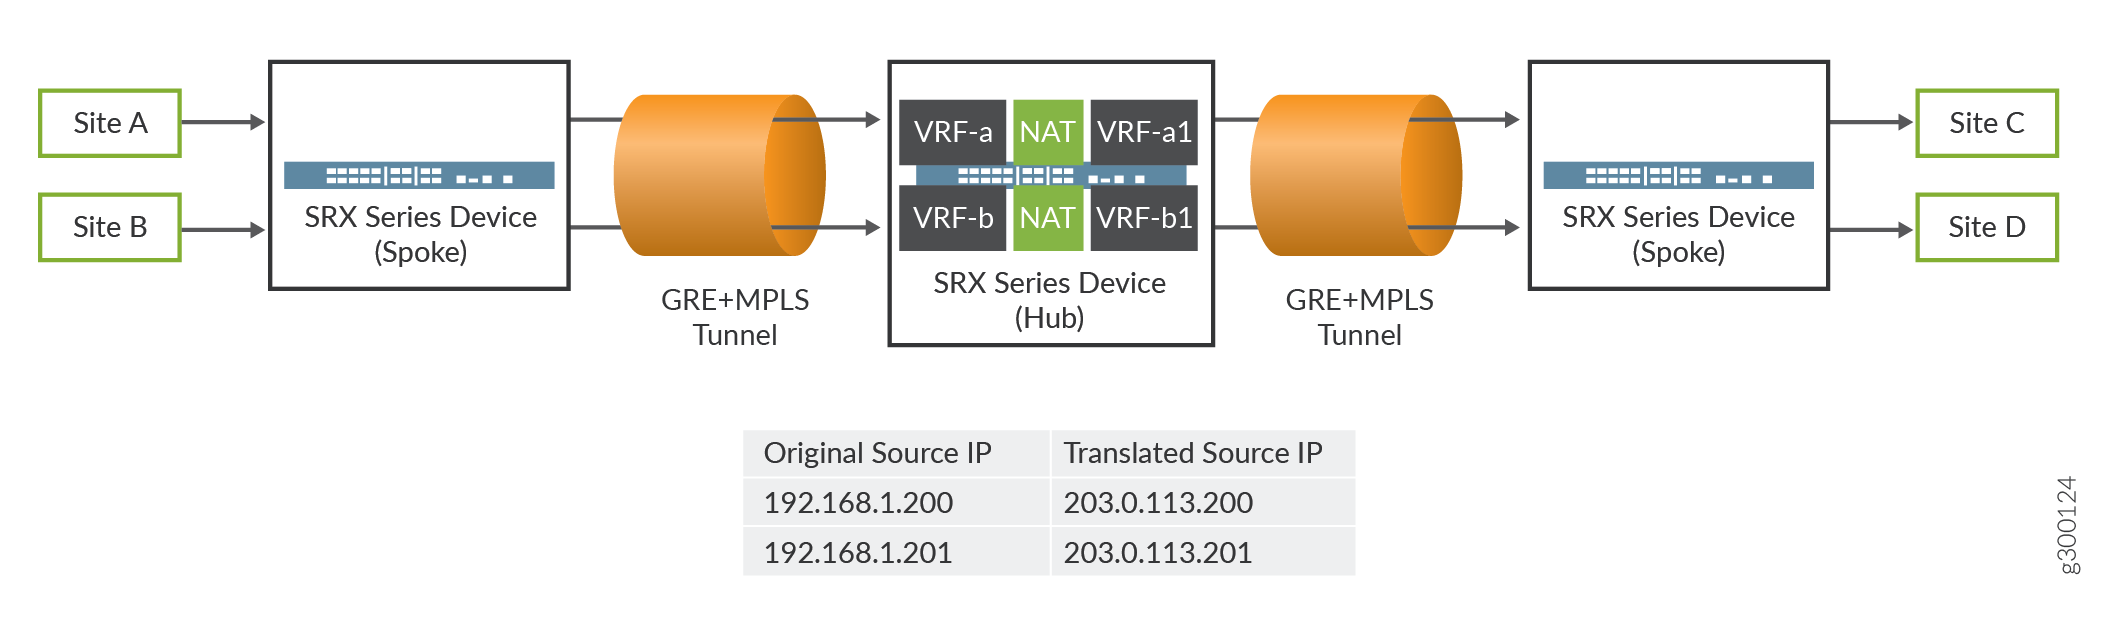
In this example, the firewall connects two MPLS private networks to convert the private IP address from one VRF’s private IP address to another VRF’s private IP address. In Figure 3, the spoke firewall is configured with VRF-a and VRF-b routing instances, which are connected to the hub firewall. Site C and site D are connected to another spoke firewall. In the hub firewall, the source IP addresses 192.168.1.200 and 192.168.1.201 from VRF-a and VRF-b routing instances are translated to 203.0.113.200 and 203.0.113.201.
Configuration
Procedure
CLI Quick Configuration
To quickly configure this example, copy the following commands, paste the
commands into a text file, remove any line breaks, change any details
necessary to match your network configuration, copy and paste the
commands into the CLI at the [edit] hierarchy level,
and then enter commit from configuration mode.
set routing-instances VRF-a instance-type vrf
set routing-instances VRF-a route-distinguisher 30:200
set routing-instances VRF-a vrf-target target:100:100
set routing-instances VRF-a vrf-table-label
set routing-instances VRF-b instance-type vrf
set routing-instances VRF-b route-distinguisher 40:200
set routing-instances VRF-b vrf-target target:200:100
set routing-instances VRF-b vrf-table-label
set routing-instances VRF-a1 instance-type vrf
set routing-instances VRF-a1 route-distinguisher 60:200
set routing-instances VRF-a1 vrf-target target:300:100
set routing-instances VRF-a1 vrf-table-label
set routing-instances VRF-b1 instance-type vrf
set routing-instances VRF-b1 route-distinguisher 50:200
set routing-instances VRF-b1 vrf-target target:400:100
set routing-instances VRF-b1 vrf-table-label
 set security nat source pool vrf-a_p address 203.0.113.200
set security nat source rule-set vrf-a_rs from routing-instance VRF-a
set security nat source rule-set vrf-a_rs to routing-instance VRF-a1
set security nat source rule-set vrf-a_rs rule rule1 match source-address 192.168.1.200
set security nat source rule-set vrf-a_rs rule rule1 then source-nat pool vrf-a_p
set security nat source pool vrf-b_p address 203.0.113.201
set security nat source rule-set vrf-b_rs from routing-instance VRF-b
set security nat source rule-set vrf-b_rs to routing-instance VRF-b1
set security nat source rule-set vrf-b_rs rule rule2 match source-address 192.168.1.201
set security nat source rule-set vrf-b_rs rule rule2 then source-nat pool vrf-b_p
Step-by-Step Procedure
The following example requires you to navigate various levels in the configuration hierarchy.
To configure source NAT mapping:
L3VPN require a VRF table for distributing routes within the networks. Create a VRF instance and specify the value vrf.
[edit routing-instances]
user@host#set VRF-a instance-type vrf
user@host#set VRF-b instance-type vrf
user@host#set VRF-a1 instance-type vrf
user@host#set VRF-b1 instance-type vrf
Assign an RD to the routing instance.
[edit routing-instances]
user@host#set VRF-a route-distinguisher 30:200
user@host#set VRF-b route-distinguisher 40:200
user@host#set VRF-a1 route-distinguisher 60:200
user@host#set VRF-b1 route-distinguisher 50:200
Create a community policy to import or export all routes.
[edit routing-instances]
user@host#set VRF-a vrf-target target:100:100
user@host#set VRF-b vrf-target target:200:100
user@host#set VRF-a1 vrf-target target:300:100
user@host#set VRF-b1 vrf-target target:400:100
Assign a single VPN label for all the routes in the VRF.
[edit routing-instances]
user@host#set VRF-a vrf-table-label
user@host#set VRF-a1 vrf-table-label
user@host#set VRF-b vrf-table-label
user@host#set VRF-b1 vrf-table-label
Create a source NAT pool.
[edit security nat source]
user@host#set vrf-a_p address 203.0.113.200
user@host#set vrf-b_p address 203.0.113.201
Create a source NAT rule set.
[edit security nat source]
user@host#set rule-set vrf-a_rs from routing-instance VRF-a
user@host#set rule-set vrf-a_rs to routing-instance VRF-a1
user@host#set rule-set vrf-b_rs from routing-instance VRF-b
user@host#set rule-set vrf-b_rs to routing-instance VRF-b1
Configure a rule that matches packets and translates the source IP address to an IP address in the source NAT pool.
[edit security nat source]
user@host# set rule-set vrf-a_rs rule rule1 match source-address 192.168.1.200
user@host# set rule-set vrf-a_rs rule rule1 then source-nat pool vrf-a_p
user@host# set rule-set vrf-b_rs rule rule2 match source-address 192.168.1.201
user@host# set rule-set vrf-b_rs rule rule2 then source-nat pool vrf-b_p
Results
From configuration mode, confirm your configuration by entering the
show security nat and show
routing-instances commands. If the output does not display
the intended configuration, repeat the configuration instructions in
this example to correct it.
[edit]
user@host# show security nat
    source {
        pool vrf-a_p {
            address {
                203.0.113.200/32;
            }
        }
        pool vrf-b_p {
            address {
                203.0.113.201/32;
            }
        }
        rule-set vrf-a_rs {
            from routing-instance VRF-a;
            to routing-instance VRF-a1;
            rule rule1 {
                match {
                    source-address 192.168.1.200/32;
                }
                then {
                    source-nat {
                        pool {
                            vrf-a_p;
                        }
                    }
                }
            }
        }
        rule-set vrf-b_rs {
            from routing-instance VRF-b;
            to routing-instance VRF-b1;
            rule rule2 {
                match {
                    source-address 192.168.1.201/32;
                }
                then {
                    source-nat {
                        pool {
                            vrf-b_p;
                        }
                    }
                }
            }
        }
    }
[edit]
user@host# show routing-instances
    VRF-a {
        instance-type vrf;
        route-distinguisher 30:200;
        vrf-target target:100:100;
        vrf-table-label;
    }
    VRF-a1 {
        instance-type vrf;
        route-distinguisher 60:200;
        vrf-target target:300:100;
        vrf-table-label;
    }
    VRF-b {
        instance-type vrf;
        route-distinguisher 40:200;
        vrf-target target:200:100;
        vrf-table-label;
    }
    VRF-b1 {
        instance-type vrf;
        route-distinguisher 50:200;
        vrf-target target:400:100;
        vrf-table-label;
    }
If you are done configuring the device, enter commit
from configuration mode.
Verification
Verifying Source NAT Rule Usage
Purpose
Verify that the traffic matching the source NAT rules.
Action
From operational mode, enter the show security nat source
rule all command. In the Translation hits field, verify
whether the traffic that matches the source NAT rule.
user@host>show security nat source rule all
Total rules: 2
Total referenced IPv4/IPv6 ip-prefixes: 2/0
source NAT rule: rule1                  Rule-set: vrf-a_rs
  Rule-Id                    : 1
  Rule position              : 1
  From routing instance      : VRF-a
  To routing instance        : VRF-a1
  Match
    Source addresses         : 192.168.1.200   - 192.168.1.200
  Action                        : vrf-a_p
    Persistent NAT type         : N/A
    Persistent NAT mapping type : address-port-mapping
    Inactivity timeout          : 0
    Max session number          : 0
  Translation hits           : 0
    Successful sessions      : 0
    Failed sessions          : 0
  Number of sessions         : 0
source NAT rule: rule2                  Rule-set: vrf-b_rs
  Rule-Id                    : 2
  Rule position              : 2
  From routing instance      : VRF-b
  To routing instance        : VRF-b1
  Match
    Source addresses         : 192.168.1.201   - 192.168.1.201
  Action                        : vrf-b_p
    Persistent NAT type         : N/A
    Persistent NAT mapping type : address-port-mapping
    Inactivity timeout          : 0
    Max session number          : 0
  Translation hits           : 0
    Successful sessions      : 0
    Failed sessions          : 0
  Number of sessions         : 0
Example: Configure Destination NAT to Convert a Public IP Address to a Single Private IP Address in a VRF Instance
This example describes how to configure the destination NAT mapping of a public IP address to the single VRF’s private address for directing the packets to the correct VRF instance.
Requirements
-
Understand VRF Instances. See Virtual Routing and Forwarding Instances in SD-WAN Deployments.
Overview
Destination NAT is the translation of the destination IP address of a packet entering the Juniper Networks device. Destination NAT is used to redirect traffic destined to a virtual host (identified by the original destination IP address) to the real host (identified by the translated destination IP address).
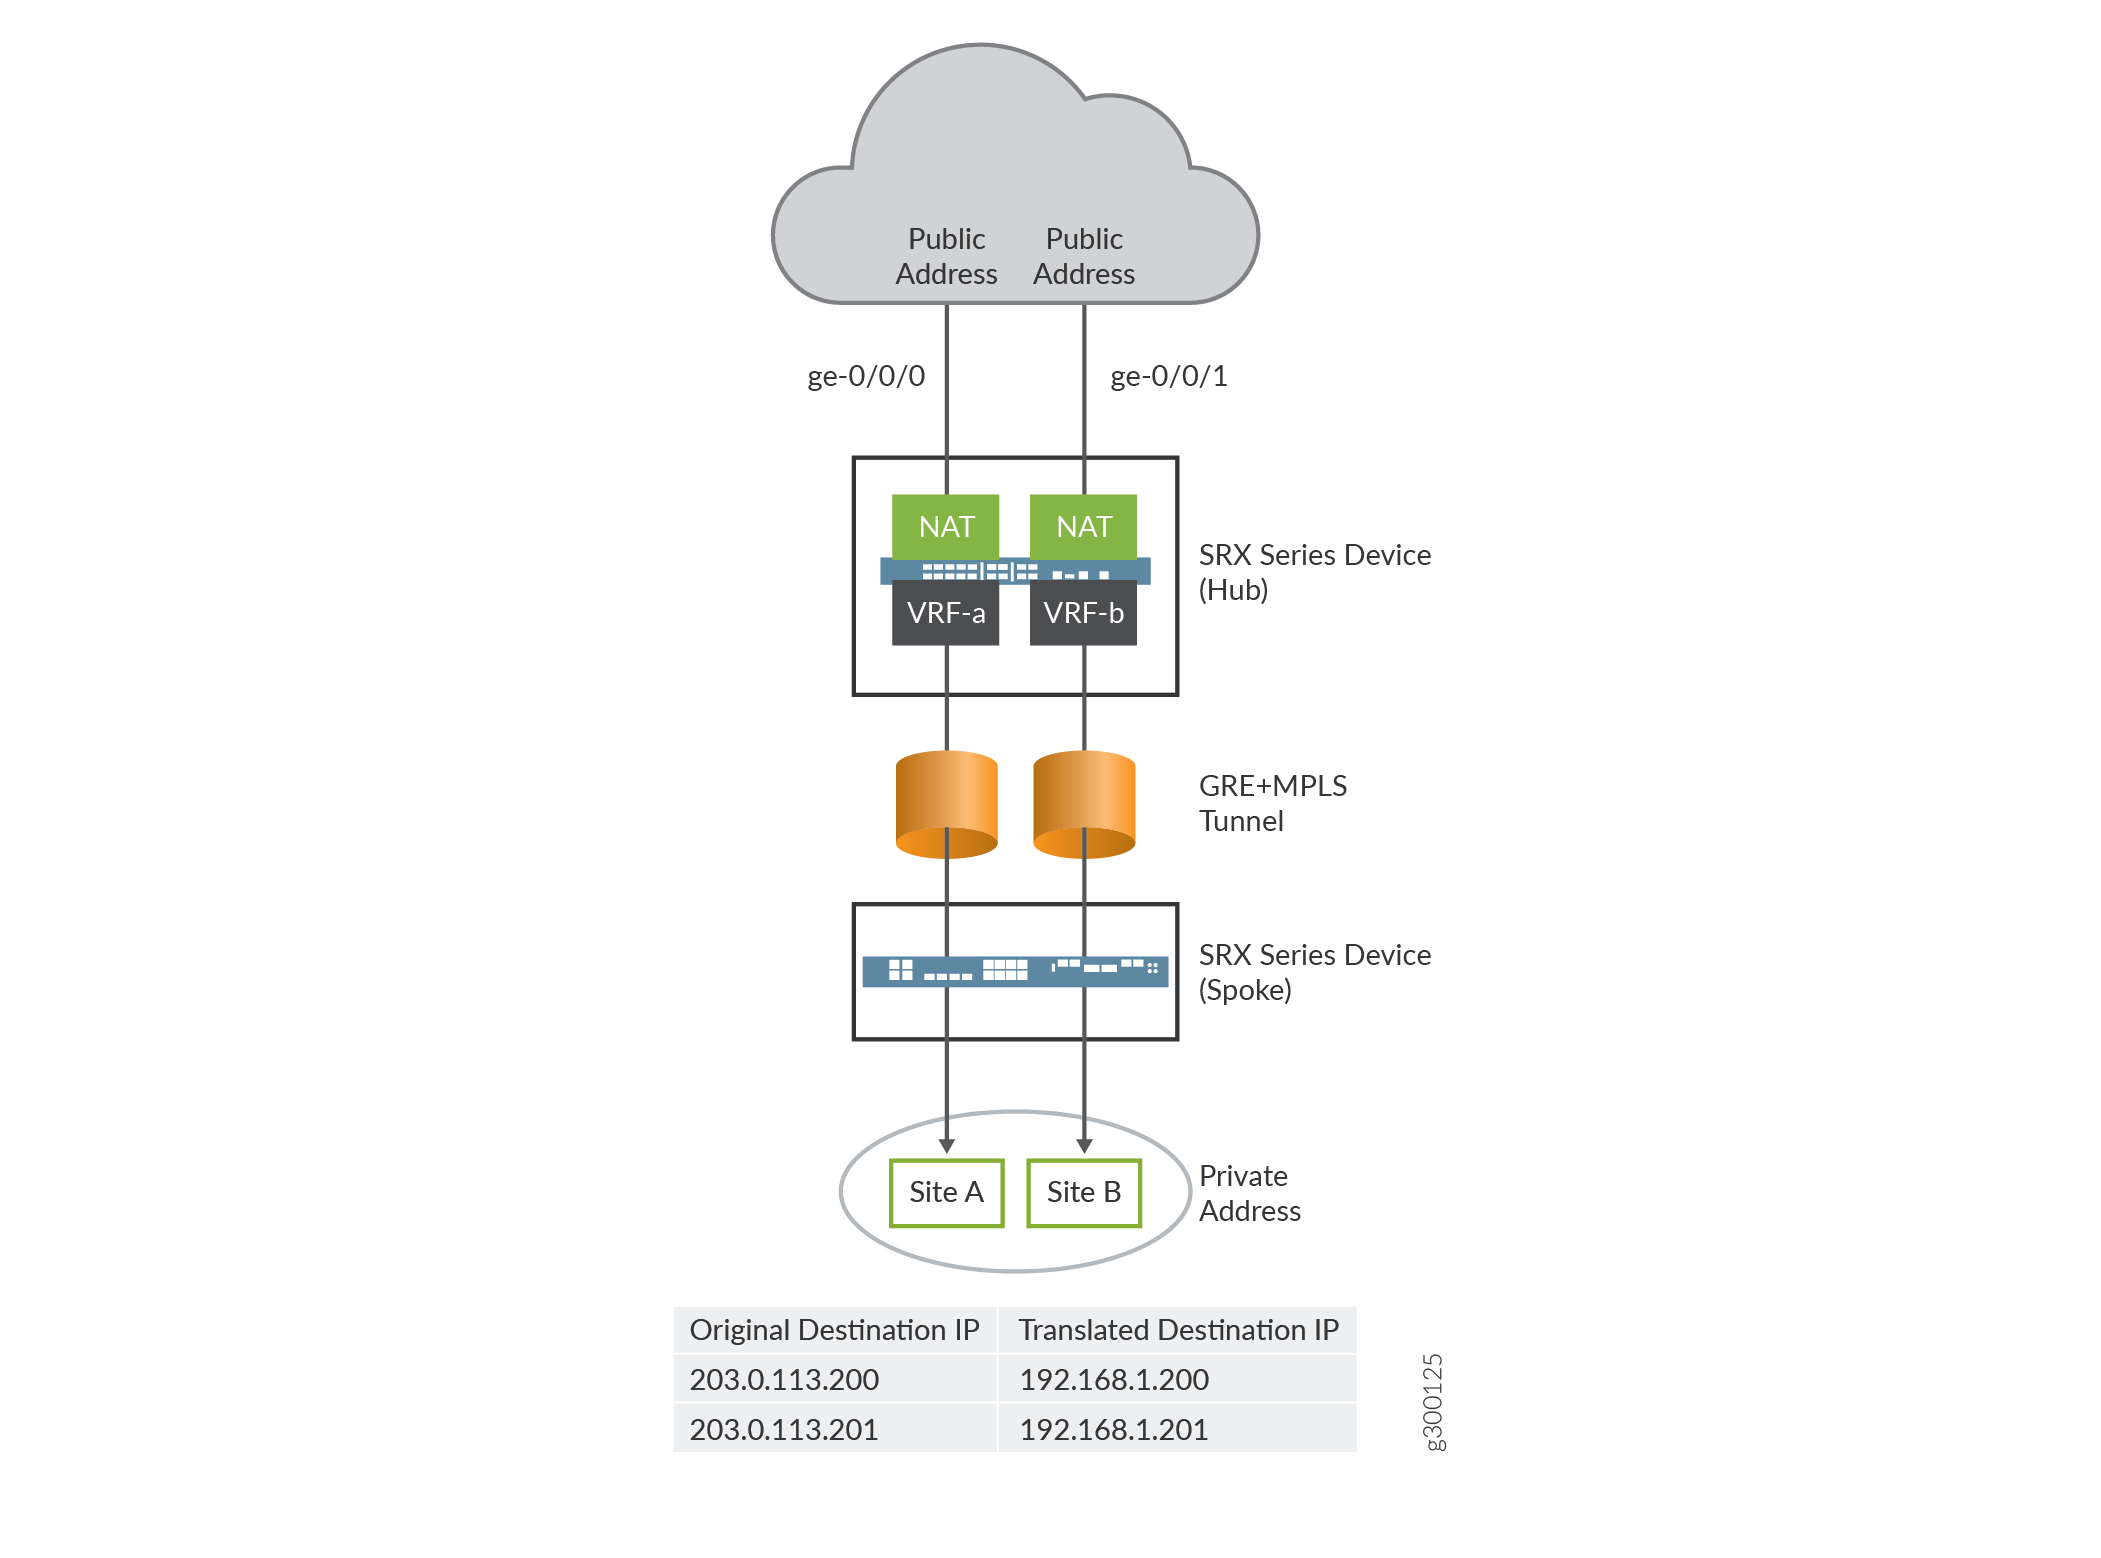
In this example, a firewall is configured with destination NAT to convert a public IP address to the VRF private IP address of a VRF instance. The public IP address can be configured per VRF instance. In Figure 4, the firewall is configured with two VRF instances, VRF-a and VRF-b. The firewall coverts the public IP address to private IP address of a VRF instance.
Configuration
Procedure
CLI Quick Configuration
To quickly configure this example, copy the following commands, paste the
commands into a text file, remove any line breaks, change any details
necessary to match your network configuration, copy and paste the
commands into the CLI at the [edit] hierarchy level,
and then enter commit from configuration mode.
set routing-instances VRF-a instance-type vrf
set routing-instances VRF-a route-distinguisher 30:200
set routing-instances VRF-a vrf-target target:100:100
set routing-instances VRF-a vrf-table-label
set routing-instances VRF-b instance-type vrf
set routing-instances VRF-b route-distinguisher 40:200
set routing-instances VRF-b vrf-target target:200:100
set routing-instances VRF-b vrf-table-label
set security nat destination pool vrf-a_p routing-instance VRF-a
set security nat destination pool vrf-a_p address 192.168.1.200
set security nat destination rule-set rs from interface ge-0/0/0
set security nat destination rule-set rs rule vrf-a_r match destination-address 203.0.113.200
set security nat destination rule-set rs rule vrf-a_r then destination-nat pool vrf-a_p
set security nat destination pool vrf-b_p routing-instance VRF-b
set security nat destination pool vrf-b_p address 192.168.1.201
set security nat destination rule-set rs from interface ge-0/0/1
set security nat destination rule-set rs rule vrf-b_r match destination-address 203.0.113.201
set security nat destination rule-set rs rule vrf-b_r then destination-nat pool vrf-b_p
Step-by-Step Procedure
The following example requires you to navigate various levels in the configuration hierarchy.
To configure destination NAT mapping for a single VRF:
L3VPN require a VRF table for distributing routes within the networks. Create a VRF instance and specify the value vrf.
[edit routing-instances]
user@host#set VRF-a instance-type vrf
user@host#set VRF-b instance-type vrf
Assign an RD to the routing instance.
[edit routing-instances]
user@host#set VRF-a route-distinguisher 30:200
user@host#set VRF-b route-distinguisher 40:200
Create a community policy to import or export all routes.
[edit routing-instances]
user@host#set VRF-a vrf-target target:100:100
user@host#set VRF-b vrf-target target:200:100
Assign a single VPN label for all the routes in the VRF.
[edit routing-instances]
user@host#set VRF-a vrf-table-label
user@host#set VRF-b vrf-table-label
Specify a destination NAT IP address pool.
[edit security nat destination]
user@host# set pool vrf-a_p address 192.168.1.200
user@host# set pool vrf-b_p address 192.168.1.201
Assign the routing instance to the destination pool.
[edit security nat destination]
user@host# set pool vrf-a_p routing-instance VRF-a
user@host# set pool vrf-b_p routing-instance VRF-b
Create a destination NAT rule set.
[edit security nat destination]
user@host# set rule-set rs from interface ge-0/0/0
user@host# set rule-set rs from interface ge-0/0/1
Configure a rule that matches packets and translates the destination IP address to an IP address in the destination NAT IP address pool.
[edit security nat destination]
user@host# set  rule-set rs rule vrf-a_r match destination-address 203.0.113.200
user@host# set rule-set rs rule vrf-a_r then destination-nat pool vrf-a_p
user@host# set rule-set rs rule vrf-b_r match destination-address 203.0.113.201
user@host# set rule-set rs rule vrf-b_r then destination-nat pool vrf-b_p
Results
From configuration mode, confirm your configuration by entering the
show security nat and show
routing-instances commands. If the output does not display the
intended configuration, repeat the configuration instructions in this
example to correct it.
[edit]
user@host# show security nat
    destination {
        pool vrf-a_p {
            routing-instance {
                VRF-a;
            }
            address 192.168.1.200/32;
        }
        pool vrf-b_p {
            routing-instance {
                VRF-b;
            }
            address 192.168.1.201/32;
        }
        rule-set rs {
            from interface [ ge-0/0/0.0 ge-0/0/1.0 ];
            rule vrf-a_r {
                match {
                    destination-address 203.0.113.200/32;
                }
                then {
                    destination-nat {
                        pool {
                            vrf-a_p;
                        }
                    }
                }
            }
            rule vrf-b_r {
                match {
                    destination-address 203.0.113.201/32;
                }
                then {
                    destination-nat {
                        pool {
                            vrf-b_p;
                        }
                    }
                }
            }
        }
    }
[edit]
user@host# show routing-instances
    VRF-a {
        instance-type vrf;
        route-distinguisher 30:200;
        vrf-target target:100:100;
        vrf-table-label;
    }
    VRF-b {
        instance-type vrf;
        route-distinguisher 40:200;
        vrf-target target:200:100;
        vrf-table-label;
    }
If you are done configuring the device, enter commit from
configuration mode.
Verification
Verifying Destination NAT Rule Usage
Purpose
Verify that the traffic matching the destination NAT rules.
Action
From operational mode, enter the show security nat destination
rule all command. In the Translation hits field, verify
whether the traffic that matches the destination NAT rule.
user@host> show security nat destination rule all
Total destination-nat rules: 2
Total referenced IPv4/IPv6 ip-prefixes: 2/0
Destination NAT rule: vrf-a_r                Rule-set: rs
  Rule-Id                    : 1
  Rule position              : 1
  From interface             : ge-0/0/0.0
                             : ge-0/0/1.0
    Destination addresses    : 203.0.113.200   - 203.0.113.200
  Action                     : vrf-a_p
  Translation hits           : 0
    Successful sessions      : 0
    Failed sessions          : 0
  Number of sessions         : 0
Destination NAT rule: vrf-b_r                Rule-set: rs
  Rule-Id                    : 2
  Rule position              : 2
  From interface             : ge-0/0/0.0
                             : ge-0/0/1.0
    Destination addresses    : 203.0.113.201   - 203.0.113.201
  Action                     : vrf-b_p
  Translation hits           : 0
    Successful sessions      : 0
    Failed sessions          : 0
  Number of sessions         : 0
Example: Configure Static NAT to Convert the Private IP Address of a VRF Instance to a Public IP Address
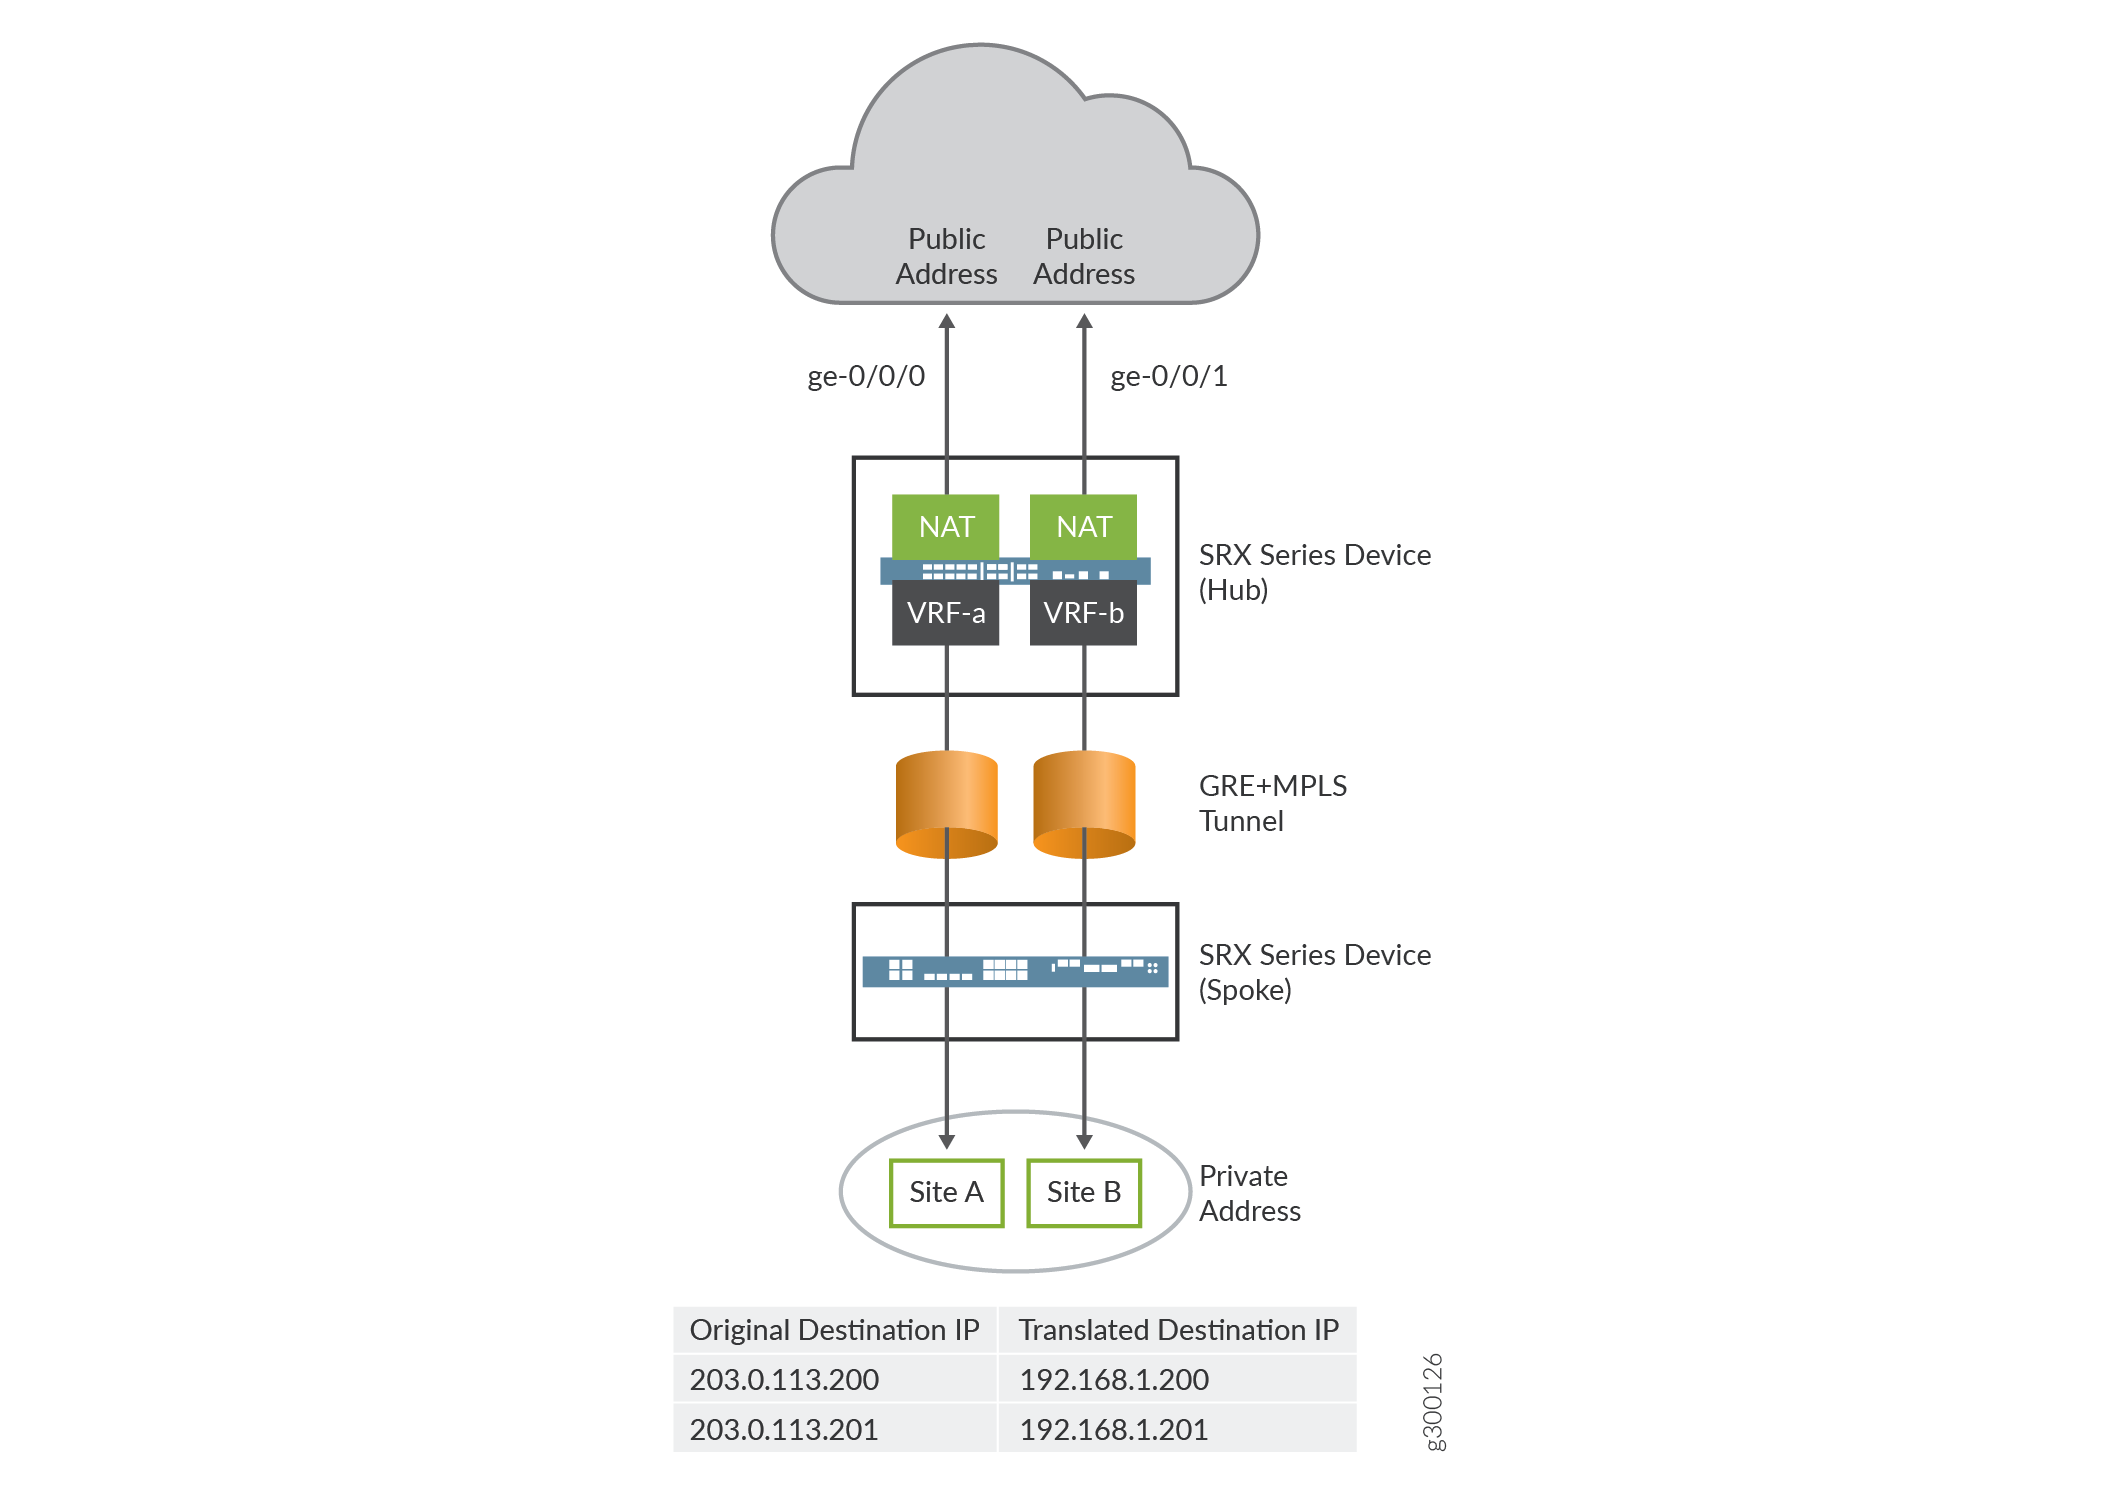
This example describes how to configure a static NAT mapping of VRF single private IP address to a public IP address.
Requirements
Understand how firewalls work in an SD-WAN deployment for NAT.
Overview
In this example, a firewall is configured with static NAT to convert the VRF private IP address of a VRF instance to a public IP address of a VRF instance. Static NAT can be applied on the source NAT and destination NAT. In Figure 5, the firewall is configured with two VRF instances, VRF-a and VFR-b. The firewall converts the private IP address of a VRF instance to a public IP address.
Configuration
Procedure
CLI Quick Configuration
To quickly configure this example, copy the following commands, paste the
commands into a text file, remove any line breaks, change any details
necessary to match your network configuration, copy and paste the
commands into the CLI at the [edit] hierarchy level,
and then enter commit from configuration mode.
set routing-instances VRF-a instance-type vrf
set routing-instances VRF-a route-distinguisher 30:200
set routing-instances VRF-a vrf-target target:100:100
set routing-instances VRF-a vrf-table-label
set routing-instances VRF-b instance-type vrf
set routing-instances VRF-b route-distinguisher 40:200
set routing-instances VRF-b vrf-target target:200:100
set routing-instances VRF-b vrf-table-label
set security nat static rule-set rs from interface ge-0/0/0
set security nat static rule-set rs rule vrf-a_r match static-address 203.0.113.200
set security nat static rule-set rs rule vrf-a_r then static-nat prefix 192.168.1.200
set security nat static rule-set rs rule vrf-a_r then static-nat prefix routing-instance VRF-a
set security nat static rule-set rs from interface ge-0/0/1
set security nat static rule-set rs rule vrf-b_r match static-address 203.0.113.201
set security nat static rule-set rs rule vrf-b_r then static-nat prefix 192.168.1.201
set security nat static rule-set rs rule vrf-b_r then static-nat prefix routing-instance VRF-b
Step-by-Step Procedure
The following example requires you to navigate various levels in the configuration hierarchy.
To configure static NAT mapping for the IP address of a single VRF:
L3VPN require a VRF table for distributing routes within the networks. Create a VRF instance and specify the value vrf.
[edit routing-instances]
user@host#set VRF-a instance-type vrf
user@host#set VRF-b instance-type vrf
Assign an RD to the routing instance.
[edit routing-instances]
user@host#set VRF-a route-distinguisher 30:200
user@host#set VRF-b route-distinguisher 40:200
Create a community policy to import or export all routes.
[edit routing-instances]
user@host#set VRF-a vrf-target target:100:100
user@host#set VRF-b vrf-target target:200:100
Assign a single VPN label for all the routes in the VRF.
[edit routing-instances]
user@host#set VRF-a vrf-table-label
user@host#set VRF-b vrf-table-label
Create a static NAT rule set.
[edit security nat static]
user@host# set rule-set rs from interface ge-0/0/0
user@host# set rule-set rs from interface ge-0/0/1
Configure a rule that matches packets and translates the destination address in the packets to a private IP address.
[edit security nat static]
user@host# set rule-set rs rule vrf-a_r match static-address 203.0.113.200
user@host# set rule-set rs rule vrf-a_r then static-nat prefix 192.168.1.200
user@host# set rule-set rs rule vrf-a_r then static-nat prefix routing-instance VRF-a
user@host# set rule-set rs rule vrf-b_r match static-address 203.0.113.201
user@host# set rule-set rs rule vrf-b_r then static-nat prefix 192.168.1.201
user@host# set rule-set rs rule vrf-b_r then static-nat prefix routing-instance VRF-b
Results
From configuration mode, confirm your configuration by entering the
show security nat and show
routing-instances commands. If the output does not display the
intended configuration, repeat the configuration instructions in this
example to correct it.
[edit]
user@host# show security nat
    static {
        rule-set rs {
            from interface [ ge-0/0/0.0 ge-0/0/1.0 ];
            rule vrf-a_r {
                match {
                    destination-address 203.0.113.200/32;
                }
                then {
                    static-nat {
                        prefix {
                            192.168.1.200/32;
                            routing-instance VRF-a;
                        }
                    }
                }
            }
            rule vrf-b_r {
                match {
                    destination-address 203.0.113.201/32;
                }
                then {
                    static-nat {
                        prefix {
                            192.168.1.201/32;
                            routing-instance VRF-b;
                        }
                    }
                }
            }
        }
    }
[edit]
user@host# show routing-instances
    VRF-a {
        instance-type vrf;
        route-distinguisher 30:200;
        vrf-target target:100:100;
        vrf-table-label;
    }
    VRF-b {
        instance-type vrf;
        route-distinguisher 40:200;
        vrf-target target:200:100;
        vrf-table-label;
    }
If you are done configuring the device, enter commit from
configuration mode.
Verification
Verifying Static NAT Rule Usage
Purpose
Verify that the traffic matching the static NAT rules.
Action
From operational mode, enter the show security nat static
rule command. In the Translation hits field, verify whether
the traffic that matches the static NAT rule.
user@host> show security nat static rule all
Total static-nat rules: 2
Total referenced IPv4/IPv6 ip-prefixes: 4/0
Static NAT rule: vrf-a_r                Rule-set: rs
  Rule-Id                    : 1
  Rule position              : 1
  From interface             : ge-0/0/0.0
                             : ge-0/0/1.0
  Destination addresses      : 203.0.113.200
  Host addresses             : 192.168.1.200
  Netmask                    : 32
  Host routing-instance      : VRF-a
  Translation hits           : 0
    Successful sessions      : 0
    Failed sessions          : 0
  Number of sessions         : 0
Static NAT rule: vrf-b_r                Rule-set: rs
  Rule-Id                    : 2
  Rule position              : 2
  From interface             : ge-0/0/0.0
                             : ge-0/0/1.0
  Destination addresses      : 203.0.113.201
  Host addresses             : 192.168.1.201
  Netmask                    : 32
  Host routing-instance      : VRF-b
  Translation hits           : 0
    Successful sessions      : 0
    Failed sessions          : 0
  Number of sessions         : 0