Configure SSO Between Routing Director and Microsoft Entra ID
Use the information in this topic to configure SAML SSO between Microsoft Entra ID and Routing Director.
Use this procedure to create and configure a Microsoft Entra ID Enterprise Application for Juniper Routing Director SAML authentication. Routing Director acts as the SAML Service Provider (SP), and Microsoft Entra ID acts as the Identity Provider (IdP).
Before You Begin
Obtain the following information from Routing Director:
- Assertion Consumer Service (ACS) URL
- Service Provider Entity ID
- Planned Routing Director role names for RBAC mapping. To create the role
names:
- Log in to Routing Director and navigate to Settings Menu > System Settings. The Organization Settings page is displayed.
- Click the Create Role (+) icon.
- On the Create Role page, configure the following:
- Name — enter the name of your IdP user group. For example, SuperUser or Network Admin.
- Role — select the required predefined role:
- Super User
- Network Admin. Access Control Profile is required when assigning the Network Admin role. Select one or more profiles that determine which resources the Network Admin can access.
- Click Create.
The new mapping will then appear in the Roles table.
- (Optional) Routing Director metadata file.
To fetch the metadata, use the metadata API endpoint from Routing Director.
https://<ui-address>/api/v1/orgs/<org-id>/ssos/<ssos-id>/metadata
Response will look like below and extract
metadatafield fromJSONoutput.{ "entity_id":"https://<ui-address>/api/v1/saml/noroe3o8/login", "acs_url":"https://<ui-address>/api/v1/saml/noroe3o8/login", "logout_url":"https://<ui-address>/api/v1/saml/noroe3o8/logout", "metadata":"<?xml version=\"1.0\" encoding=\"UTF-8\"?><md:EntityDescriptor xmlns:md=\"urn:oasis:names:tc:SAML:2.0:metadata\" entityID=\"https://<ui-address>/api/v1/saml/noroe3o8/login\" validUntil=\"2036-02-10T00:48:33.245485+00:00\" xmlns:ds=\"http://www.w3.org/2000/09/xmldsig#\">\n <md:SPSSODescriptor AuthnRequestsSigned=\"false\" WantAssertionsSigned=\"true\" protocolSupportEnumeration=\"urn:oasis:names:tc:SAML:2.0:protocol\">\n <md:SingleLogoutService Binding=\"urn:oasis:names:tc:SAML:2.0:bindings:HTTP-POST\" Location=\"https://<ui-address>/api/v1/saml/noroe3o8/logout\" />\n <md:NameIDFormat>urn:oasis:names:tc:SAML:1.1:nameid-format:unspecified</md:NameIDFormat>\n <md:AssertionConsumerService Binding=\"urn:oasis:names:tc:SAML:2.0:bindings:HTTP-POST\" Location=\"https://<ui-address>/api/v1/saml/noroe3o8/login\" index=\"0\" isDefault=\"true\"/>\n <md:AttributeConsumingService index=\"0\">\n <md:ServiceName xml:lang=\"en-US\">Paragon</md:ServiceName>\n <md:RequestedAttribute Name=\"Role\" NameFormat=\"urn:oasis:names:tc:SAML:2.0:attrname-format:basic\" isRequired=\"true\"/>\n <md:RequestedAttribute Name=\"FirstName\" NameFormat=\"urn:oasis:names:tc:SAML:2.0:attrname-format:basic\" isRequired=\"false\"/>\n <md:RequestedAttribute Name=\"LastName\" NameFormat=\"urn:oasis:names:tc:SAML:2.0:attrname-format:basic\" isRequired=\"false\"/>\n </md:AttributeConsumingService>\n </md:SPSSODescriptor>\n</md:EntityDescriptor>\n" }Extracted
metadatawill look similar to followingXMLcontent.<?xml version="1.0" encoding="UTF-8"?> <md:EntityDescriptor xmlns:md="urn:oasis:names:tc:SAML:2.0:metadata" entityID="https://<ui-address>/api/v1/saml/noroe3o8/login" validUntil="2036-02-10T00:48:33.245485+00:00" xmlns:ds="http://www.w3.org/2000/09/xmldsig#"> <md:SPSSODescriptor AuthnRequestsSigned="false" WantAssertionsSigned="true" protocolSupportEnumeration="urn:oasis:names:tc:SAML:2.0:protocol"> <md:SingleLogoutService Binding="urn:oasis:names:tc:SAML:2.0:bindings:HTTP-POST" Location="https://<ui-address>/api/v1/saml/noroe3o8/logout" /> <md:NameIDFormat>urn:oasis:names:tc:SAML:1.1:nameid-format:unspecified</md:NameIDFormat> <md:AssertionConsumerService Binding="urn:oasis:names:tc:SAML:2.0:bindings:HTTP-POST" Location="https://<ui-address>/api/v1/saml/noroe3o8/login" index="0" isDefault="true"/> <md:AttributeConsumingService index="0"> <md:ServiceName xml:lang="en-US">Paragon</md:ServiceName> <md:RequestedAttribute Name="Role" NameFormat="urn:oasis:names:tc:SAML:2.0:attrname-format:basic" isRequired="true"/> <md:RequestedAttribute Name="FirstName" NameFormat="urn:oasis:names:tc:SAML:2.0:attrname-format:basic" isRequired="false"/> <md:RequestedAttribute Name="LastName" NameFormat="urn:oasis:names:tc:SAML:2.0:attrname-format:basic" isRequired="false"/> </md:AttributeConsumingService> </md:SPSSODescriptor> </md:EntityDescriptor>
Proceed to configure the Microsoft Entra ID.
Create the Enterprise Application
-
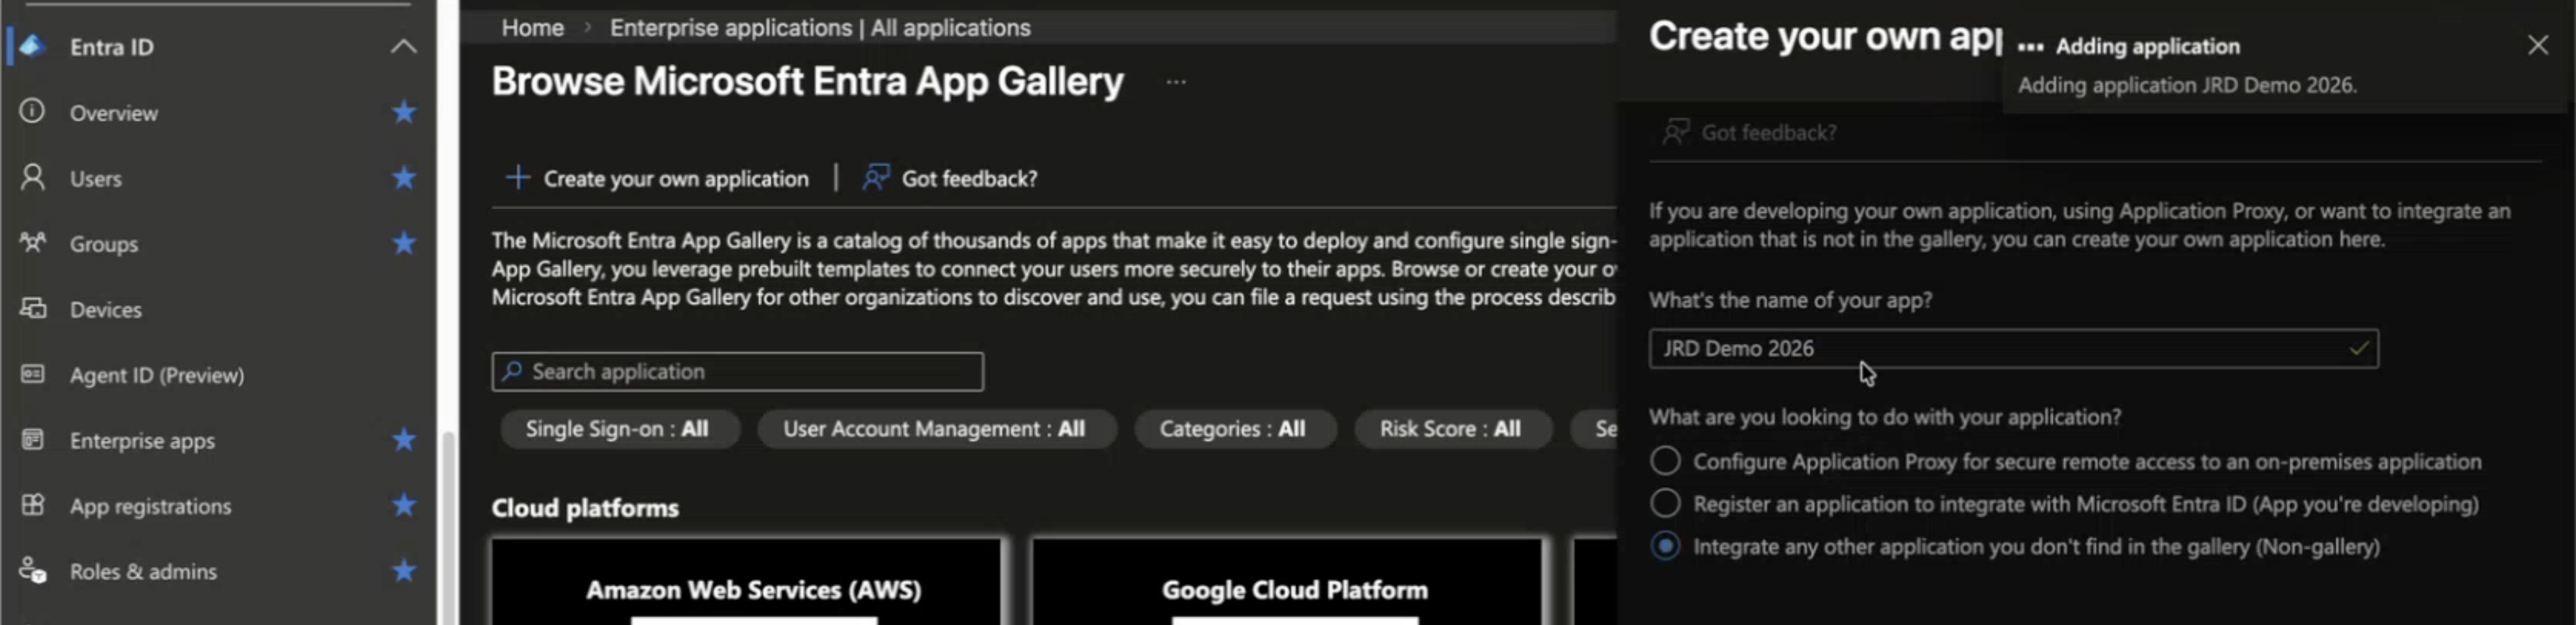
Enter a name for the application. For example, JRD Demo 2026.
Create the application as a non-gallery application. Select Integrate any other application you don't find in the gallery (Non-gallery).Figure 1: Create application
-
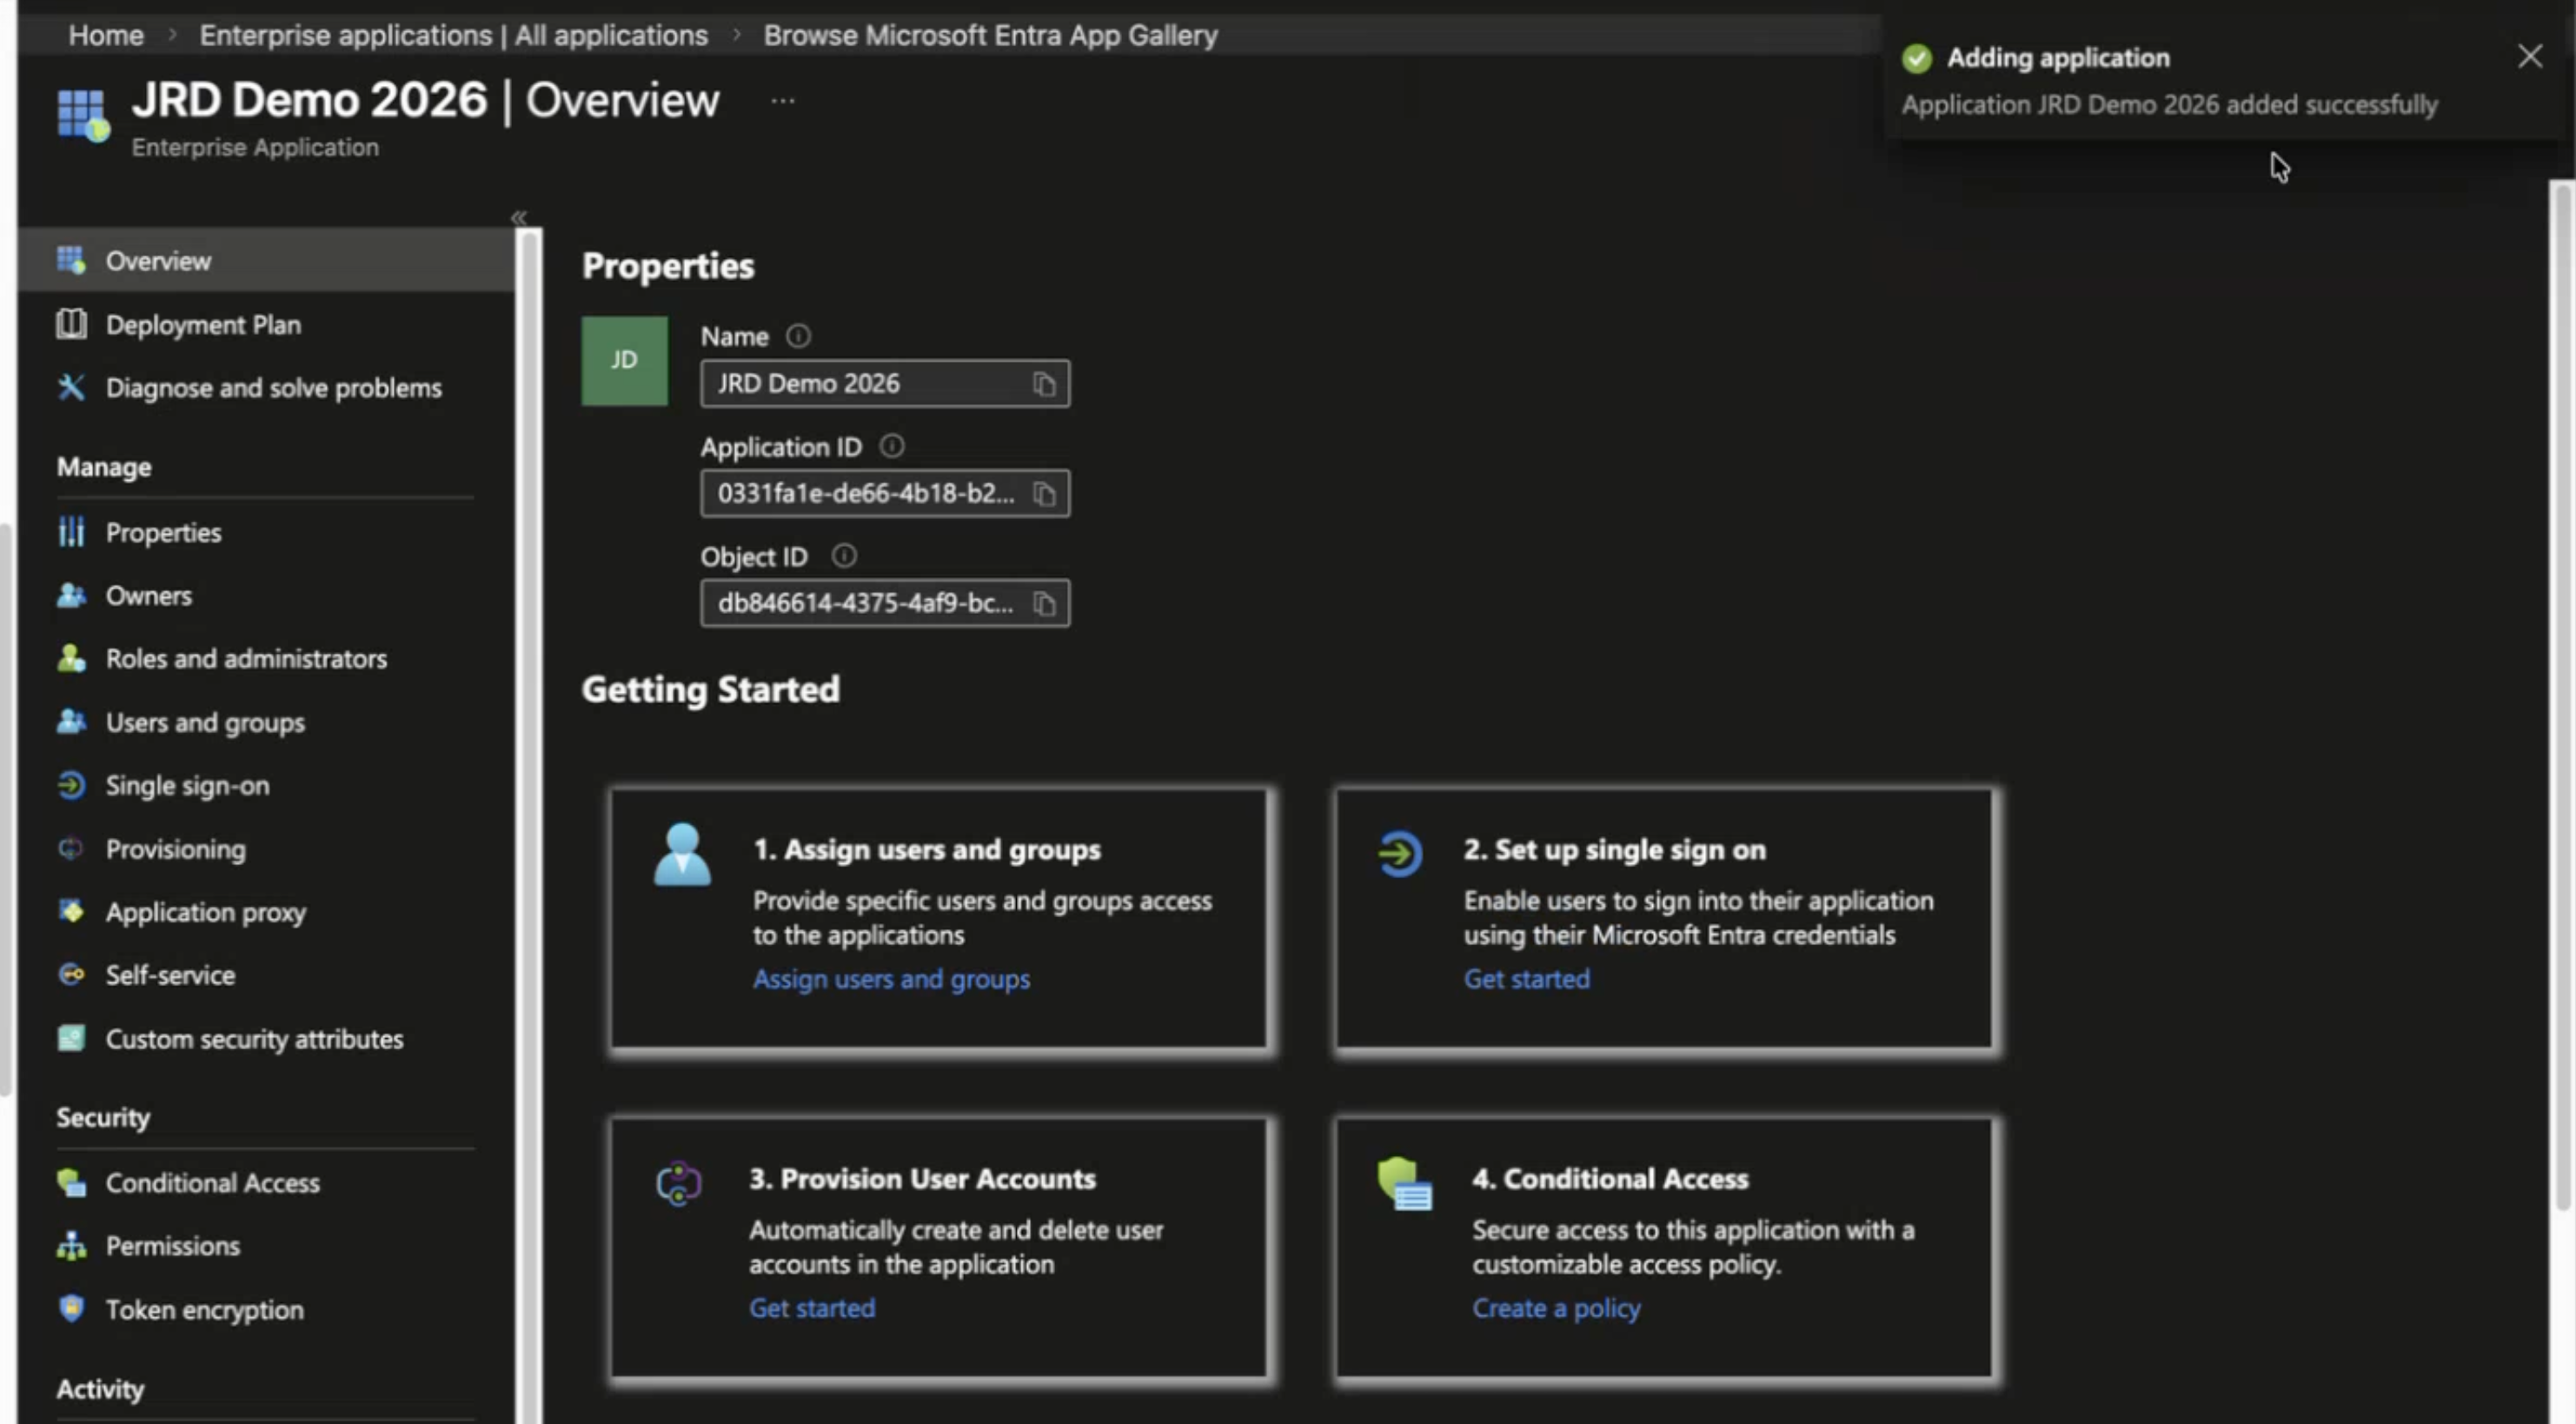
Verify that the application you created appears in the Enterprise
Applications list.
Figure 2: Enterprise applications list
Configure SAML Single Sign-On
Configure SAML based single sign-on.
Open the newly created Enterprise Application, and click Single sign-on (see Figure 2). The Single sign-on page appears.
Select SAML as the sign-on method on the Single Sign-on page.
The SAML-based Sign-on page is displayed.
Configure the following:
Basic SAML
-
Configure Values Manually
- In the Basic SAML Configuration section on the SAML-based Sign-on page, click Edit.
- Click Add identifier to manually update the Microsoft
Entra Identifier (Entity ID). Enter Routing Director Assertion
Consumer Service (ACS) URL as the Identifier (Entity ID).Figure 3: Configure basic SAML parameters
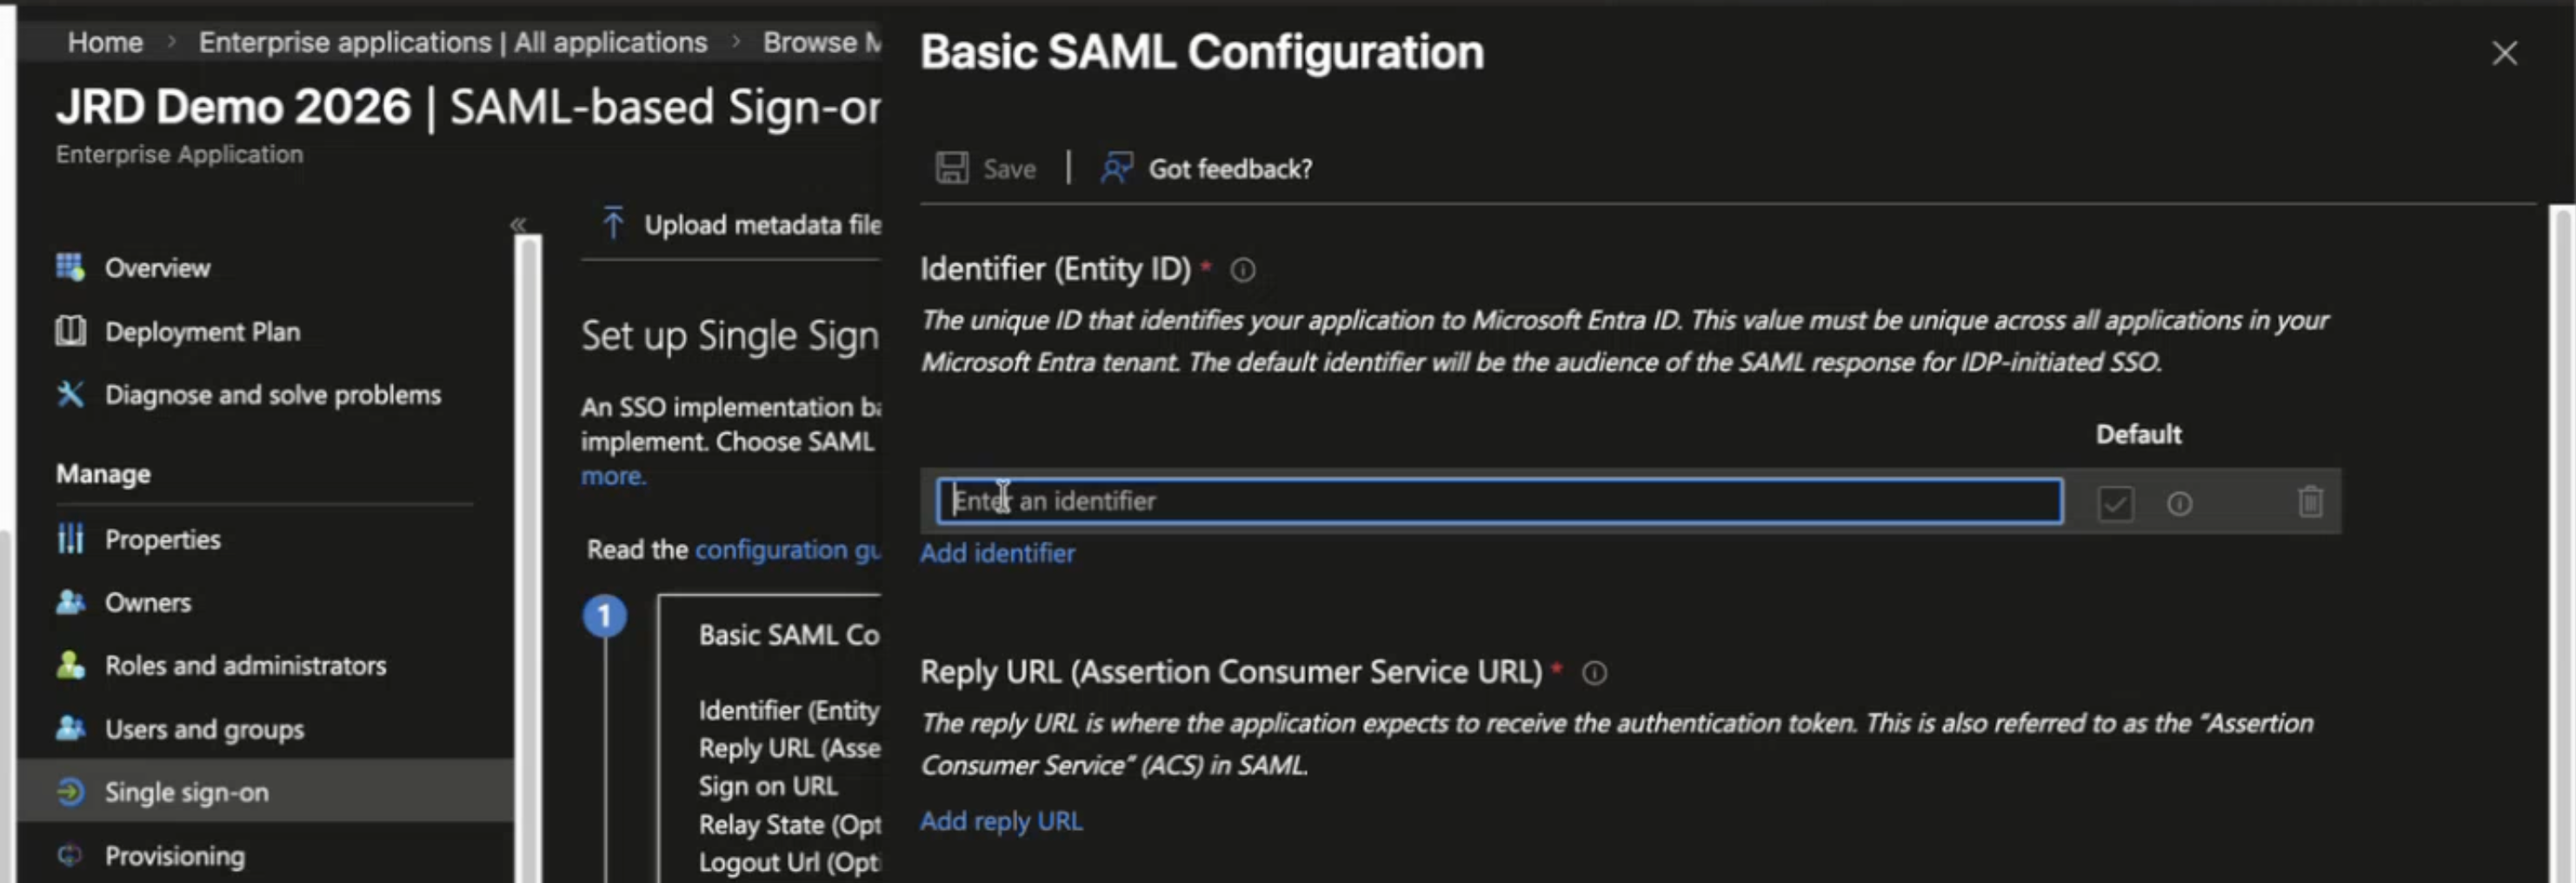
- Click Add reply URL and enter Routing Director ACS URL as the Reply URL (Assertion Consumer Service URL).
- Save the configuration.
- Verify that all values match the Routing Director configuration. Go to Verify Basic SAML Configuration.
-
Import Routing Director Metadata
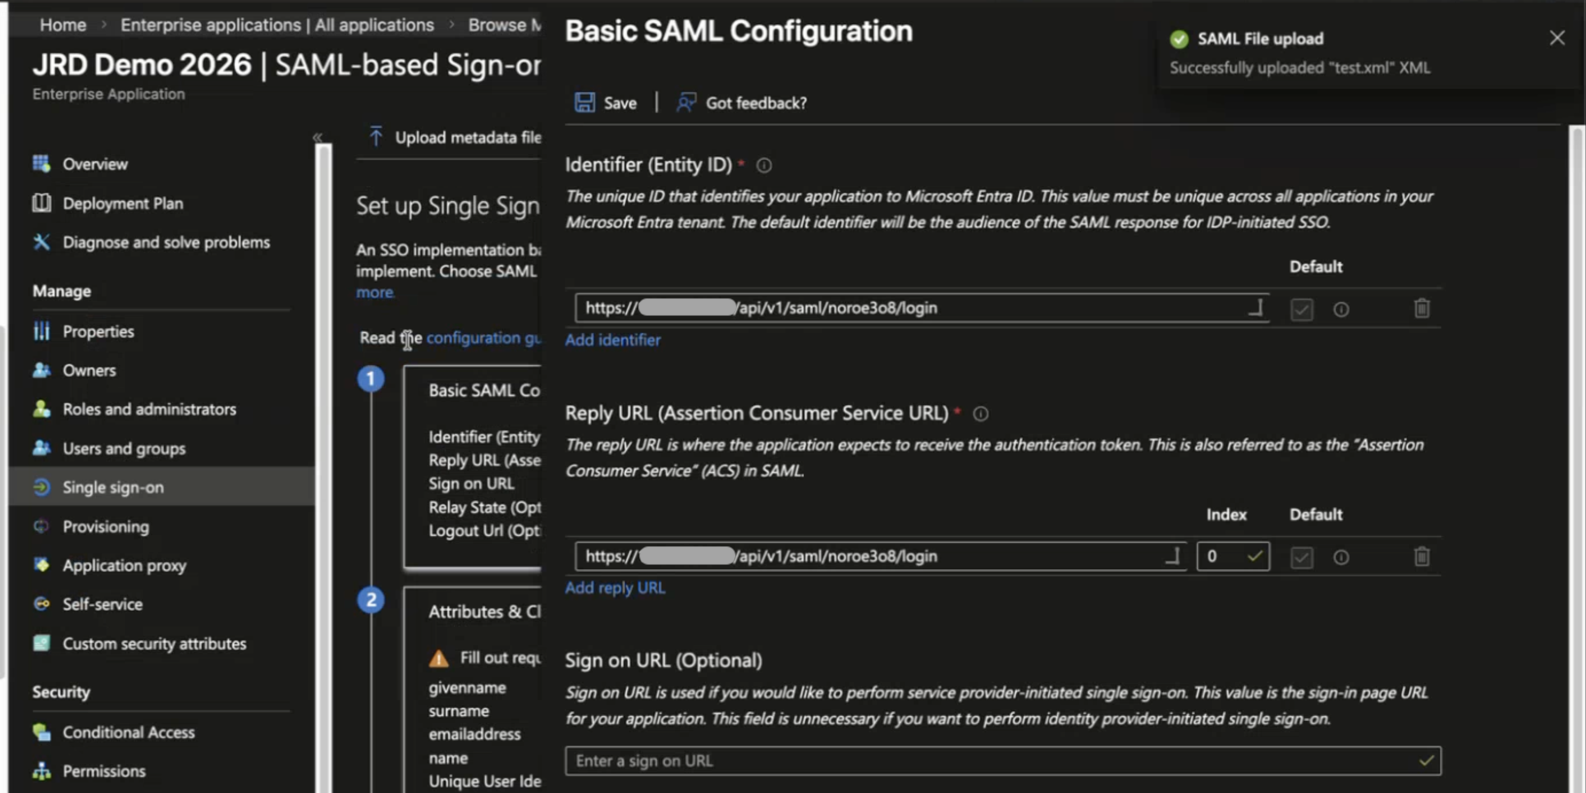
Above the Basic SAML Configuration section, click Upload metadata file.
- Browse to the Routing Director metadata file that you saved in your local storage and upload it.
- Verify that the Identifier (Entity ID) and Reply URL are
populated automatically. Figure 4: Configure Entity ID and Reply URL
- Save the configuration.
- Verify that all values match the Routing Director configuration.
Verify Basic SAML Configuration after the update. Ensure that the Service Provider Entity ID and ACS URL match the values configured in Routing Director.
SAML Signing Certificate
Configure the SAML certificate parameters:
- In the SAML Certificates section on the SAML-based Sign-on page, click Edit. The SAML Signing Certificate page is displayed.
- Click the Signing Option drop-down list and select Sign SAML response and assertion.
- Select the appropriate Signing Algorithm. The same algorithm must also be updated in the Routing Director configuration.
- Configure the Notification Email Address to
receive alerts about certificate expiry.Figure 5: Configure signing option, algorithm, and notification e-mail
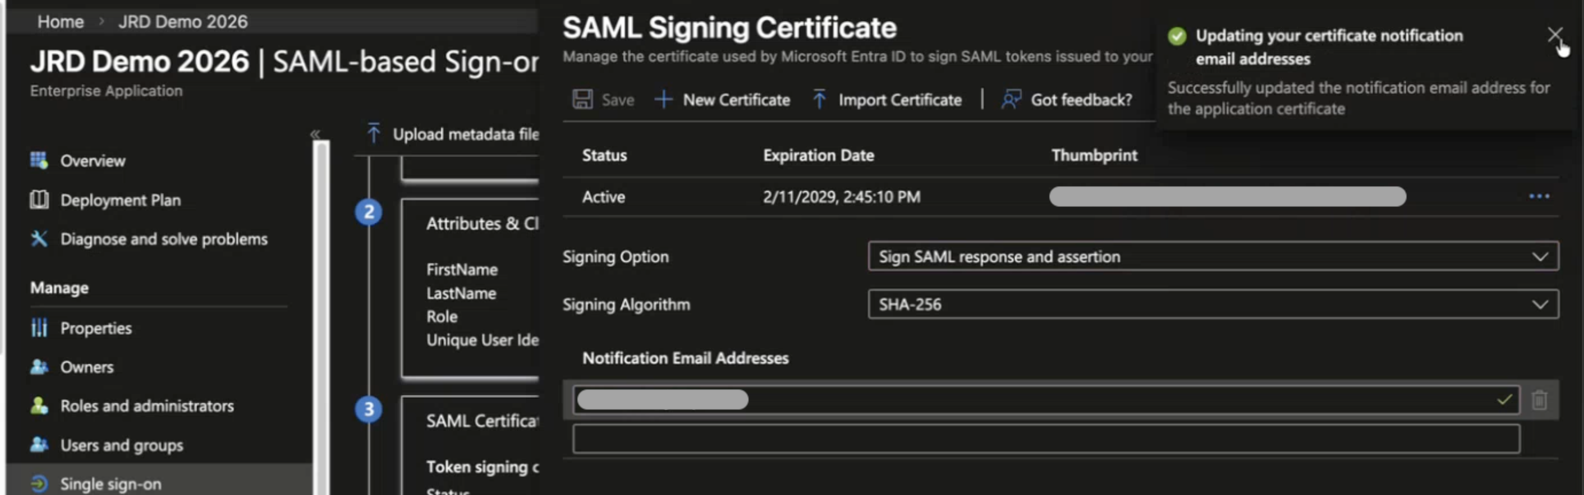
Save the configuration and verify the updates.
- Download the certificate in Base64 format. The certificate information
must be updated in Routing Director.Figure 6: Download Certificate (Base64)
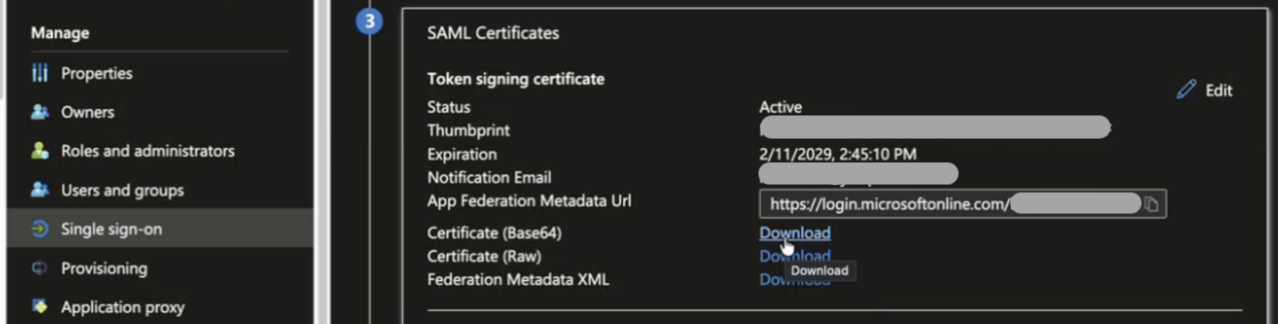
- Note down the following information:
- Microsoft Entra Identifier (Entity ID)
- Signing Algorithm
Location of the Certificate (Base64) file.
This information is required when configuring Routing Director as a SAML Service Provider.
Assign Users and Groups
- Click Users and groups from the left menu.
- Click Add user/group.
- Search for users and/or groups that require access to Routing Director
select the required users and groups.Figure 7: Add users and groups

- Verify the selected assignments. Figure 8: Verify users and groups
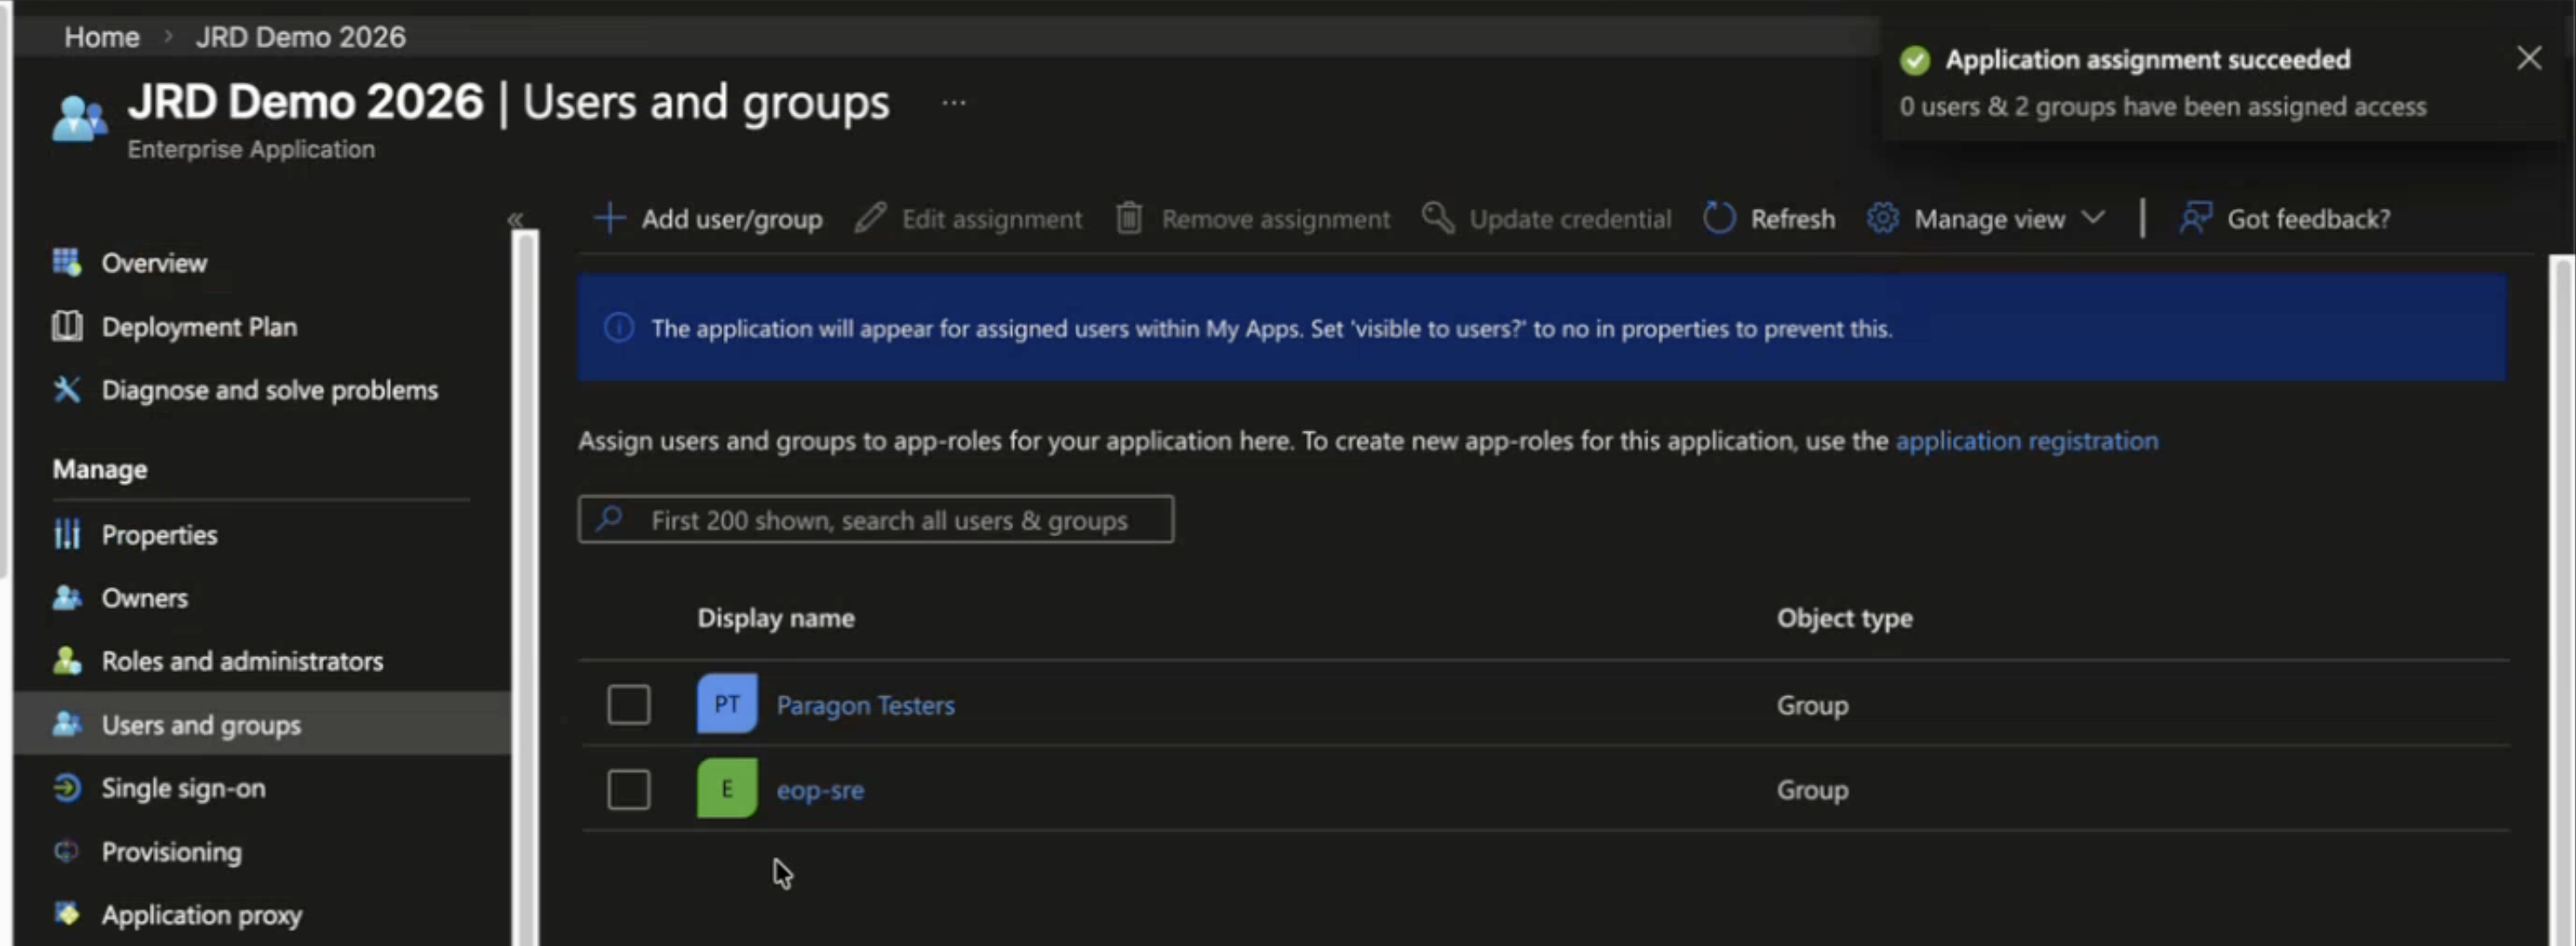
- Save the configuration.
Users who are not assigned to the Enterprise Application cannot authenticate through the application.
Configure Attributes and Claims
Routing Director requires a NameID and additional user attributes to create user sessions and apply role mappings.
Navigate to the created Enterprise Application, and click Single sign-on (see Figure 2). The Single sign-on page is displayed.
Select SAML as the sign-on method on the Single Sign-on page.
The SAML-based Sign-on page is displayed.
Confirm Default Claims
- Navigate to Attributes & Claims and click Edit. The Attributes & Claims page appears.
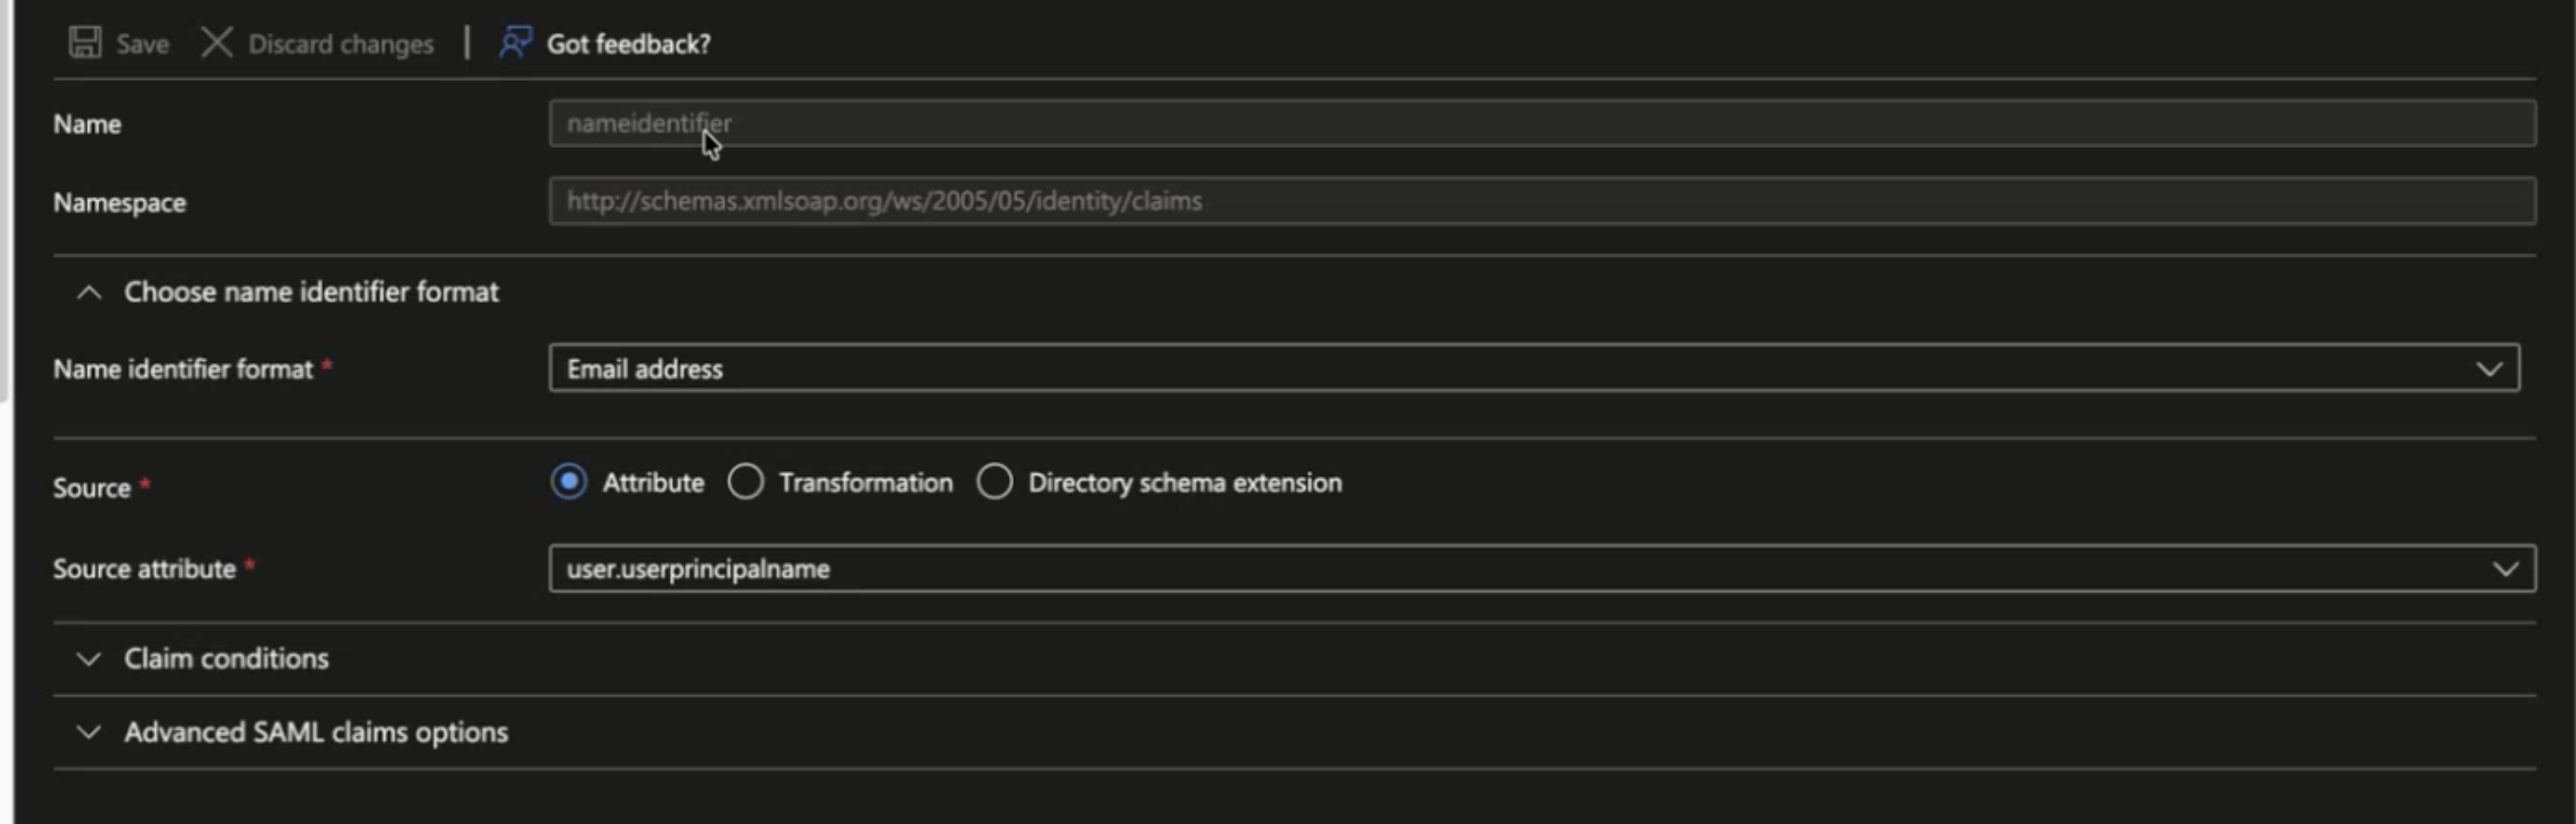
- Verify the existing claim configuration. Click the Unique
User Identifier (Name ID). Figure 9: Configure Unique User Identifier (Name ID)
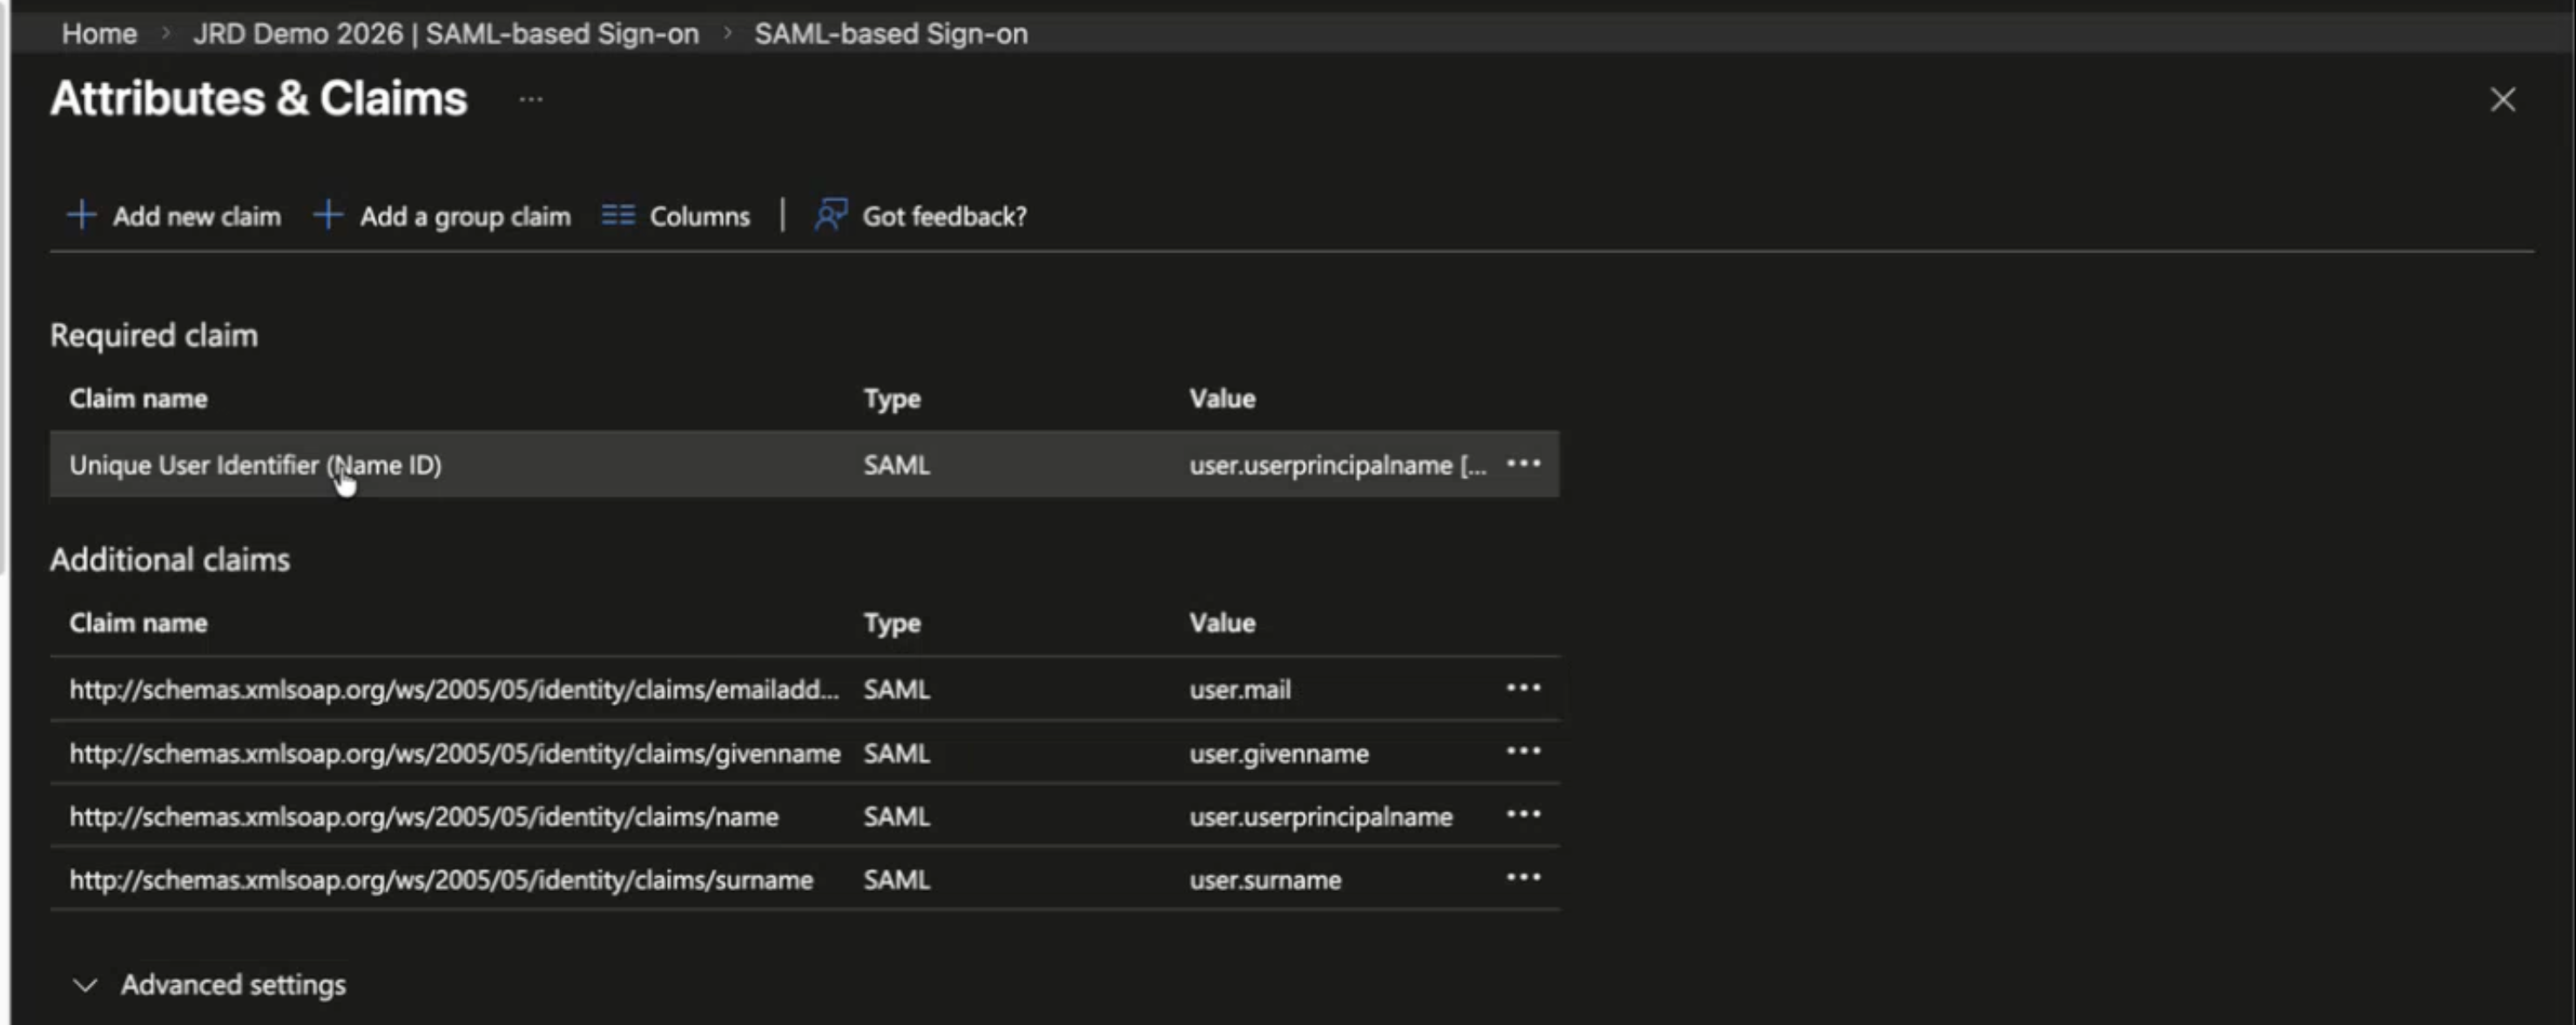
- Ensure that the Name identifier format is set to Email Address.
- Confirm that the Source attribute is
user.userprincipalname. Figure 10: Configure Source and Source attribute
- Remove all additional prepopulated default claims. Click the trashcan
icon next to a claim. Figure 11: Delete additional claims

- A deletion confirmation pop-up appears. Click OK to confirm the deletion of the additional claim. Repeat and delete all additional claims.
Confirm that only the required claim Unique User Identifier (Name ID) is configured.
Figure 12: Verify attributes and claims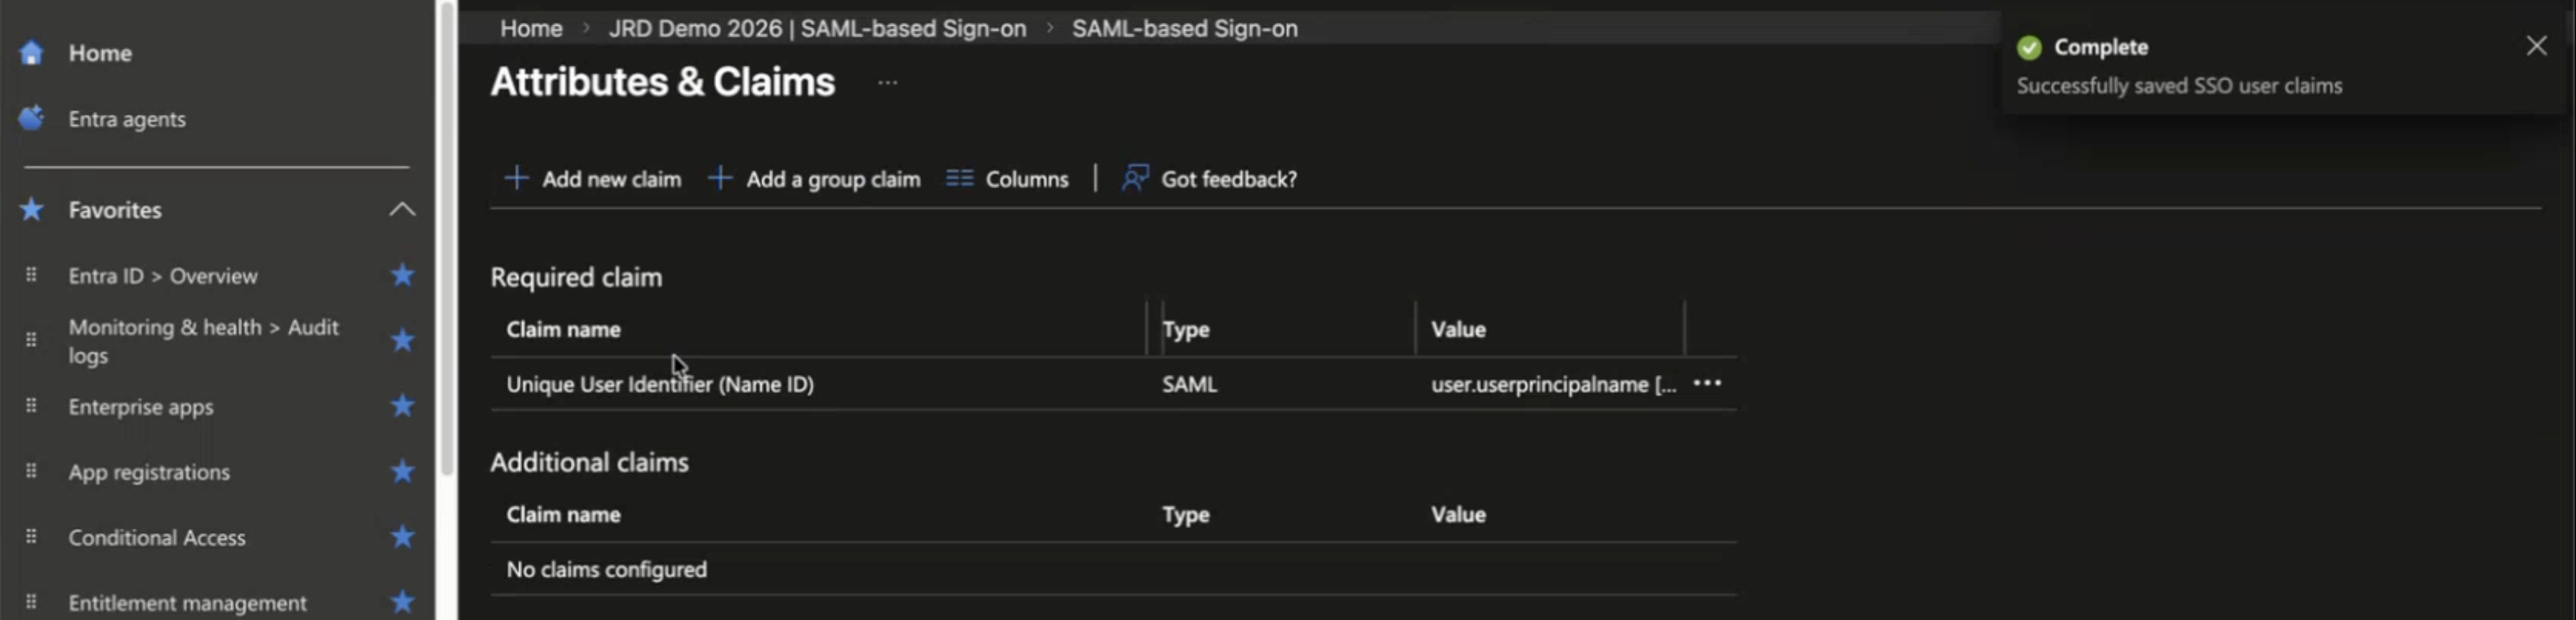
Configure FirstName and LastName Claims
- Click Add new claim at the top of the Attributes & Claims page. The Manage claim page is displayed.
- Configure the following values:
Table 1: Add FirstName Claim Field Value Name Enter FirstName. Source Select Attribute. Source Attribute Enter user.givenname. Figure 13: Add FirstName claim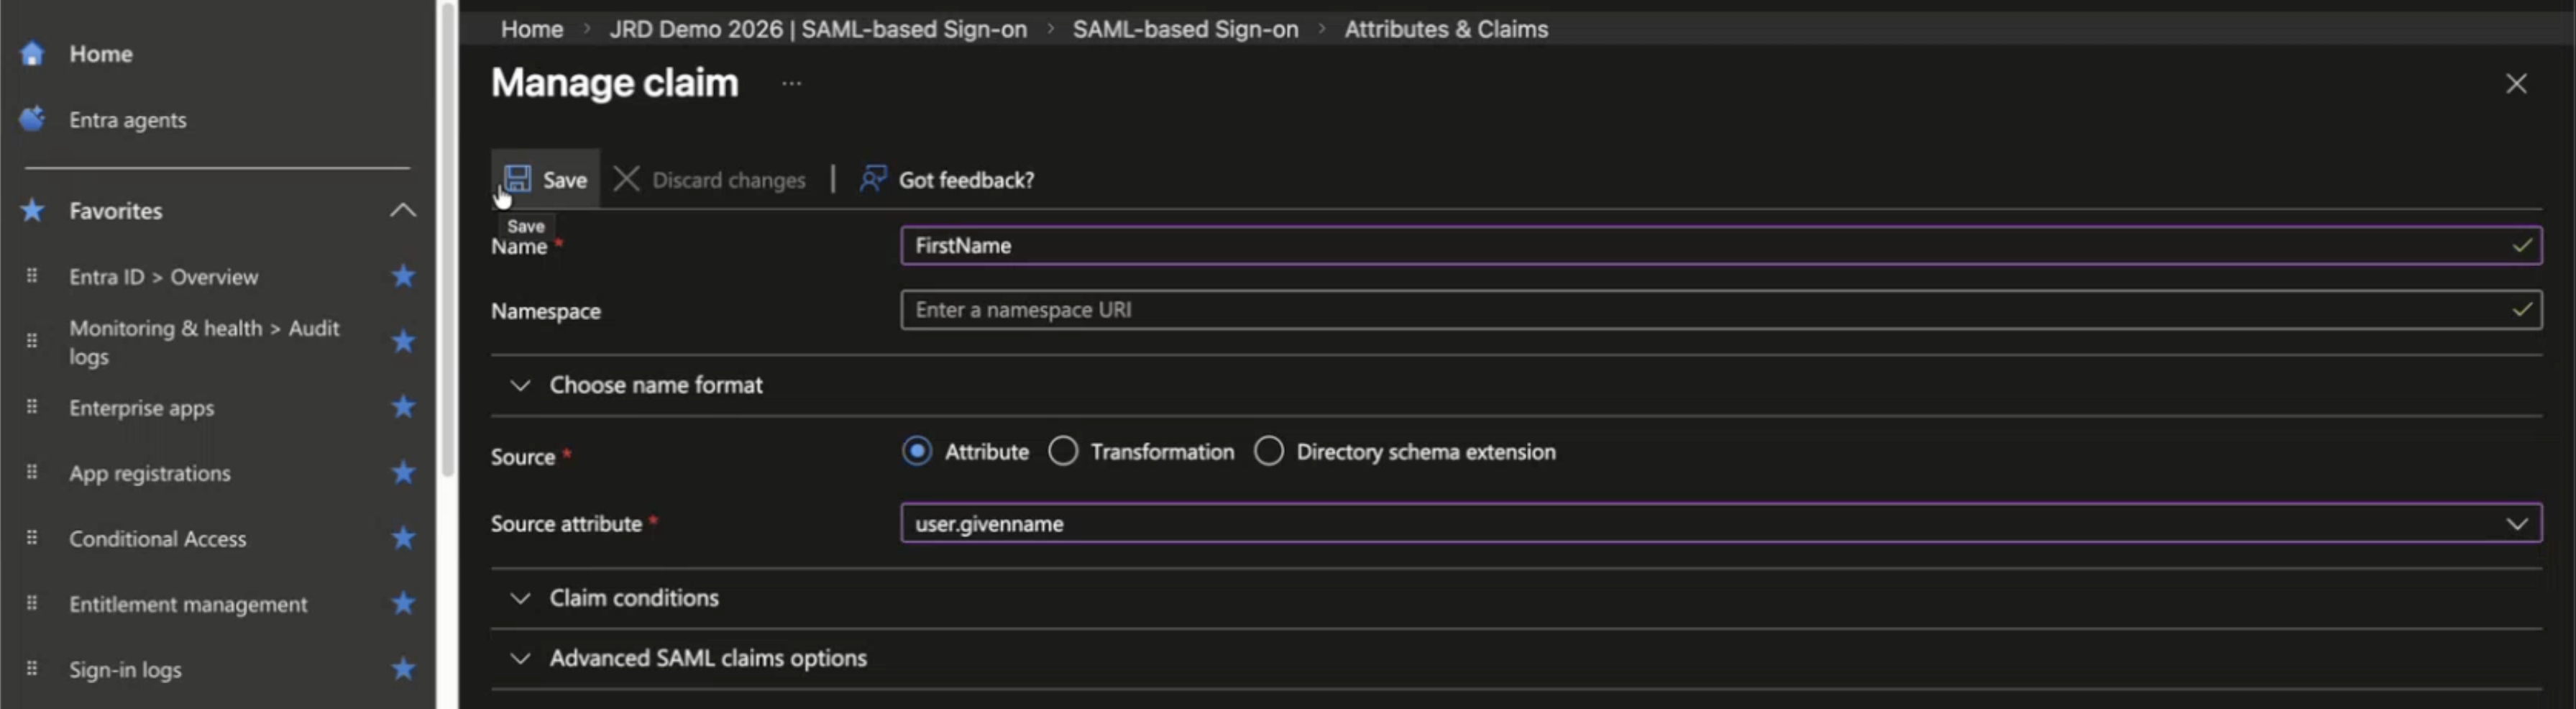
- Save the claim and confirm the configuration in the Additional claims list on the Attributes & Claims page.
- Click Add new claim at the top of the Attributes & Claims page. The Manage claim page is displayed.
- Configure the following values:
Table 2: Add LastName claim Field Value Name Enter LastName Source Select Attribute. Source Attribute Enter user.surname. - Save the claim and confirm the configuration in the Additional claims list on the Attributes & Claims page.
Configure the Role Claim
Use a Role claim to map Microsoft Entra ID groups to Routing Director roles.
- Click Add new claim at the top of the Attributes and Claims page. The Manage claim page is displayed.
- Configure the following values:
Table 3: Configure the Role claim Field Value Name Enter Role Source Select Attribute. Expand Claim Conditions. User type Select Members from the drop-down list. Scoped Groups Click Select Groups and search for and select the previously added group member. 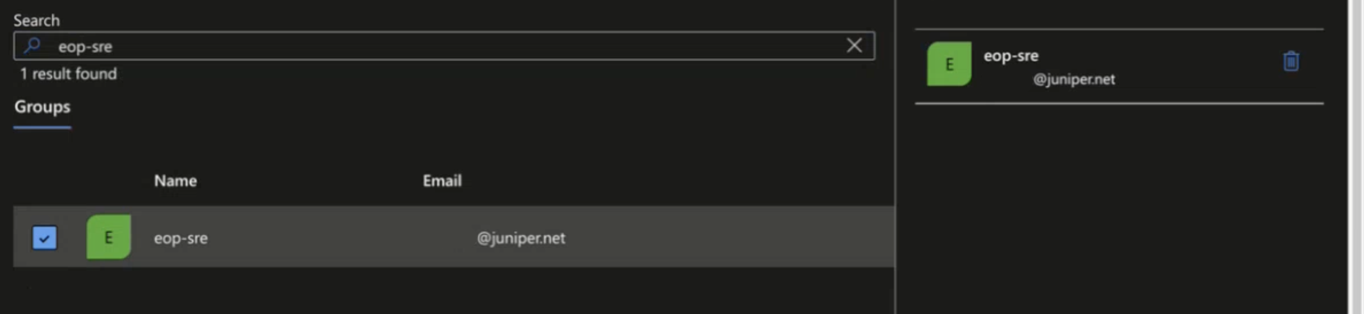
Source Select Attribute. Value Enter the role name defined in Routing Director which corresponds to the role of the group you just selected. Select the role name within quotes to add the text. 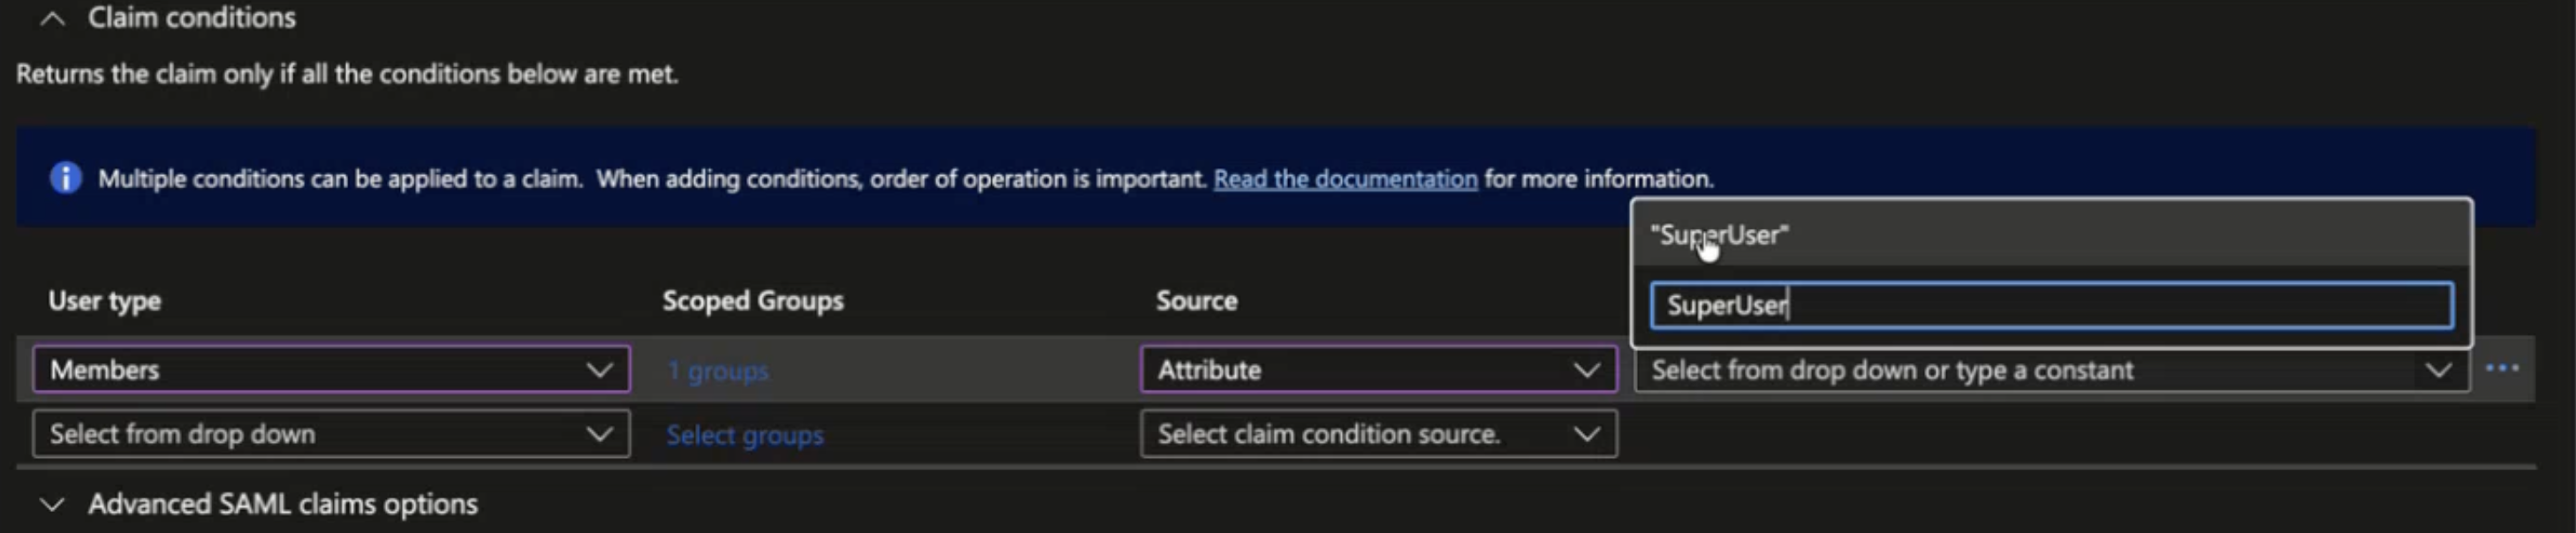
Repeat these steps for additional groups and role mappings. Add attribute values corresponding to those member groups. Ensure that the claim value exactly matches the Routing Director role name configured for SAML role mapping.
Save and verify the configuration.
Verify all the Attributes and Claims configuration.
Figure 14: Verify all attributes and claims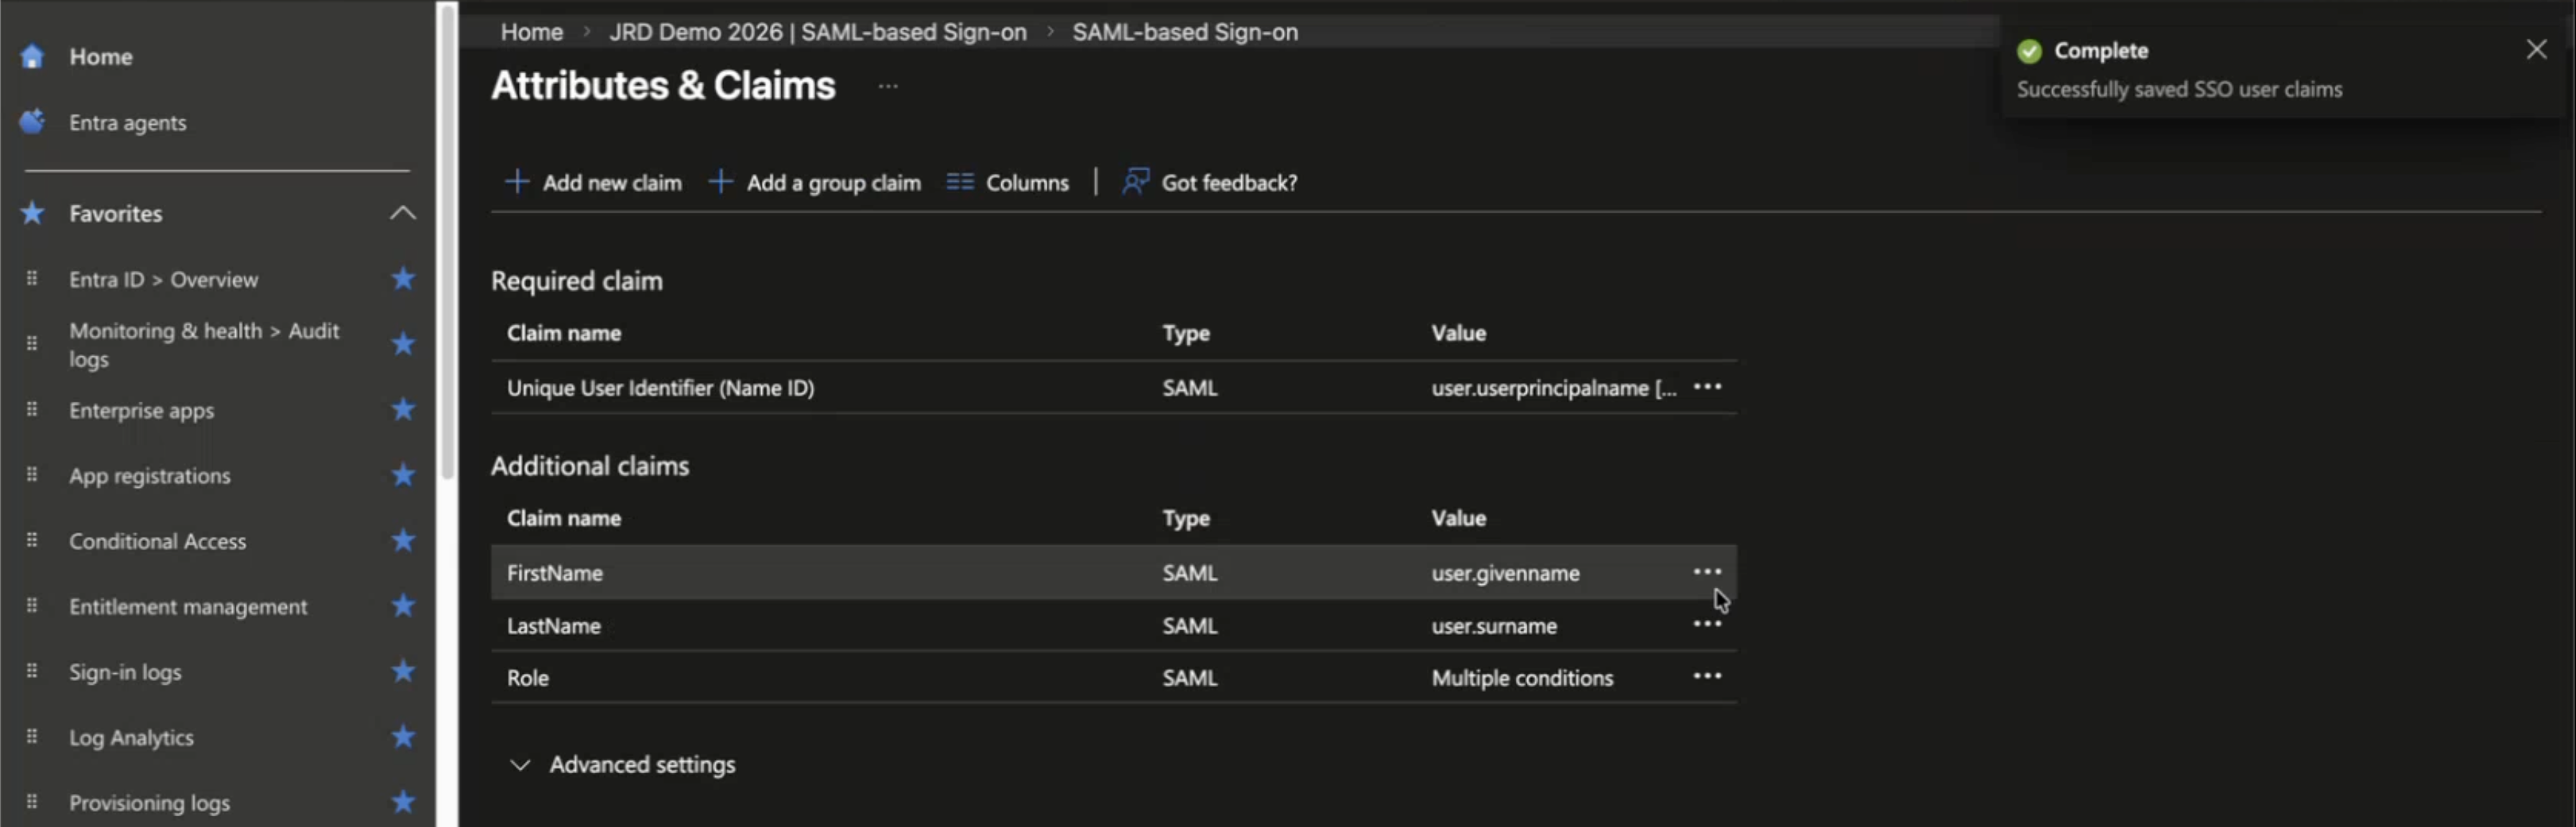
Click Close to exit out of the Attributes & Claims page.
Verify Enterprise Application Configuration
- Review the Attributes & Claims configuration.
- Review the Users and Groups assignments.
- Verify the NameID configuration.
- Confirm that FirstName, LastName, and Role claims are present.
- Note down the required URLs from the Set up
Enterprise-application-name section:
- Login URL
- Microsoft Entra Identifier
- (Optional) Logout URL
This information is required when configuring Routing Director as a SAML Service Provider.
Figure 15: Copy the required URLs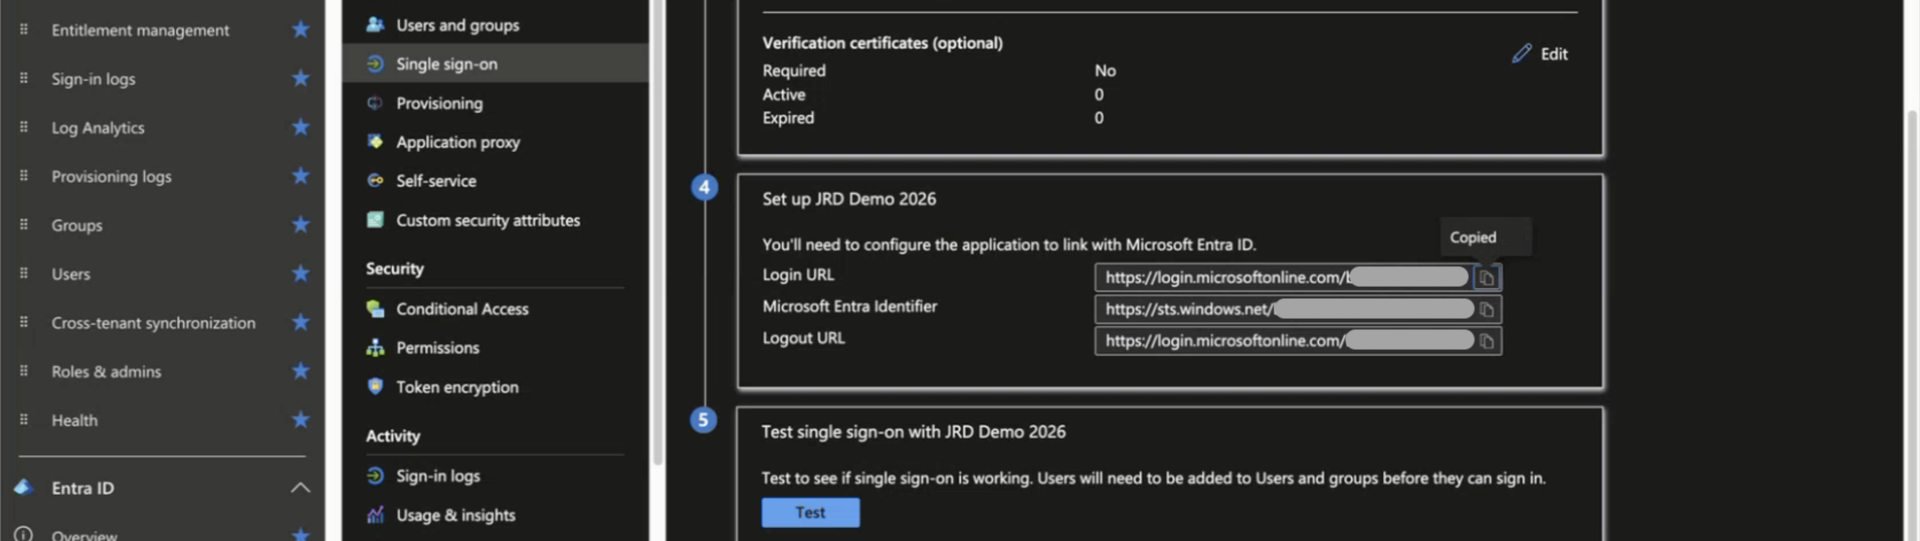
The Enterprise Application is now ready to be integrated with Routing Director.
Configure Routing Director SAML Identity Provider
- In Routing Director, navigate to Organization Settings > Identity Providers.
- Click Add New Identity Provider (IdP). The Create Identity Provider page is displayed.
- Configure the following required SAML settings using the values from the
Configure SAML Single Sign-On and Configure Attributes and Claims configuration:
Table 4: Fields on the Create Identity Provider page Field Value Name Enter a unique name for the Identity Provider. Type Select SAML. Issuer Enter the Microsoft Entra Identifier URL. Name ID Format Select the appropriate NameID format (email address is commonly used). Select E-mail. Signing Algorithm Select the signing algorithm that matches the Entra ID configuration. Certificate Copy and paste the content of the Base64-encoded signing certificate from Entra ID. SSO URL Enter the Entra Login URL. Custom Logout URL If your organization uses coordinated logout with Entra ID, enter the Entra Logout URL endpoint. Otherwise, leave this field blank. - Save the configuration to create the new IdP.