Configuring VPN on a Device Running Junos OS
This section describes sample configurations of an IPsec VPN on a Junos OS device using IKEv1 and IKEv2.
Configuring VPN on a Device Running Junos OS Overview
This section describes sample configurations of an IPsec VPN on a Junos OS device using the following IKE authentication methods:
-
Configuring an IPsec VPN with an RSA Signature for IKE Authentication
-
Configuring an IPsec VPN with an ECDSA Signature for IKE Authentication
Figure 1 illustrates the VPN topology used in all the examples described in this section. Here, H0 and H1 are the host PCs, R0 and R2 are the two endpoints of the IPsec VPN tunnel, and R1 is a router to route traffic between the two different networks.
The router R1 can be a Linux-based router, a Juniper Networks device, or any other vendor router.
There is a possibility of a VPN or IKE connection terminating unintentionally, i.e. without any peer issuing a command to terminate the connection. The TOE software monitors the status of each connection. If the connection is unintentionally terminated, the TOE shall generate a log entry of the termination and automatically attempt to re-establish the connection in accordance with the configured VPN policies.
The administrator may set the IKE lifetime in seconds. The IKE lifetime sets the lifetime of an IKE SA. When the IKE SA expires, it is replaced by a new SA (and SPI) or terminated. The default value IKE lifetime is 3600 seconds. To configure the IKE lifetime, include the lifetime-seconds statement and specify the number of seconds (180 through 86,400) at the [edit security ike proposal ike-proposal-name] hierarchy level:
[edit security ike proposal ike-proposal-name] lifetime-seconds seconds;
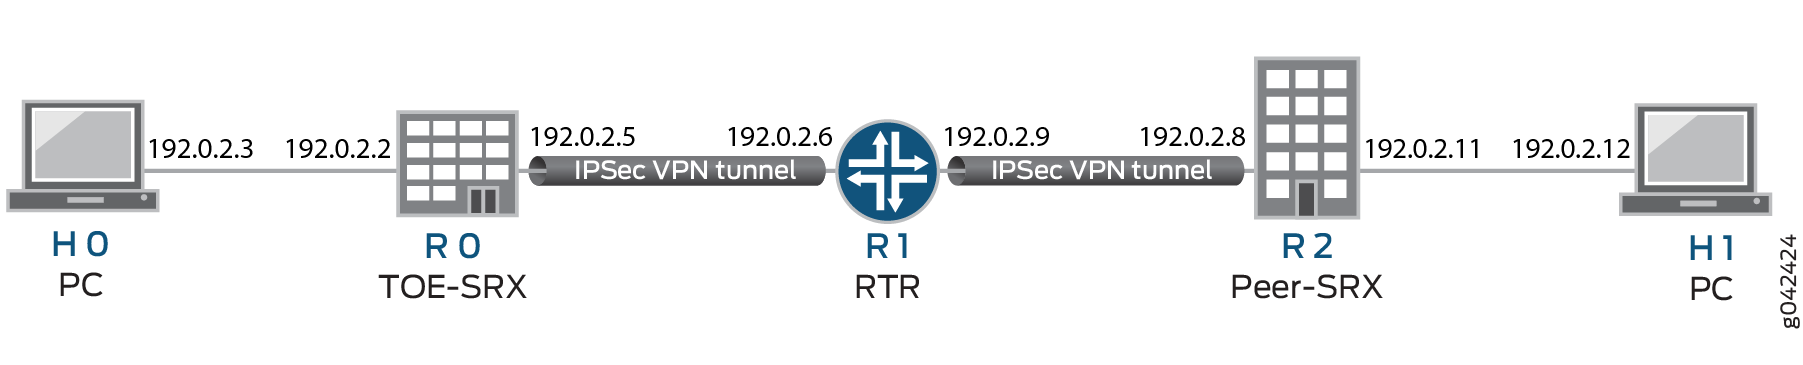
Table 1 The following provides a complete list of the supported IKE protocols, tunnel modes, Phase 1 negotiation mode, authentication method or algorithm, encryption algorithm, DH groups supported for the IKE authentication and encryption (Phase1, IKE Proposal), and for IPsec authentication and encryption (Phase2, IPsec Proposal). The listed protocols, modes, and algorithms are supported and required for 24.4R1 Common Criteria.
|
IKE Protocol |
Tunnel Mode |
Phase1 Negotiation Mode |
Phase 1 Proposal (P1, IKE) |
|||
|---|---|---|---|---|---|---|
|
Authentication Method |
Authentication Algorithm |
DH Group |
Encryption Algorithm |
|||
|
IKEv1 |
Main |
Route |
sha-256 |
group14 |
aes-128-cbc |
|
|
IKEv2 |
rsa-signatures-2048 |
sha-384 |
group19 |
aes-128-cbc |
||
|
ecdsa-signatures-256 |
group20 |
aes-128-gcm |
||||
|
ecdsa-signatures-384 |
aes-192-cbc |
|||||
|
aes-256-cbc |
||||||
|
aes-256-gcm |
||||||
|
IKE Protocol |
Tunnel Mode |
Phase1 Negotiation Mode |
Phase 2 Proposal (P2, IPsec) |
|||
|---|---|---|---|---|---|---|
|
Authentication Algorithm |
DH Group (PFS) |
Encryption Method |
Encryption Algorithm |
|||
|
IKEv1 |
Main |
Route |
hmac-sha256 |
group14 |
ESP |
|
|
IKEv2 |
group19 |
aes-128-cbc |
||||
|
aes-128-gcm |
||||||
|
aes-192-cbc |
||||||
|
aes-192-gcm |
||||||
|
aes-256-cbc |
||||||
|
aes-256-gcm |
||||||
The following sections provide sample configurations of IKEv1 IPsec VPN examples for selected
algorithms. Authentication and encryption algorithms can be replaced in the configurations to
accomplish the user’s desired configurations. Use set security ike gateway
<gw-name> version v2-only command for IKEv2 IPsec VPN.
The TOE does support the SAN extension for X.509 certificate reference identifier. The
reference identifier of the peer can be configured with the following command: set
security ike gateway remote-identity <identity_type>.
IKE Phase 1 Security Association lifetime must be configured to less than 24 hours. For the
rekeying of IKE Phase 1 Security Association to occur at an interval less than 24 hours, the
lifetime must be configured to 82800 seconds (i.e. 23 hours) or to a smaller value. Configuring
the IKE Phase 1 Security Association to 82800 seconds, i.e. forcing the rekeying every 23
hours, is done by the following command: set security ike proposal ike-proposal-name
lifetime-seconds 82800.
By default, the TOE uses the IP address of its external interface to the remote peer as its
IKE ID. This IKE ID can be overridden by configuring the local-identity statement at the
[edit security ike gateway gateway-name] hierarchy level. If you need to
configure the local-identity statement on an SRX Series Firewall, make sure that the configured
IKE ID matches the IKE ID expected by the remote peer.
The IPsec SA lifetime can be configured using the command lifetime-seconds seconds in the
[edit security ipsec proposal] hierarchy level. The lifetime of the SA can be
between 180 and 86,400 seconds.
- Configuring an IPsec VPN with an RSA Signature for IKE Authentication
- Configuring an IPsec VPN with an ECDSA Signature for IKE Authentication
Configuring an IPsec VPN with an RSA Signature for IKE Authentication
The following section provides an example to configure Junos OS devices for IPsec VPN using RSA Signature as IKE Authentication method, whereas, the algorithms used in IKE/IPsec authentication/encryption is as shown in the following table. In this section, you configure devices running Junos OS for IPsec VPN using an RSA signature as the IKE authentication method. The algorithms used in IKE or IPsec authentication or encryption is shown in Table 3.
|
IKE Protocol |
Tunnel Mode |
Phase1 Negotiation Mode |
Phase 1 Proposal (P1, IKE) |
|||
|---|---|---|---|---|---|---|
|
Authentication Method |
Authentication Algorithm |
DH Group |
Encryption Algorithm |
|||
|
IKEv1 |
Main |
Route |
rsa-signatures-2048 |
sha-256 |
group19 |
aes-128-cbc |
|
IKE Protocol |
Tunnel Mode |
Phase1 Negotiation Mode |
Phase 2 Proposal (P2, IPsec) |
|||
|---|---|---|---|---|---|---|
|
Authentication Algorithm |
DH Group (PFS) |
Encryption Method |
Encryption Algorithm |
|||
|
IKEv1 |
Main |
Route |
hmac-sha-256-128 |
group19 |
ESP |
aes-128-cbc |
Configuring IPsec VPN with RSA Signature as IKE Authentication on the Initiator or Responder
To configure the IPsec VPN with RSA signature IKE authentication on the initiator:
-
Configure the PKI. See Example: Configuring PKI.
-
Generate the RSA key pair using command request security pki generate-key-pair as below. For full details, see request security pki generate-key-pair (Security).
request security pki generate-key-pair type <algorithm> size <key_size> certificate-id <id>
-
Generate and load the CA certificate. See Example: Loading CA and Local Certificates Manually.
-
Load the CRL. See Example: Manually Loading a CRL onto the Device.
-
Generate and load a local certificate. See Example: Loading CA and Local Certificates Manually.
-
Configure the IKE proposal.
[edit security ike]
user@host# set proposal ike-proposal1 authentication-method rsa-signatures
user@host# set proposal ike-proposal1 dh-group group19
user@host# set proposal ike-proposal1 authentication-algorithm sha-256
user@host# set proposal ike-proposal1 encryption-algorithm aes-128-cbc
Note:Here,
ike-proposal1is the name given by the authorized administrator. -
Configure the IKE policy.
[edit security ike]
user@host# set policy ike-policy1 mode main
user@host# set policy ike-policy1 proposals ike-proposal1
user@host# set policy ike-policy1 certificate local-certificate cert1
Note:Here,
ike-policy1IKE policy name given by the authorized administrator. -
Configure the IPsec proposal.
[edit security ipsec]
user@host# set proposal ipsec-proposal1 protocol esp
user@host# set proposal ipsec-proposal1 authentication-algorithm hmac-sha-256-128
user@host# set proposal ipsec-proposal1 encryption-algorithm aes-128-cbc
Note:Here,
ipsec-proposal1is the name given by the authorized administrator. -
Configure the IPsec policy.
[edit security ipsec]
user@host# set policy ipsec-policy1 perfect-forward-secrecy keys group19
user@host# set policy ipsec-policy1 proposals ipsec-proposal1
Note:Here,
ipsec-policy1is the name given by the authorized administrator. -
Configure the IKE.
[edit security ike]
user@host# set gateway gw1 ike-policy ike-policy1
user@host# set gateway gw1 address 192.0.2.8
user@host# set gateway gw1 local-identity inet 192.0.2.5
user@host# set gateway gw1 external-interface fe-0/0/1
Note:Here,
192.0.2.8is the peer VPN endpoint IP,192.0.2.5is the local VPN endpoint IP, andfe-0/0/1is the local outbound interface as VPN endpoint. The following configuration is also needed for IKEv2.[edit security ike] user@host# set gateway gw1 version v2-only
-
Configure VPN.
[edit security ipsec]
user@host# set vpn vpn1 ike gateway gw1
user@host# set vpn vpn1 ike ipsec-policy ipsec-policy1
user@host# set vpn vpn1 bind-interface st0.0
Note:Here,
vpn1is the VPN tunnel name given by the authorized administrator.[edit] user@host# set routing-options static route 192.0.2.10/24 qualified-next-hop st0.0 preference 1
-
Configure the outbound flow policies.
[edit security policies]
user@host# set from-zone trustZone to-zone untrustZone policy policy1 match source-address trustLan
user@host# set from-zone trustZone to-zone untrustZone policy policy1 match destination-address untrustLan
user@host# set from-zone trustZone to-zone untrustZone policy policy1 match application any
user@host# set from-zone trustZone to-zone untrustZone policy policy1 then permit
user@host# set from-zone trustZone to-zone untrustZone policy policy1 then log session-init
user@host# set from-zone trustZone to-zone untrustZone policy policy1 then log session-close
Note:Here,
trustZoneanduntrustZoneare preconfigured security zone andtrustLananduntrustLanare preconfigured network addresses. -
Configure the inbound flow policies.
[edit security policies]
user@host# set from-zone untrustZone to-zone trustZone policy policy1 match source-address untrustLan
user@host# set from-zone untrustZone to-zone trustZone policy policy1 match destination-address trustLan
user@host# set from-zone untrustZone to-zone trustZone policy policy1 match application any
user@host# set from-zone untrustZone to-zone trustZone policy policy1 then permit
user@host# set from-zone untrustZone to-zone trustZone policy policy1 then log session-init
user@host# set from-zone untrustZone to-zone trustZone policy policy1 then log session-close
Note:Here,
trustZoneanduntrustZoneare preconfigured security zones andtrustLananduntrustLanare preconfigured network addresses. -
Commit the configuration.
[edit]
user@host# commit
Configuring an IPsec VPN with an ECDSA Signature for IKE Authentication
In this section, you configure devices running Junos OS for IPsec VPN using an ECDSA signature as the IKE authentication method. The algorithms used in IKE or IPsec authentication or encryption are shown in Table 4.
|
IKE Protocol |
Tunnel Mode |
Phase1 Negotiation Mode |
Phase 1 Proposal (P1, IKE) |
|||
|---|---|---|---|---|---|---|
|
Authentication Method |
Authentication Algorithm |
DH Group |
Encryption Algorithm |
|||
|
IKEv1 |
Main |
Route |
ecdsa-signatures-256 |
sha-384 |
group14 |
aes-256-cbc |
|
IKE Protocol |
Tunnel Mode |
Phase1 Negotiation Mode |
Phase 2 Proposal (P2, IPsec) |
|||
|---|---|---|---|---|---|---|
|
Authentication Algorithm |
DH Group (PFS) |
Encryption Method |
Encryption Algorithm |
|||
|
IKEv1 |
Main |
Route |
No Algorithm |
group14 |
ESP |
aes-256-gcm |
- Configuring IPsec VPN with ECDSA signature IKE authentication on the Initiator
- Configuring IPsec VPN with ECDSA signature IKE authentication on the Responder
Configuring IPsec VPN with ECDSA signature IKE authentication on the Initiator
To configure the IPsec VPN with ECDSA signature IKE authentication on the initiator:
-
Configure the PKI. See Example: Configuring PKI.
-
Generate the RSA key pair using command request security pki generate-key-pair as below. For full details, see request security pki generate-key-pair (Security).
request security pki generate-key-pair type size <key_size> certificate-id
-
Generate and load the CA certificate. See Example: Loading CA and Local Certificates Manually.
-
Load the CRL. See Example: Manually Loading a CRL onto the Device.
-
Generate and load a local certificate. See Example: Loading CA and Local Certificates Manually.
-
Configure the IKE proposal.
[edit security ike]
user@host# set proposal ike-proposal1 authentication-method ecdsa-signatures-256
user@host# set proposal ike-proposal1 dh-group group14
user@host# set proposal ike-proposal1 authentication-algorithm sha-384
user@host# set proposal ike-proposal1 encryption-algorithm aes-256-cbc
Note:Here,
ike-proposal1is the IKE proposal name given by the authorized administrator. -
Configure the IKE policy.
[edit security ike]
user@host# set policy ike-policy1 mode main
user@host# set policy ike-policy1 proposals ike-proposal1
user@host# set policy ike-policy1 certificate local-certificate cert1
-
Configure the IPsec proposal.
[edit security ipsec]
user@host# set proposal ipsec-proposal1 protocol esp
user@host# set proposal ipsec-proposal1 encryption-algorithm aes-256-gcm
Note:Here,
ipsec-proposal1is the IPsec proposal name given by the authorized administrator. -
Configure the IPsec policy.
[edit security ipsec]
user@host# set policy ipsec-policy1 perfect-forward-secrecy keys group14
user@host# set policy ipsec-policy1 proposals ipsec-proposal1
Note:Here,
ipsec-policy1is the IPsec policy name andipsec-proposal1is the IPsec proposal name given by the authorized administrator. -
Configure IKE.
[edit security ike]
user@host# set gateway gw1 ike-policy ike-policy1
user@host# set gateway gw1 address 192.0.2.8
user@host# set gateway gw1 local-identity inet 192.0.2.5
user@host# set gateway gw1 external-interface ge-0/0/2
Note:Here,
gw1is an IKE gateway name,192.0.2.8is the peer VPN endpoint IP,192.0.2.5is the local VPN endpoint IP, andge-0/0/2is a local outbound interface as the VPN endpoint. The following configuration is also needed for IKEv2.[edit security ike] user@host# set gateway gw1 version v2-only
-
Configure the VPN.
[edit]
user@host# set security ipsec vpn vpn1 ike gateway gw1
user@host# set security ipsec vpn vpn1 ike ipsec-policy ipsec-policy1
user@host# set security ipsec vpn vpn1 bind-interface st0.0
user@host# set routing-options static route 192.0.2.10/24 qualified-next-hop st0.0 preference 1
Note:Here,
vpn1is the VPN tunnel name given by the authorized administrator. -
Configure the outbound flow policies.
[edit security policies]
user@host# set from-zone trustZone to-zone untrustZone policy policy1 match source-address trustLan
user@host# set from-zone trustZone to-zone untrustZone policy policy1 match destination-address untrustLan
user@host# set from-zone trustZone to-zone untrustZone policy policy1 match application any
user@host# set from-zone trustZone to-zone untrustZone policy policy1 then permit
user@host# set from-zone trustZone to-zone untrustZone policy policy1 then log session-init
user@host# set from-zone trustZone to-zone untrustZone policy policy1 then log session-close
Note:Here,
trustZoneanduntrustZoneare preconfigured security zones andtrustLananduntrustLanare preconfigured network addresses. -
Configure the inbound flow policies.
[edit security policies]
user@host# set from-zone untrustZone to-zone trustZone policy policy1 match source-address untrustLan
user@host# set from-zone untrustZone to-zone trustZone policy policy1 match destination-address trustLan
user@host# set from-zone untrustZone to-zone trustZone policy policy1 match application any
user@host# set from-zone untrustZone to-zone trustZone policy policy1 then permit
user@host# set from-zone untrustZone to-zone trustZone policy policy1 then log session-init
user@host# set from-zone untrustZone to-zone trustZone policy policy1 then log session-close
Note:Here,
trustZoneanduntrustZoneare preconfigured security zones andtrustLananduntrustLanare preconfigured network addresses. -
Commit your configuration.
user@host# commit
Configuring IPsec VPN with ECDSA signature IKE authentication on the Responder
To configure IPsec VPN with ECDSA signature IKE authentication on the responder:
-
Configure the PKI. See Example: Configuring PKI.
-
Generate the ECDSA key pair using command request security pki generate-key-pair as below. For full details, see request security pki generate-key-pair (Security).
request security pki generate-key-pair type size <key_size> certificate-id
-
Generate and load the CA certificate. See Example: Loading CA and Local Certificates Manually.
-
Load the CRL. See Example: Manually Loading a CRL onto the Device .
-
Configure the IKE proposal.
[edit security ike]
user@host# set proposal ike-proposal1 authentication-method ecdsa-signatures-256
user@host# set proposal ike-proposal1 dh-group group14
user@host# set proposal ike-proposal1 authentication-algorithm sha-384
user@host# set proposal ike-proposal1 encryption-algorithm aes-256-cbc
Note:Here,
ike-proposal1is the IKE proposal name given by the authorized administrator. -
Configure the IKE policy.
[edit security ike]
user@host# set policy ike-policy1 mode main
user@host# set policy ike-policy1 proposals ike-proposal1
user@host# set policy ike-policy1 certificate local-certificate cert1
-
Configure the IPsec proposal.
[edit security ipsec]
user@host# set proposal ipsec-proposal1 protocol esp
user@host# set proposal ipsec-proposal1 encryption-algorithm aes-256-gcm
Note:Here,
ipsec-proposal1is the IPsec proposal name given by the authorized administrator. -
Configure the IPsec policy.
[edit security ipsec]
user@host# set policy ipsec-policy1 perfect-forward-secrecy keys group14
user@host# set policy ipsec-policy1 proposals ipsec-proposal1
Note:Here,
ipsec-policy1is the IPsec policy name andipsec-proposal1is the IPsec proposal name given by the authorized administrator. -
Configure the IKE.
[edit security ike]
user@host# set gateway gw1 ike-policy ike-policy1
user@host# set gateway gw1 address 192.0.2.5
user@host# set gateway gw1 local-identity inet 192.0.2.8
user@host# set gateway gw1 external-interface ge-0/0/1
Note:Here,
gw1is an IKE gateway name,192.0.2.5is the peer VPN endpoint IP,192.0.2.8is the local VPN endpoint IP, andge-0/0/1is a local outbound interface as the VPN endpoint. The following configuration is also needed for IKEv2.[edit security ike] user@host# set gateway gw1 version v2-only
-
Configure the VPN.
[edit]
user@host# set security ipsec vpn vpn1 ike gateway gw1
user@host# set security ipsec vpn vpn1 ike ipsec-policy ipsec-policy1
user@host# set security ipsec vpn vpn1 bind-interface st0.0
user@host# set routing-options static route 192.0.2.1/24 qualified-next-hop st0.0 preference 1
Note:Here,
vpn1is the VPN tunnel name given by the authorized administrator. -
Configure the outbound flow policies.
[edit security policies]
user@host# set from-zone trustZone to-zone untrustZone policy policy1 match source-address trustLan
user@host# set from-zone trustZone to-zone untrustZone policy policy1 match destination-address untrustLan
user@host# set from-zone trustZone to-zone untrustZone policy policy1 match application any
user@host# set from-zone trustZone to-zone untrustZone policy policy1 then permit
user@host# set from-zone trustZone to-zone untrustZone policy policy1 then log session-init
user@host# set from-zone trustZone to-zone untrustZone policy policy1 then log session-close
Note:Here,
trustZoneanduntrustZoneare preconfigured security zones andtrustLananduntrustLanare preconfigured network addresses. -
Configure the inbound flow policies.
[edit security policies]
user@host# set from-zone untrustZone to-zone trustZone policy policy1 match source-address untrustLan
user@host# set from-zone untrustZone to-zone trustZone policy policy1 match destination-address trustLan
user@host# set from-zone untrustZone to-zone trustZone policy policy1 match application any
user@host# set from-zone untrustZone to-zone trustZone policy policy1 then permit
user@host# set from-zone untrustZone to-zone trustZone policy policy1 then log session-init
user@host# set from-zone untrustZone to-zone trustZone policy policy1 then log session-close
Note:Here,
trustZoneanduntrustZoneare preconfigured security zones andtrustLananduntrustLanare preconfigured network addresses. -
Commit your configuration.
user@host# commit