Update System ID Assignment (Freeform)

You can change Freeform system ID (serial number) assignments from the Topology or Systems view.

Update One System ID Assignment (from Topology)

  1. From the blueprint, navigate to Staged > Physical > Topology and click Edit to open the topology editor.
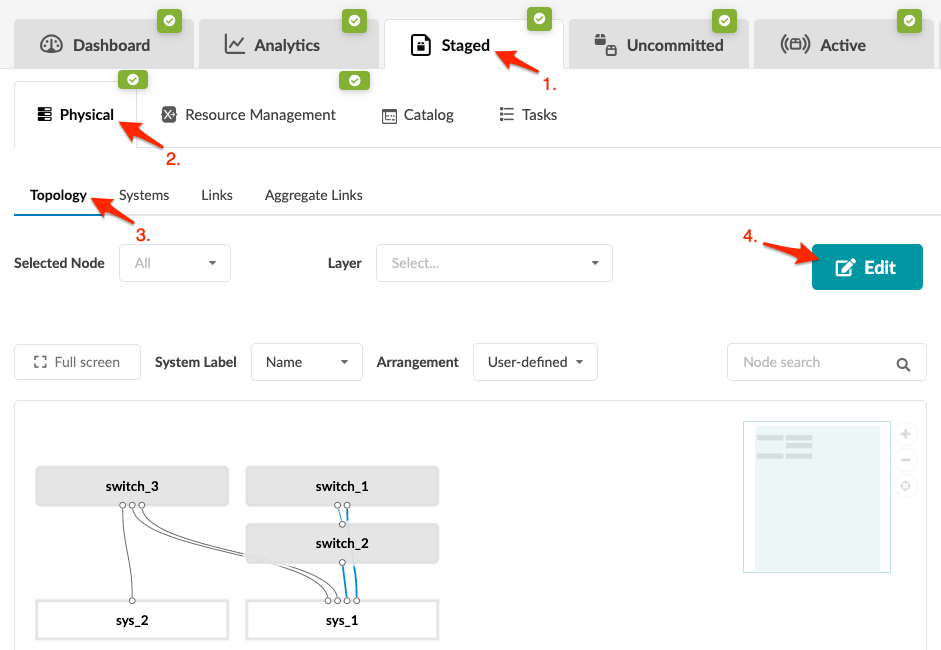
    Staged network topology view with active Physical and Topology sections, allowing edits to connections between switches and systems.
    CAUTION:

    Be careful. If you click away from the topology editor after making changes without clicking Save, your changes are discarded.

  2. In the topology editor, click the system to change, then click the Manage selected nodes properties button that becomes available. (You can also open the same dialog by clicking the settings button for the selected system. It's the gear at the top-right of the system.)
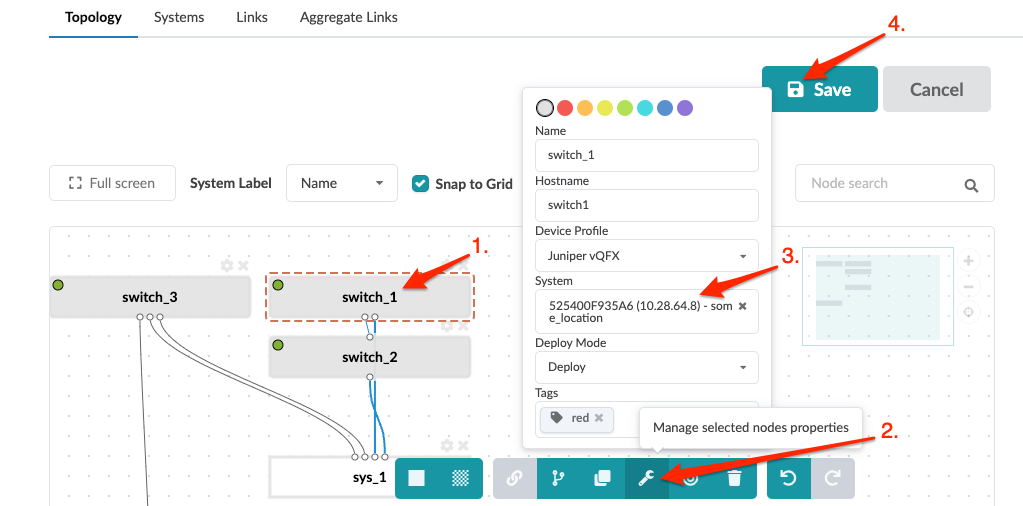
    Network topology interface showing nodes switch_1, switch_2, switch_3, sys_1, with connections. Node Properties Panel open for switch_1. Save and Cancel buttons visible.
  3. Select the new system ID from the System drop-down list, or click x to remove an existing assignment.

    The list includes managed devices that haven't been assigned yet. If you have your devices ready and they're not appearing in this list, you still need to bring them under HPE Networking Apstra Data Center Director management by adding them to Managed Devices.

  4. To close the dialog, click anywhere on the canvas outside of the dialog.
  5. Click Save to stage your changes, exit the topology editor and return to the Topology view. (If you leave the page without saving, your changes are discarded.)
    If you've removed an assignment, the device is still under Apstra management. It's ready and available to be assigned to any blueprint. To remove the device completely from Apstra management, remove the device from Managed Devices.
When you're ready to activate your changes, commit them from the Uncommitted tab.

Update One or More System ID Assignments (from Topology)

  1. From the blueprint, navigate to Staged > Physical > Topology and click Edit to open the topology editor.
    Staged network topology view with active Physical and Topology sections, allowing edits to connections between switches and systems.
    CAUTION:

    Be careful. If you click away from the topology editor after making changes without clicking Save, your changes are discarded.

  2. Select the systems to update, then click the Batch assign systems to selected nodes button that becomes available.
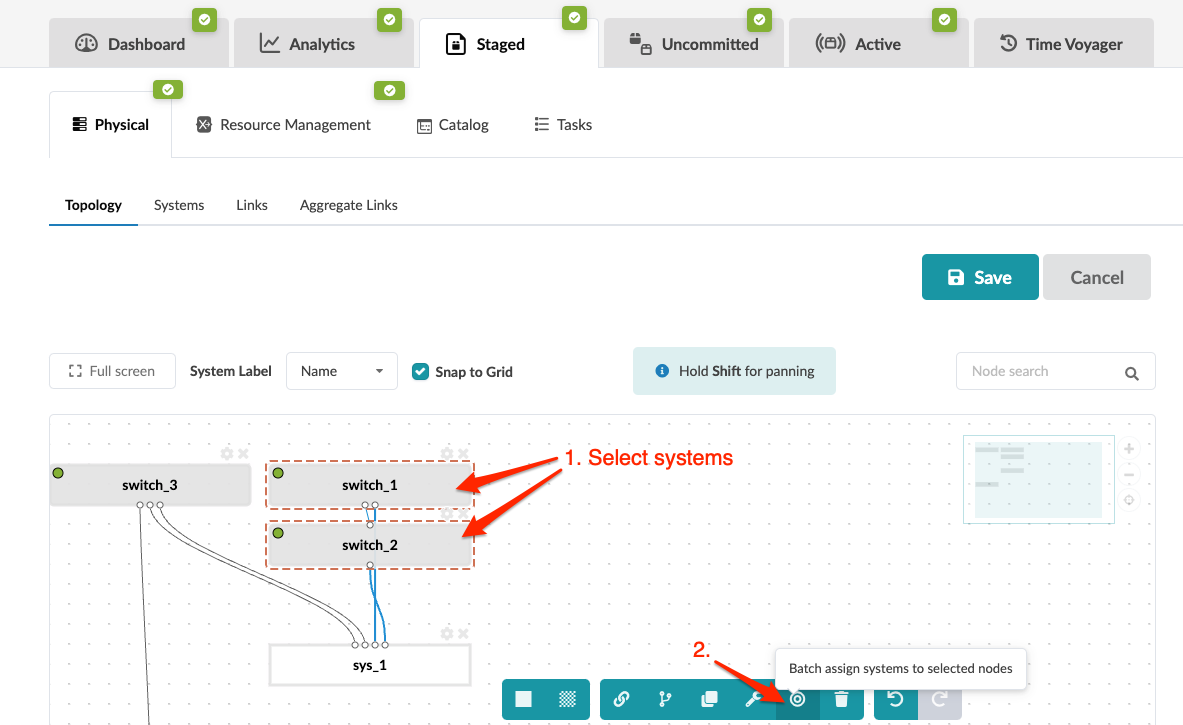
    Network topology interface showing selected switch_1 and switch_2 with batch assign systems button highlighted.
  3. Select system IDs from the System drop-down lists, or click the x to remove an existing assignment..

    The list includes managed devices that haven't been assigned yet. If you have your devices ready and they're not appearing in this list, you still need to bring them under Apstra management by adding them to Managed Devices.
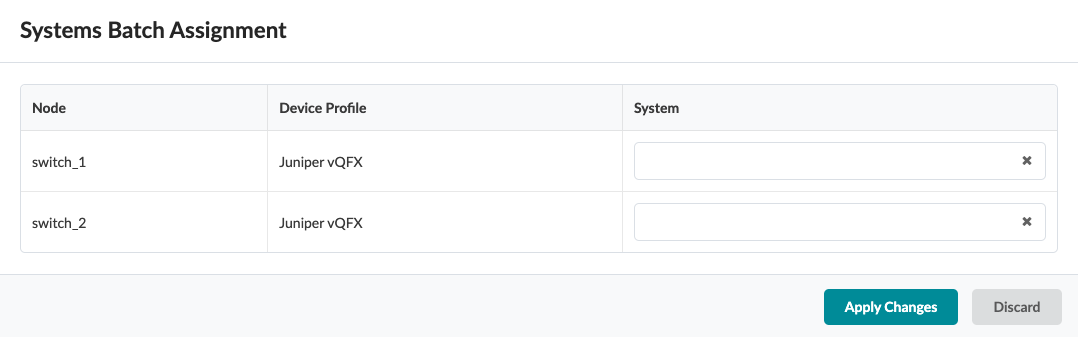
    User interface for Systems Batch Assignment tool with nodes switch_1 and switch_2, Juniper vQFX profiles, and Apply Changes and Discard buttons.
  4. Click Apply Changes to apply the changes or, if you decide not to keep the changes, click Discard.
    If you've removed an assignment, the device is still under Apstra DC Director management. It's ready and available to be assigned to any blueprint. To remove the device completely from Apstra DC Director management, remove the device from Managed Devices.
When you're ready to activate your changes, commit them from the Uncommitted tab.

Update One System ID Assignment (from Systems)

  1. From the blueprint, navigate to Staged > Physical > Systems and click the system name to go to details for that system.
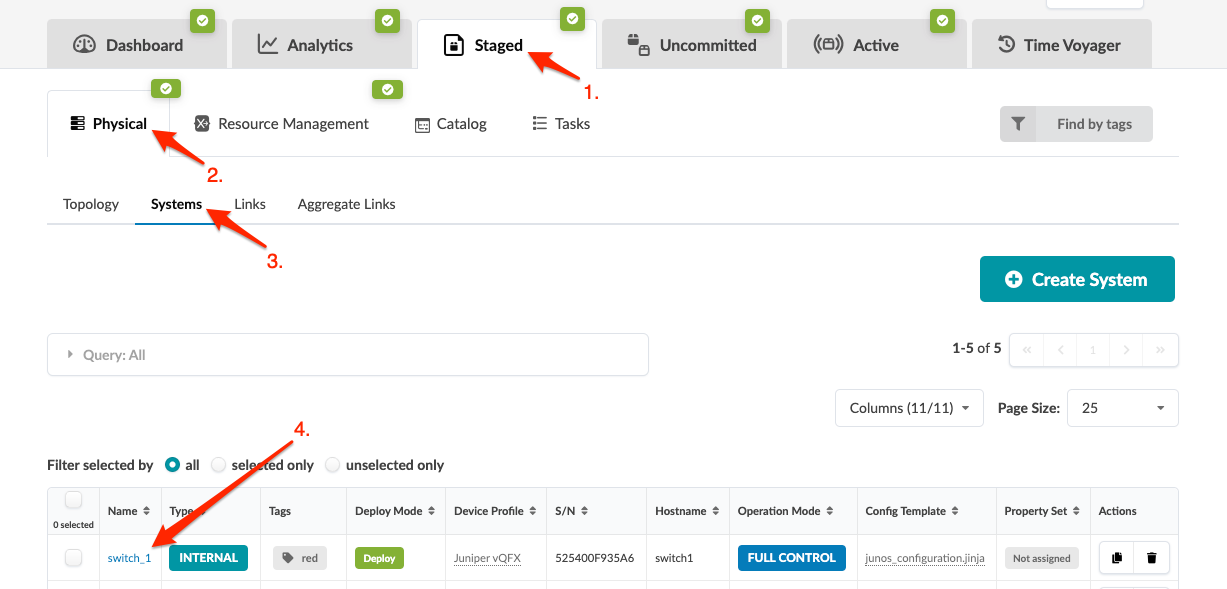
    Network management tool interface showing "Staged" tab in "Physical" section with "Systems" tab selected. Displays system details for "switch_1" with attributes like Type INTERNAL, Tags red, Deploy Mode Deploy, and Device Profile Juniper vQFX. Options to edit or delete system are available.
    Note:

    You can also get to the Systems details page from the Topology view. From the blueprint, navigate to Staged > Physical > Topology and select the system to update.

  2. In the panel on the right, in the Devices tab, click the Edit button for the S/N field.
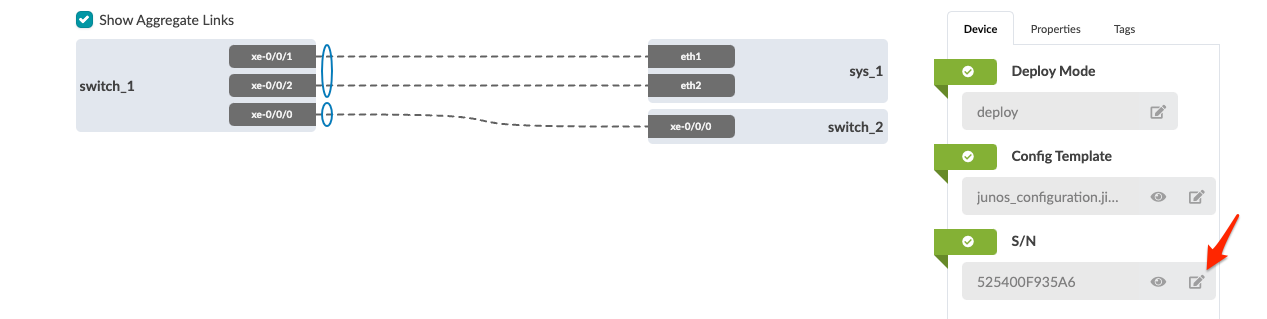
    Network topology diagram with switch_1 connected to sys_1 via eth1 and eth2, and to switch_2 via xe-0/0/0. Dashed lines show connections. Configuration panel shows deploy mode, junos_configuration.ji... template, and serial number 525400F935A6 with editable icon. Aggregate links checkbox is checked.
  3. Select the new system ID from the System drop-down list, or click the red box to remove an existing assignment.

    The list includes managed devices that haven't been assigned yet. If you have your devices ready and they're not appearing in this list, you still need to bring them under Apstra DC Director management by adding them to Managed Devices.

  4. If you're going to deploy the device, make sure the deploy mode is set to Deploy, then save it. If you're removing an assignment, update the deploy mode to Undeploy, then save it.
  5. Click the Save button to stage your changes.
    If you've removed an assignment, the device is still under Apstra DC Director management. It's ready and available to be assigned to any blueprint. To remove the device completely from Apstra DC Director management, remove the device from Managed Devices.

When you're ready to activate your changes, commit them from the Uncommitted tab.

Update One or More System ID Assignments (from Systems)

  1. From the blueprint, navigate to Staged > Physical > Systems and select the check boxes for one or more systems, then click the Change System IDs assignments button.
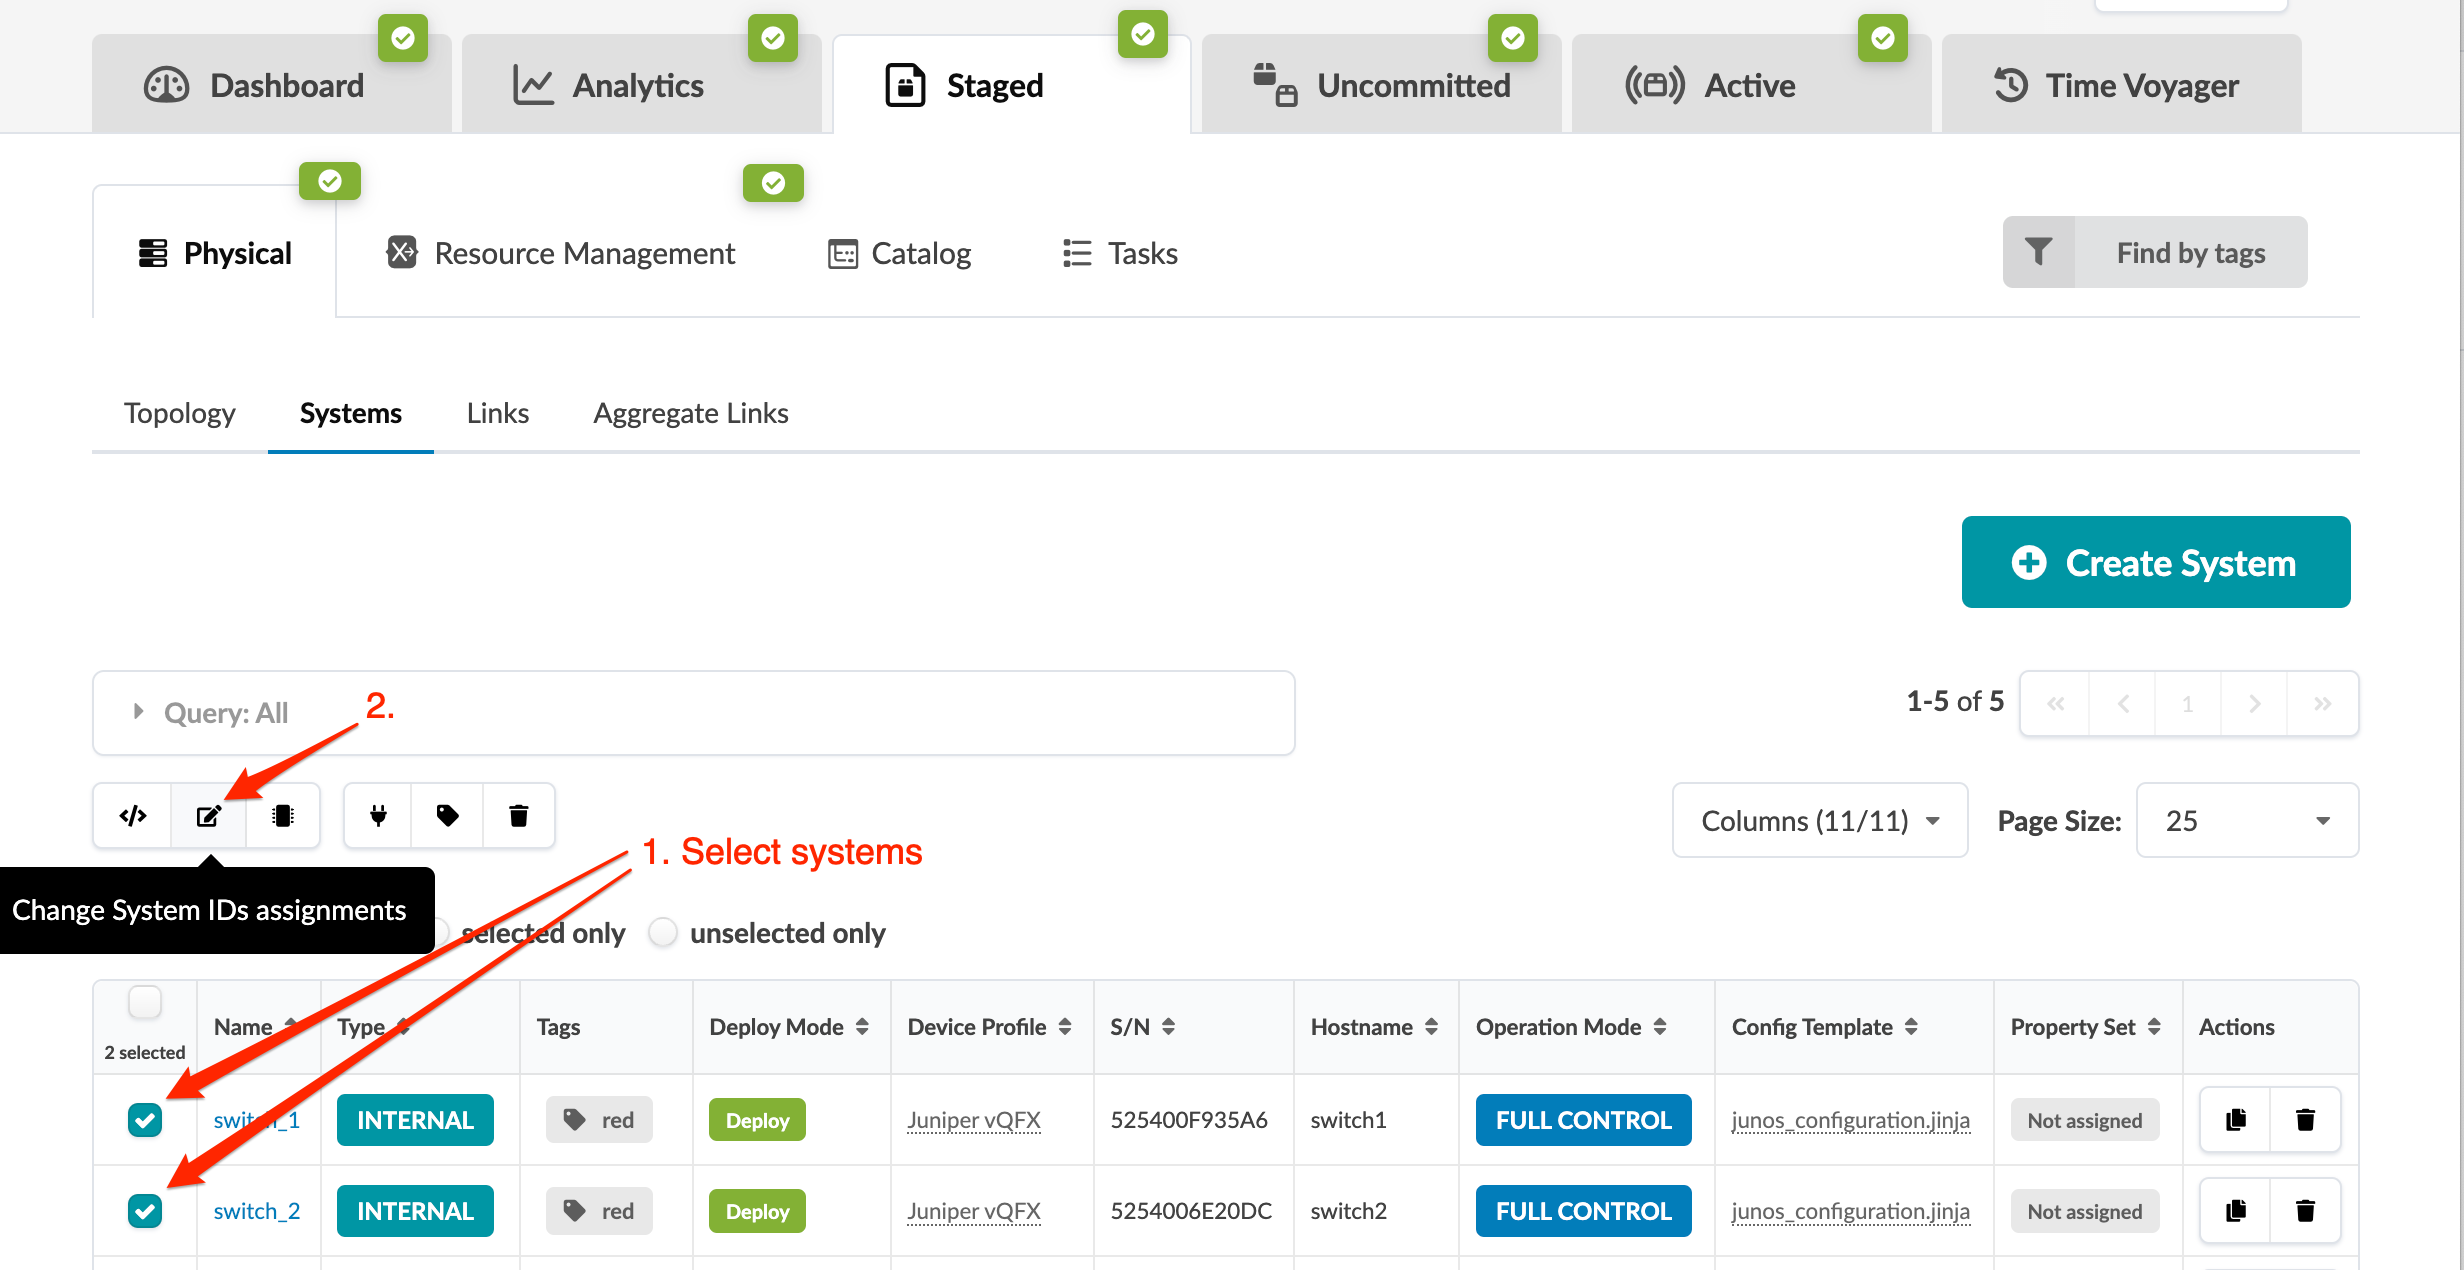
    User interface of a network management tool showing steps to select systems and change system ID assignments. Tabs like Dashboard, Analytics, Physical section with Topology and Systems sub-tabs, and a table listing systems with details such as Name, Type, Tags, and Configurations are visible. Systems switch_1 and switch_2 are selected.
  2. In the dialog that opens, select new system IDs from the System drop-down lists, or click the red trash can button to remove an existing assignment. If you're removing an assignment, go ahead and update the deploy mode to Undeploy as well.

    The list includes managed devices that haven't been assigned yet. If you have your devices ready and they're not appearing in the lists, you still need to bring them under Apstra DC Director management by adding them to Managed Devices.
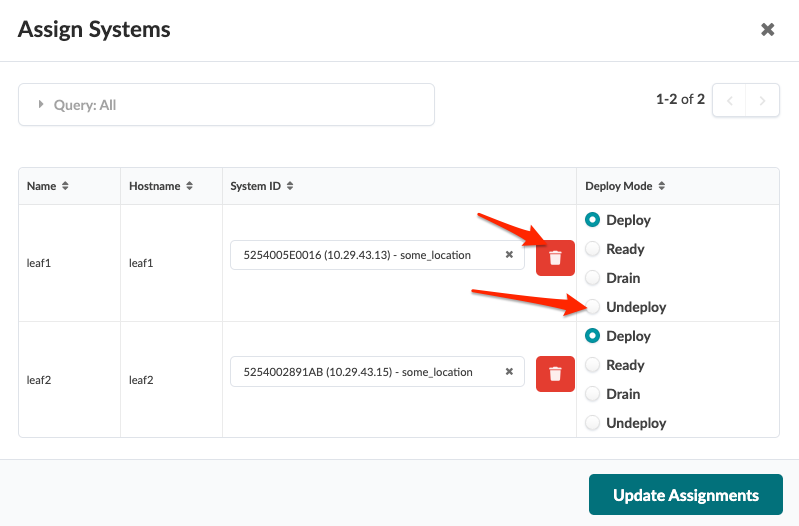
    User interface for assigning systems, showing a table with system names, hostnames, IDs, deploy modes set to Undeploy, red trash can icons for deletion, pagination, and Update Assignments button.
  3. Click Update Assignments to stage your changes and return to the Systems view.
    If you've removed an assignment, the device is still under Apstra DC Director management. It's ready and available to be assigned to any blueprint. To remove the device completely from Apstra DC Director management, remove the device from Managed Devices.
When you're ready to activate your changes, commit them from the Uncommitted tab.