Launch HPE Networking Apstra Data Center Director Edge Docker Containers in Apstra DC Director for Data Center Assurance

Use the following steps to manage and launch Apstra Edge Docker containers natively within the Apstra DC Dirctor GUI for Data Center Assurance (DC Assurance).

In release 5.1 or later, you can install the Apstra Edge from within Apstra DC Director. The Edge is a hardware-agnostic virtual device that runs within a container in the data center. It is a required component for enabling DC Assurance and it's supported features, like Application Awareness, Impact Analysis, and Service Level Expectations.

To install the Edge from within Apstra DC Director:

Note:

In 5.1 and later, each image is bundled together with an Apstra DC Director Edge image. When you download the 5.1 (or later) image from the Support site, it comes with Apstra DC Director Edge version 0.5.0. Apstra DC Director now supports an auto-updating Edge, which requires version 0.13.2 or later. For more information, see Upgrade to the Auto-updating Edge in Juniper Apstra 5.1.

Note:

For version 5.0 and earlier, you must use the steps in the following guide to install the Edge: Apstra Edge Setup Guide.

  1. From within the DC Assurance GUI, navigate to DC Edges.
  2. Click Adopt Apstra Edge at the top right side of the page.
    The Adopt Apstra Edge window displays.
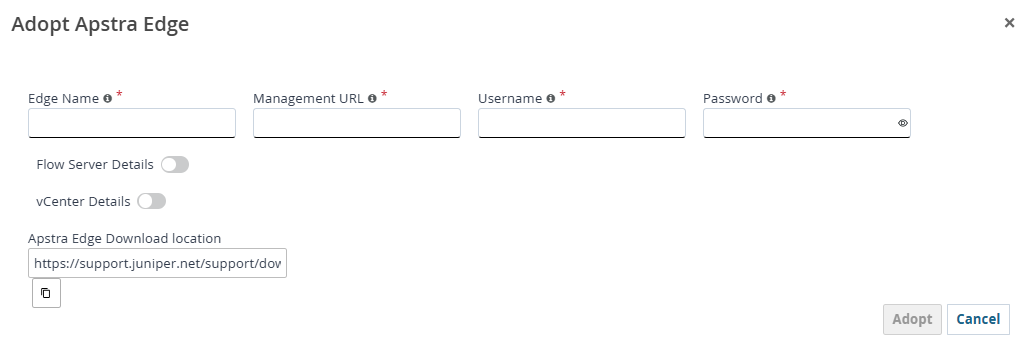
    User interface for adopting an Apstra Edge device with fields for Edge Name, Management URL, Username, Password, optional toggles for Flow Server Details and vCenter Details, Apstra Edge Download location URL, and buttons for Adopt and Cancel.
  3. In a separate browser window, log in to your Apstra DC Director GUI.
  4. Copy the management URL of your Apstra DC Director GUI (the URL of the Apstra DC Director GUI)
  5. From within the Adopt Apstra Edge window of the DC Assurance GUI, fill in the following:
    • Edge Name: The name of the Apstra DC Director Edge instance

    • Management URL: The management URL of Apstra DC Director

    • Username: The username you use to access Apstra DC Director

    • Password: The password you use to access Apstra DC Director

    • Apstra DC Director Edge Download Location: The Juniper Downloads URL for the latest Apstra DC Director Edge distribution. Use the following Juniper Downloads link to download the latest Apstra DC Director Edge version: https://support.juniper.net/support/downloads/?p=apstra.

  6. To add Flow servers, enable the Flow Server Details toggle and enter details in the fields that appear.
  7. (Optional) To add multiple Flow Servers, click the plus icon.
    To support multiple Flow servers, 5.1.0 and Edge version 0.24.0 or later are required.
  8. To add vCenter servers, enable the vCenter toggle and fill in the details in the fields that appear.
  9. (Optional) To add multiple vCenter servers, click the plus icon.
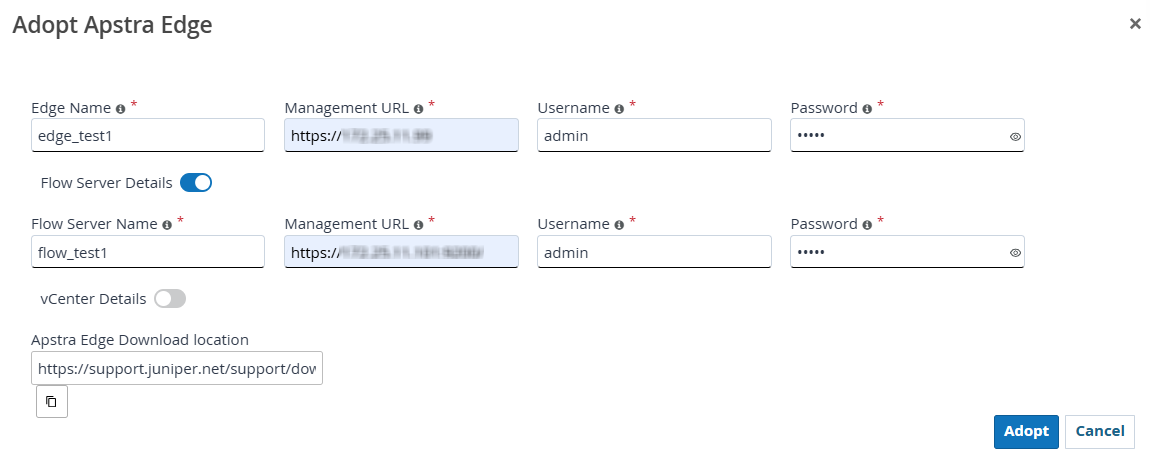
    Configuration interface for adopting an Apstra Edge with fields for Edge Name, Management URL, Username, Password, Flow Server Details, and Apstra Edge Download Location. Adopt and Cancel buttons at the bottom.
  10. Click Adopt.
    The new Apstra DC Director Edge appears in the Inventory list.
  11. Click the box next to the new Apstra DC Director Edge, and click the More dropdown menu > Get Registration Code.
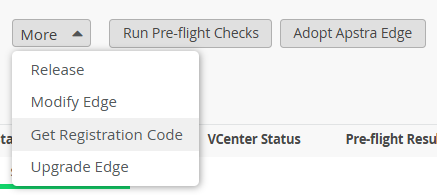
    User interface section with a More dropdown menu offering Release, Modify Edge, Get Registration Code, Upgrade Edge options, buttons for Run Pre-flight Checks and Adopt Apstra Edge, and a table with VCenter Status and Pre-flight Result columns.
  12. Copy the registration code and click Close.
  13. From the GUI, navigate to Platform > Apstra Edge.
  14. Click the plus icon at the top right of the page to launch a new Apstra DC Director Edge container.
    The Create Apstra Edge window displays.
  15. Enter the following information:
    • Registration key: Paste the Apstra Edge registration code here. This code links your local Apstra controller to DC Assurance.

    • Cloud term: The endpoint URL the Edge uses to communicate with the cloud (the current default URL is ep‑term.ai.juniper.net).

    Optional fields (These fields are populated with default values if left blank):

    • Image name: The name of the Apstra DC Director Edge container image downloaded from the Juniper support site. This container will be deployed on your local Apstra DC Director VM.

    • Container CPU limit: The maximum number of CPU cores allocated to the Edge container. This limits the container's processing resources. The default value is 0.5.

    • Container CPU shares limit: The relative CPU share allocation for the Edge container. This controls how CPU resources are distributed when multiple containers compete for processing power. The default value is 1024.

    • Container memory limit: The maximum amount of RAM the Edge container can use. This prevents the container from consuming excessive memory resources. The default value is 500m.

    • Environment variables: Configure additional Docker container environment variables. These parameters allow for custom container configuration settings. For a complete list of available variables, refer to the Apstra DC Director Edge Internal Variables documentation: Internal Variables for Apstra Edge Configuration.

  16. Click Create.
    The new Edge configuration displays. The State should change from Queued to LAUNCHED. This might take up to a minute.
  17. From the DC Assurance GUI, verify the following statuses: .
    • Registration Status: Registered

    • Cloud Connectivity: Connected

    • Apstra Connectivity: Connected

    • Flow Server Status: Configured


    System management interface showing Devils_Tower with registration status registered, cloud and Apstra connectivity connected, flow server configured, current version 0.16.5, latest version 0.24.0.
    To edit config details of your Edge from within the GUI, navigate to Platform > Apstra Edge.
After installation, we recommend that you run a pre-flight check. A pre-flight check verifies whether certain prerequisites and configuration requirements are met, and provides actionable guidance on how to resolve potential issues. For more information, see Verify DC Assurance Setup.
