BGPルートのローカルプリファレンス
ルート優先値(管理距離)の理解
Junos OSルーティングプロトコルプロセスは、ルーティングテーブルが受信する各ルートにデフォルトの優先値( 管理距離とも呼ばれます)を割り当てます。デフォルト値は、ルートのソースによって異なります。優先値は0〜 4,294,967,295 (232 – 1)の 値で、値が低いほど優先ルートを示します。 表1 に、デフォルトのプリファレンス値を示します。
| ルートの学習方法 |
デフォルト設定 |
デフォルト 設定を変更するステートメント |
|---|---|---|
| 直接接続されたネットワーク |
0 |
– |
| システムルート |
4 |
– |
| 静的LSPと静的LSP |
5 |
|
| ARI-TS |
5 |
ARI-TS優先度。 Junos OSリリース22.2R1以降、ARIルートは、以前のJunos OSリリースにインストールされた静的ルートではなく、ARI-TSプロトコルルートとしてインストールされます。 |
| 静的LSP |
6 |
MPLS優先度
注:
10.4以前のJunos OSリリースでは、 |
| RSVPシグナル化されたLSP |
7 |
MPLSアプリケーションユーザーガイドで説明されているRSVP |
| SR-TE |
8 |
SR-TE優先度 |
| LDPシグナルのLSP |
9 |
『MPLSアプリケーションユーザーガイド』で説明されているLDP |
| OSPF内部ルート |
10 |
OSPF優先度 |
| OSPF SRルート | 10 |
ラベル付き OSPF 優先度 |
| アクセス内部ルート |
12 |
– |
| アクセスルート |
13 |
– |
| IS-IS SRルート |
14 |
ラベル付きIS-IS優先度 |
| IS-ISレベル 1内部ルート |
15 |
IS-IS優先 |
| IS-ISレベル 2内部ルート |
18 |
IS-IS優先 |
| リダイレクト |
30 |
– |
| カーネル |
40 |
– |
| SNMP |
50 |
– |
| ルーターの検出 |
55 |
– |
| リップ |
100 |
RIP優先 |
| RIPng |
100 |
RIPng優先度 |
| PIM |
105 |
|
| DVMRP |
110 |
|
| アグリゲート |
130 |
|
| OSPF AS外部ルート |
150 |
OSPF外部プリファレンス |
| IS-ISレベル 1外部ルート |
160 |
IS-IS外部プリファレンス |
| IS-ISレベル 2外部ルート |
165 |
IS-IS外部プリファレンス |
| BGP |
170 |
BGPのプリファレンス、エクスポート、インポート |
| MSDP |
175 |
|
| EVPNタイプ5 |
170 |
|
| EVPN Type-2(ローカルで学習された MAC/IP) |
7 |
EVPNルートは、タイプによって優先度が異なります。ローカルで学習されたMAC/IPエントリーのタイプ2ルートの優先度は7で、タイプ5ルート(IPプレフィックスルート)の優先度は170です。
一般に、ステートメントの範囲が狭いほど、その優先度の高い値が与えられますが、影響を受けるルートのセットは小さくなります。ルーティングプロトコルによって学習されたルートのデフォルトのプリファレンス値を変更するには、通常、個々のルーティングプロトコルを設定するときにルーティングポリシーを適用します。また、表に示されている他の設定ステートメントを使用して、一部の設定を変更することもできます。
関連項目
例:BGPルートのプリファレンス値の設定
この例では、BGPから学習したルートの優先度を指定する方法を示しています。ルーティング情報は複数のソースから学習できます。複数のソースから学習した等しく特定のルート間の結びつきを断ち切るために、各ソースに優先値があります。スタティックルートなどの明示的な管理アクションによって学習されたルートは、BGPやOSPFなどのルーティングプロトコルから学習したルートよりも優先されます。この概念は、一部のベンダーによって 管理距離 と呼ばれています。
要件
この例を設定する前に、デバイスの初期化以外の特別な設定は必要ありません。
概要
ルーティング情報は、静的設定、BGP、内部ゲートウェイプロトコル(IGP)など、複数のソースから学習できます。Junos OSがルートの優先度をアクティブルートと判断すると、優先度の低いルートをアクティブルートとして選択し、このルートを転送テーブルにインストールします。デフォルトでは、ルーティングソフトウェアは 、BGPから発信されたルートに優先度170を割り当てます。すべてのルーティングプロトコルの中で、BGPのデフォルトプリファレンス値が最も高いため、BGPによって学習されたルートがアクティブルートになる可能性が最も低いことを意味します。
一部のベンダーでは、外部 BGP(EBGP)の優先度(距離)を 20、内部 BGP(IGBP)の距離を 200 に設定しています。Junos OS は、EBGP と IBGP の両方に同じ値(170)を使用します。ただし、Junos OS は常に IBGP ルートよりも EBGP ルートを優先するため、このベンダー間の違いは運用に影響しません。
ベンダー間でのもう一つの異なる点は、IGPの距離とBGPの距離に関する点です。例えば、一部のベンダーは、OSPFルートに110の距離を割り当てています。これは EBGP 距離の 20 よりも長く、同等の OSPF ルート上で EBGP ルートが選択されます。同じシナリオで、内部OSPFルートのデフォルトのプリファレンス値 10 と外部OSPFルートのデフォルトのプリファレンス値 150 が、すべてのBGPルートに割り当てられたプリファレンス値 170 よりも低いため、Junos OS がOSPFルートを選択します。
マルチベンダー環境では、BGPルートの優先値を変更して、Junos OSがOSPFルートではなくEBGPルートを選択するようにすることができます。この目標を達成するための1つのオプションは、EBGP設定に preference ステートメントを含めることです。デフォルトのBGP優先値を変更するには、0〜 4,294,967,295 (232 – 1)の 値を指定するpreferenceステートメントを含めます。
マルチベンダー互換性を実現するもう1つの方法は、EBGP設定に advertise-inactive ステートメントを含めることです。これにより、ルーティングテーブルは、Junos OSがアクティブルートとして選択しなかった場合でも、BGPによって学習されたBGPに最適なルートをBGPにエクスポートします。デフォルトでは、BGPはアップデートメッセージから受け取ったルート情報をJunos OSのルーティングテーブルに格納し、ルーティングテーブルはアクティブなルートのみをBGPにエクスポートし、BGPはそれをピアにアドバタイズします。 advertise-inactive ステートメントにより、Junos OSは、IGP設定のために非アクティブな最適なBGPルートをアドバタイズします。 advertise-inactive ステートメントを使用する場合、Junos OSデバイスは転送にOSPFルートを使用し、他のベンダーのデバイスは転送にEBGPルートを使用します。ただし、隣接するAS内のEBGPピアの視点からは、両方のベンダーのデバイスが同じように動作しているように見えます。
トポロジー
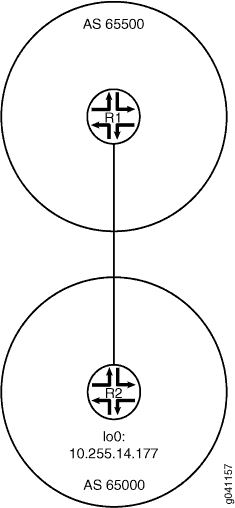
サンプル ネットワークでは、デバイス R1 とデバイス R2 は、互いに EBGP ルートを持ち、互いにも OSPF ルートを持っています。
この例では、以下の場合のルーティングテーブルを示しています。
-
デフォルトのプリファレンス値である BGP の場合は 170、OSPF の場合は 10 を受け入れます。
-
BGPプリファレンスを8に変更します。
図1は、サンプルネットワークを示しています。
設定
CLIクイックコンフィグレーション
この例をすばやく設定するには、以下のコマンドをコピーしてテキスト ファイルに貼り付け、改行を削除して、ネットワーク構成に合わせて必要な詳細を変更し、 [edit] 階層レベルのCLIにコマンドをコピー アンド ペーストします。
デバイスR1
set interfaces fe-1/2/0 unit 4 family inet address 1.12.0.1/30
set interfaces lo0 unit 2 family inet address 10.255.71.24/32
set protocols bgp export send-direct
set protocols bgp group ext type external
set protocols bgp group ext preference 8
set protocols bgp group ext peer-as 65000
set protocols bgp group ext neighbor 1.12.0.2
set protocols ospf area 0.0.0.0 interface fe-1/2/0.4
set protocols ospf area 0.0.0.0 interface 10.255.71.24
set policy-options policy-statement send-direct term 1 from protocol direct
set policy-options policy-statement send-direct term 1 then accept
set routing-options autonomous-system 65500
デバイスR2
set interfaces fe-1/2/0 unit 6 family inet address 1.12.0.2/30
set interfaces lo0 unit 3 family inet address 10.255.14.177/32
set protocols bgp export send-direct
set protocols bgp group ext type external
set protocols bgp group ext peer-as 65500
set protocols bgp group ext neighbor 1.12.0.1
set protocols ospf area 0.0.0.0 interface fe-1/2/0.6
set protocols ospf area 0.0.0.0 interface 10.255.14.177
set policy-options policy-statement send-direct term 1 from protocol direct
set policy-options policy-statement send-direct term 1 then accept
set routing-options autonomous-system 65000
手順
ステップバイステップの手順
次の例では、設定階層内のさまざまなレベルに移動する必要があります。CLIのナビゲーションについては、『Junos OS CLIユーザーガイド』の「設定モードでのCLIエディターの使用」を参照してください。
デバイスR1を設定するには:
-
インターフェイスを設定します。
[edit interfaces]
user@R1# set fe-1/2/0 unit 4 family inet address 1.12.0.1/30
user@R1# set lo0 unit 2 family inet address 10.255.71.24/32
-
ローカルの自律システムを設定します。
[edit routing-options]
user@R1# set autonomous-system 65500
-
デバイスR2との外部ピアリングを設定します。
[edit protocols bgp]
user@R1# set export send-direct
user@R1# set group ext type external
user@R1# set group ext preference 8
user@R1# set group ext peer-as 65000
user@R1# set group ext neighbor 1.12.0.2
-
OSPFを設定します。
[edit protocols ospf area 0.0.0.0]
user@R1# set interface fe-1/2/0.4
user@R1# set interface 10.255.71.24
-
ルーティングポリシーを設定します。
[edit policy-options policy-statement send-direct term 1]
user@R1# set from protocol direct
user@R1# set then accept
結果
設定モードから、 show interfaces、 show policy-options、 show protocols、 show routing-options コマンドを入力して設定を確認します。出力に意図した設定が表示されない場合は、この例の手順を繰り返して設定を修正します。
user@R1# show interfaces
fe-1/2/0 {
    unit 4 {
        family inet {
            address 1.12.0.1/30;
        }
    }
}
lo0 {
    unit 2 {
        family inet {
            address 10.255.71.24/32;
        }
    }
}
user@R1# show policy-options
policy-statement send-direct {
    term 1 {
        from protocol direct;
        then accept;
    }
}
user@R1# show protocols
protocols {
    bgp {
        export send-direct;
        group ext {
            type external;
            preference 8;
            peer-as 65000;
            neighbor 1.12.0.2;
        }
    }
    ospf {
        area 0.0.0.0 {
            interface fe-1/2/0.4;
            interface 10.255.71.24;
        }
    }
}
user@R1# show routing-options
autonomous-system 65500;
デバイスの設定が完了したら、設定モードから コミット を入力します。 デバイスR2でこれらの手順を繰り返します。
検証
設定が正常に機能していることを確認します。
設定の確認
目的
デバイスR1とデバイスR2のルーティングテーブルに、デバイスR1が設定されたEBGPプリファレンス8を使用しており、デバイスR2がデフォルトのEBGPプリファレンス170を使用しているという事実が反映されていることを確認してください。
アクション
動作モードから、 show route コマンドを入力します。
user@R1> show route
inet.0: 5 destinations, 7 routes (5 active, 0 holddown, 0 hidden)
+ = Active Route, - = Last Active, * = Both

1.12.0.0/30        *[Direct/0] 3d 07:03:01
                    > via fe-1/2/0.4
                    [BGP/8] 01:04:49, localpref 100
                      AS path: 65000 I
                    > to 1.12.0.2 via fe-1/2/0.4
1.12.0.1/32        *[Local/0] 3d 07:03:01
                      Local via fe-1/2/0.4
10.255.14.177/32   *[BGP/8] 01:04:49, localpref 100
                      AS path: 65000 I
                    > to 1.12.0.2 via fe-1/2/0.4
                    [OSPF/10] 3d 07:02:16, metric 1
                    > to 1.12.0.2 via fe-1/2/0.4
10.255.71.24/32    *[Direct/0] 3d 07:03:01
                    > via lo0.2
224.0.0.5/32       *[OSPF/10] 5d 03:42:16, metric 1
                      MultiRecv
user@R2> show route
inet.0: 5 destinations, 7 routes (5 active, 0 holddown, 0 hidden)
+ = Active Route, - = Last Active, * = Both

1.12.0.0/30        *[Direct/0] 3d 07:03:30
                    > via fe-1/2/0.6
                    [BGP/170] 00:45:36, localpref 100
                      AS path: 65500 I
                    > to 1.12.0.1 via fe-1/2/0.6
1.12.0.2/32        *[Local/0] 3d 07:03:30
                      Local via fe-1/2/0.6
10.255.14.177/32   *[Direct/0] 3d 07:03:30
                    > via lo0.3
10.255.71.24/32    *[OSPF/10] 3d 07:02:45, metric 1
                    > to 1.12.0.1 via fe-1/2/0.6
                    [BGP/170] 00:45:36, localpref 100
                      AS path: 65500 I
                    > to 1.12.0.1 via fe-1/2/0.6
224.0.0.5/32       *[OSPF/10] 5d 03:42:45, metric 1
                      MultiRecv
意味
出力は、デバイスR1上で、デバイスR2のループバックインターフェイス(10.255.14.177/32)へのアクティブパスがBGPルートであることを示しています。また、出力は、デバイスR2上で、デバイスR1のループバックインターフェイス(10.255.71.24/32)へのアクティブパスがOSPFルートであることを示しています。
例:ルーティングポリシーを使用してBGPルートの優先値を設定
この例では、ルーティングポリシーを使用して、BGPから学習したルートの優先度を設定する方法を示しています。ルーティング情報は複数のソースから学習できます。複数のソースから学習した等しく特定のルート間の結びつきを断ち切るために、各ソースに優先値があります。スタティックルートなどの明示的な管理アクションによって学習されたルートは、BGPやOSPFなどのルーティングプロトコルから学習したルートよりも優先されます。この概念は、一部のベンダーによって 管理距離 と呼ばれています。
要件
この例を設定する前に、デバイスの初期化以外の特別な設定は必要ありません。
概要
ルーティング情報は、静的設定、BGP、内部ゲートウェイプロトコル(IGP)など、複数のソースから学習できます。Junos OSがルートの優先度をアクティブルートと判断すると、優先度の低いルートをアクティブルートとして選択し、このルートを転送テーブルにインストールします。デフォルトでは、ルーティングソフトウェアは 、BGPから発信されたルートに優先度170を割り当てます。すべてのルーティングプロトコルの中で、BGPのデフォルトプリファレンス値が最も高いため、BGPによって学習されたルートがアクティブルートになる可能性が最も低いことを意味します。
一部のベンダーでは、外部 BGP(EBGP)の優先度(距離)を 20、内部 BGP(IGBP)の距離を 200 に設定しています。Junos OS は、EBGP と IBGP の両方に同じ値(170)を使用します。ただし、Junos OS は常に IBGP ルートよりも EBGP ルートを優先するため、このベンダー間の違いは運用に影響しません。
ベンダー間でのもう一つの異なる点は、IGPの距離とBGPの距離に関する点です。例えば、一部のベンダーは、OSPFルートに110の距離を割り当てています。これは EBGP 距離の 20 よりも長く、同等の OSPF ルート上で EBGP ルートが選択されます。同じシナリオで、内部OSPFルートのデフォルトのプリファレンス値 10 と外部OSPFルートのデフォルトのプリファレンス値 150 が、すべてのBGPルートに割り当てられたプリファレンス値 170 よりも低いため、Junos OS がOSPFルートを選択します。
この例では、特定のネクストホップからのルートを照合し、優先度を設定するルーティングポリシーを示しています。ルートが最初の用語に一致しない場合、2番目の用語によって評価されます。
トポロジー
サンプル ネットワークでは、デバイス R1 とデバイス R3 がデバイス R2 と EBGP セッションを持っています。
デバイスR2では、インポートポリシーが以下のアクションを実行します。
ネクストホップ10.0.0.1(デバイスR1)からBGP経由で受信したルートの場合、ルート優先度を10に設定します。
ネクストホップ10.1.0.2(デバイスR3)からBGP経由で受信したルートの場合、ルート優先度を15に設定します。
図 2 は、サンプル ネットワークを示しています。
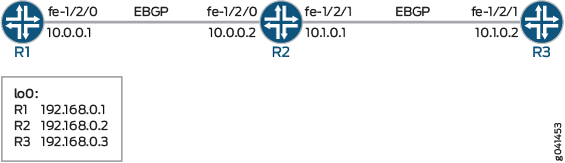
CLIクイックコンフィグレーション は、 図2に示すすべてのデバイスの構成を示しています。
セクション #d11e86__d11e235 では、デバイスR2の手順を説明します。
設定
CLIクイックコンフィグレーション
この例をすばやく設定するには、以下のコマンドをコピーしてテキスト ファイルに貼り付け、改行を削除して、ネットワーク構成に合わせて必要な詳細を変更し、 [edit] 階層レベルのCLIにコマンドをコピー アンド ペーストします。
デバイスR1
set interfaces fe-1/2/0 unit 0 family inet address 10.0.0.1/30
set interfaces lo0 unit 0 family inet address 192.168.0.1/32
set protocols bgp group ext type external
set protocols bgp group ext export send-direct
set protocols bgp group ext peer-as 200
set protocols bgp group ext neighbor 10.0.0.2
set policy-options policy-statement send-direct term 1 from protocol direct
set policy-options policy-statement send-direct term 1 then accept
set routing-options autonomous-system 100
デバイスR2
set interfaces fe-1/2/0 unit 0 family inet address 10.0.0.2/30
set interfaces fe-1/2/1 unit 0 family inet address 10.1.0.1/30
set interfaces lo0 unit 0 family inet address 192.168.0.2/32
set protocols bgp group ext type external
set protocols bgp group ext import set-preference
set protocols bgp group ext export send-direct
set protocols bgp group ext neighbor 10.0.0.1 peer-as 100
set protocols bgp group ext neighbor 10.1.0.2 peer-as 300
set policy-options policy-statement send-direct term 1 from protocol direct
set policy-options policy-statement send-direct term 1 then accept
set policy-options policy-statement set-preference term term1 from protocol bgp
set policy-options policy-statement set-preference term term1 from next-hop 10.0.0.1
set policy-options policy-statement set-preference term term1 then preference 10
set policy-options policy-statement set-preference term term2 from protocol bgp
set policy-options policy-statement set-preference term term2 from next-hop 10.1.0.2
set policy-options policy-statement set-preference term term2 then preference 15
set routing-options autonomous-system 200
デバイスR3
set interfaces fe-1/2/1 unit 0 family inet address 10.1.0.2/30
set interfaces lo0 unit 0 family inet address 192.168.0.3/32
set protocols bgp group ext type external
set protocols bgp group ext export send-direct
set protocols bgp group ext peer-as 200
set protocols bgp group ext neighbor 10.1.0.1
set policy-options policy-statement send-direct term 1 from protocol direct
set policy-options policy-statement send-direct term 1 then accept
set routing-options autonomous-system 300
手順
ステップバイステップの手順
次の例では、設定階層内のさまざまなレベルに移動する必要があります。CLIのナビゲーションについては、『Junos OS CLIユーザーガイド』の「構成モードでのCLIエディターの使用」を参照してください。
デバイスR2を設定するには:
デバイスインターフェイスを設定します。
[edit interfaces]
user@R2# set fe-1/2/0 unit 0 family inet address 10.0.0.2/30
user@R2# set fe-1/2/1 unit 0 family inet address 10.1.0.1/30
user@R2# set lo0 unit 0 family inet address 192.168.0.2/32
ローカルの自律システムを設定します。
[edit routing-options]
user@R2# set autonomous-system 200
直接ルートを送信するルーティングポリシーを設定します。
[edit policy-options policy-statement send-direct term 1]
user@R2# set from protocol direct
user@R2# set then accept
受信したルートの優先度を変更するルーティングポリシーを設定します。
[edit policy-options policy-statement set-preference]
user@R2# set term term1 from protocol bgp
user@R2# set term term1 from next-hop 10.0.0.1
user@R2# set term term1 then preference 10
user@R2# set term term2 from protocol bgp
user@R2# set term term2 from next-hop 10.1.0.2
user@R2# set term term2 then preference 15
デバイスR2との外部ピアリングを設定します。
[edit protocols bgp group ext]
user@R2# set type external
user@R2# set export send-direct
user@R2# set neighbor 10.0.0.1 peer-as 100
user@R2# set neighbor 10.1.0.2 peer-as 300
set-preferenceポリシーをインポートポリシーとして適用します。これはデバイスR2のルーティングテーブルに影響し、デバイスR1やデバイスR3には影響しません。
[edit protocols bgp group ext]
user@R2# set import set-preference
結果
設定モードから、 show interfaces、 show protocols、 show policy-options、および show routing-options コマンドを入力して設定を確認します。出力に意図した設定が表示されない場合は、この例の手順を繰り返して設定を修正します。
user@R2# show interfaces
fe-1/2/0 {
    unit 0 {
        family inet {
            address 10.0.0.2/30;
        }
    }
}
fe-1/2/1 {
    unit 0 {
        family inet {
            address 10.1.0.1/30;
        }
    }
}
lo0 {
    unit 0{
        family inet {
            address 192.168.0.2/32;
        }
    }
}
user@R2# show protocols
bgp {
    group ext {
        type external;
        import set-preference;
        export send-direct;
        neighbor 10.0.0.1 {
            peer-as 100;
        }
        neighbor 10.1.0.2 {
            peer-as 300;
        }
    }
}
user@R2# show policy-options
policy-statement send-direct {
    term 1 {
        from protocol direct;
        then accept;
    }
}
policy-statement set-preference {
    term term1 {
        from {
            protocol bgp;
            next-hop 10.0.0.1;
        }
        then {
            preference 10;
        }
    }
    term term2 {
        from {
            protocol bgp;
            next-hop 10.1.0.2;
        }
        then {
            preference 15;
        }
    }
}
user@R2# show routing-options
autonomous-system 200;
デバイスの設定が完了したら、設定モードから commit を入力します。
検証
設定が正常に機能していることを確認します。
設定の確認
目的
デバイスR1とデバイスR2のルーティングテーブルに、デバイスR1が設定されたEBGPプリファレンス8を使用しており、デバイスR2がデフォルトのEBGPプリファレンス170を使用しているという事実が反映されていることを確認してください。
アクション
動作モードから、 show route protocols bgp コマンドを入力します。
user@R2> show route protocols bgp
inet.0: 7 destinations, 9 routes (7 active, 0 holddown, 0 hidden)
+ = Active Route, - = Last Active, * = Both

10.0.0.0/30         [BGP/10] 04:42:23, localpref 100
                      AS path: 100 I, validation-state: unverified
                    > to 10.0.0.1 via fe-1/2/0.0
10.1.0.0/30         [BGP/15] 04:42:23, localpref 100
                      AS path: 300 I, validation-state: unverified
                    > to 10.1.0.2 via fe-1/2/1.0
192.168.0.1/32     *[BGP/10] 04:42:23, localpref 100
                      AS path: 100 I, validation-state: unverified
                    > to 10.0.0.1 via fe-1/2/0.0
192.168.0.3/32     *[BGP/15] 04:42:23, localpref 100
                      AS path: 300 I, validation-state: unverified
                    > to 10.1.0.2 via fe-1/2/1.0
意味
出力は、デバイスR2で、デバイスR3から学習したルートの優先値が15に変更され、デバイスR1から学習したルートの優先値が10に変更されたことを示しています。
内部 BGP ルートのローカル プリファレンス メトリックを理解する
内部BGP(IBGP)セッションでは、 ローカルプリファレンスと呼ばれるメトリックが使用され、パス属性LOCAL_PREFのIBGPアップデートパケットで伝送されます。自律システム(AS)に別のASへのルートが複数ある場合、ローカル設定は、あるBGPルートの他BGPルートに対するBGPルートの優先度を示します。ローカルプリファレンス値が最も高いBGPルートが優先されます。
LOCAL_PREFパス属性は常にIBGPピアと隣接するコンフェデレーションにアドバタイズされます。外部のBGP(EBGP)ピアにアドバタイズされることはありません。デフォルトの動作では、LOCAL_PREFパス属性存在する場合は変更しません。
デフォルトのLOCAL_PREFパス属性値である100は、ルートがルーティングテーブルからBGPにエクスポートされるエクスポート時にのみ適用されます。
LOCAL_PREF属性なしでBGPルートを受信した場合、そのルートはルーティングテーブルに保存され、LOCAL_PREF値 100で受信したかのようにBGPによってアドバタイズされます。BGPによってアドバタイズされる非BGPルートは、デフォルトでLOCAL_PREF値100 でアドバタイズされます。
関連項目
例:BGPルートのローカルプリファレンス値を設定する
この例では、内部 BGP(IBGP)ピア セッションでローカル プリファレンスを設定する方法を示します。
要件
この例を設定する前に、デバイスの初期化以外の特別な設定は必要ありません。
概要
パス属性でアドバタイズされるローカルプリファレンスメトリックを変更するには、0 から4,294,967,295 (232 – 1)までの 値を指定するlocal-preferenceステートメントを含める必要があります。
あるパスを他のパスよりも優先したい理由はいくつかあります。例えば、他のパスと比べて、一方のパスの方が使用コストが安かったり、帯域幅が広くなったり、より安定していたりする場合があります。
図3 は、内部ピアセッションと、隣接するASへの複数の出口ポイントを持つ典型的なネットワークを示しています。
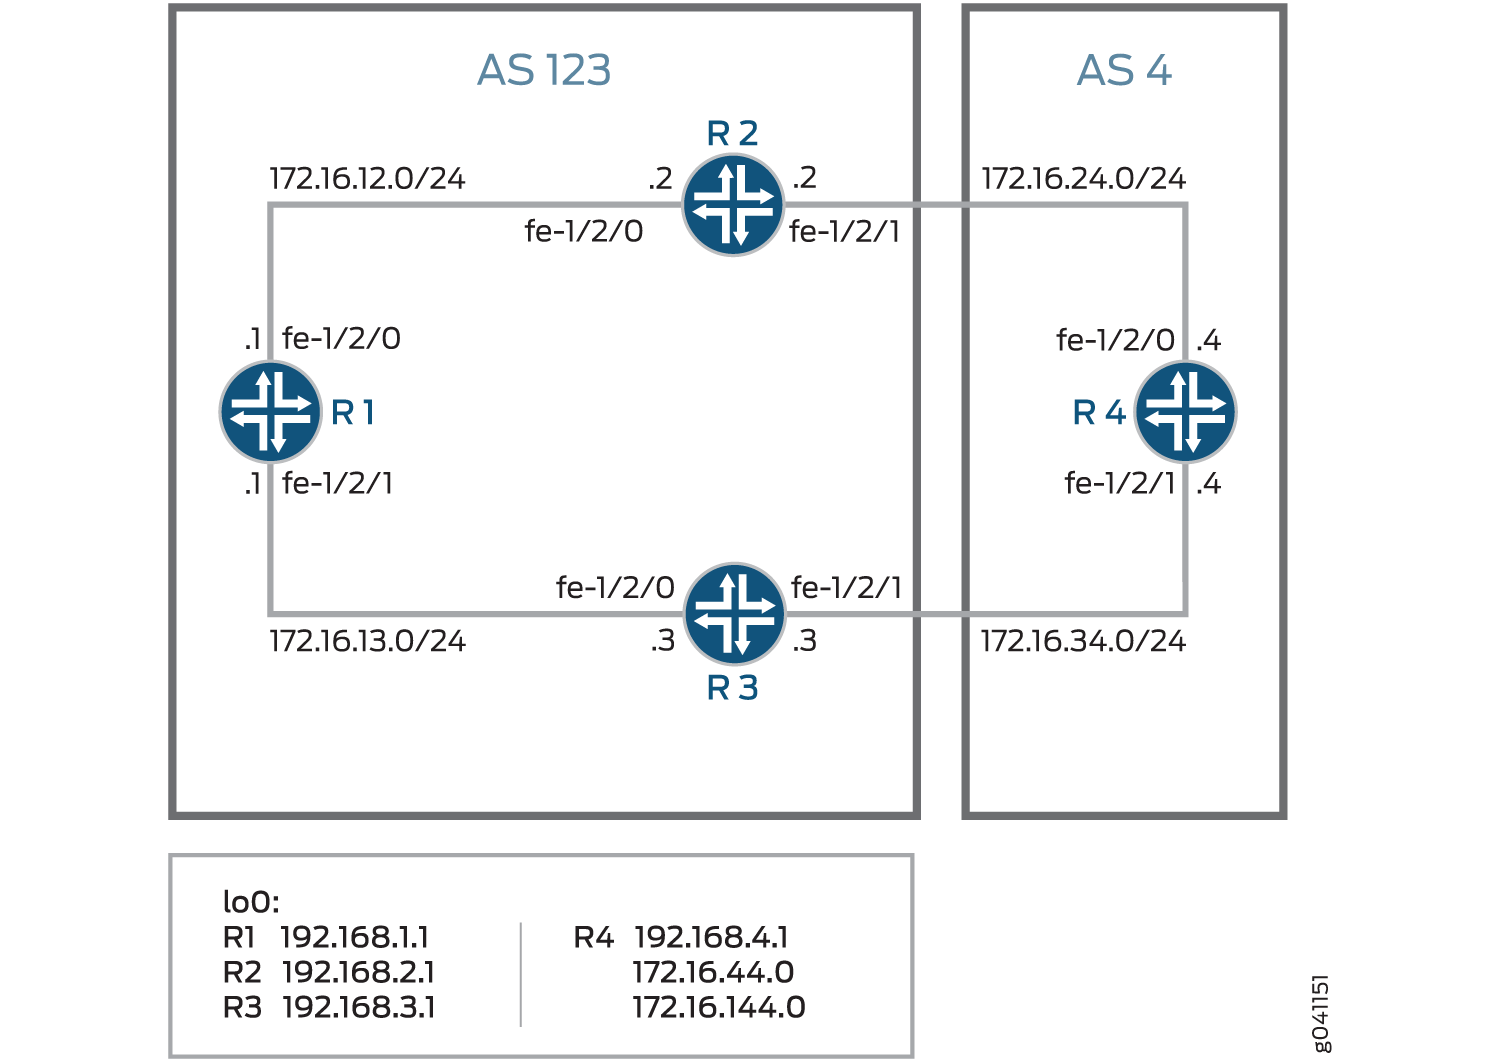 を持つ典型的なネットワーク
デバイスR4に到達するために、デバイスR1はデバイスR2またはデバイスR3のいずれかを通過できます。デフォルトでは、どちらのルートでもローカルプリファレンスは100です。ローカルのプリファレンスが等しい場合、Junos OSには同点を破ってパスを選択するためのルールがあります。( BGPパス選択についてを参照してください)。この例では、デバイスR2のルーターIDがデバイスR3のルーターIDよりも低いため、アクティブなルーターがデバイスR2を経由します。次の例は、ローカル設定の明示的な設定でデフォルトの動作を上書きする方法を示しています。この例では、デバイスR3のローカルプリファレンス300を設定することで、デバイスR3がデバイスR4に到達するための優先パスとなっています。
設定
CLIクイックコンフィグレーション
この例をすばやく設定するには、以下のコマンドをコピーしてテキストファイルに貼り付け、改行を削除して、ネットワーク構成に合わせて必要な詳細を変更してから、コマンドを [edit] 階層レベルのCLIにコピー&ペーストします。
デバイスR1
set interfaces fe-1/2/0 unit 1 family inet address 12.12.12.1/24
set interfaces fe-1/2/1 unit 2 family inet address 13.13.13.1/24
set interfaces lo0 unit 1 family inet address 192.168.1.1/32
set protocols bgp group internal type internal
set protocols bgp group internal local-address 192.168.1.1
set protocols bgp group internal export send-direct
set protocols bgp group internal neighbor 192.168.2.1
set protocols bgp group internal neighbor 192.168.3.1
set protocols ospf area 0.0.0.0 interface lo0.1 passive
set protocols ospf area 0.0.0.0 interface fe-1/2/0.1
set protocols ospf area 0.0.0.0 interface fe-1/2/1.2
set policy-options policy-statement send-direct term 1 from protocol direct
set policy-options policy-statement send-direct term 1 then accept
set routing-options autonomous-system 123
set routing-options router-id 192.168.1.1
デバイスR2
set interfaces fe-1/2/0 unit 3 family inet address 12.12.12.2/24
set interfaces fe-1/2/1 unit 4 family inet address 24.24.24.2/24
set interfaces lo0 unit 2 family inet address 192.168.2.1/32
set protocols bgp group internal type internal
set protocols bgp group internal local-address 192.168.2.1
set protocols bgp group internal export send-direct
set protocols bgp group internal neighbor 192.168.1.1
set protocols bgp group internal neighbor 192.168.3.1
set protocols bgp group external type external
set protocols bgp group external export send-direct
set protocols bgp group external peer-as 4
set protocols bgp group external neighbor 24.24.24.4
set protocols ospf area 0.0.0.0 interface lo0.2 passive
set protocols ospf area 0.0.0.0 interface fe-1/2/0.3
set protocols ospf area 0.0.0.0 interface fe-1/2/1.4
set policy-options policy-statement send-direct term 1 from protocol direct
set policy-options policy-statement send-direct term 1 then accept
set routing-options autonomous-system 123
set routing-options router-id 192.168.2.1
デバイスR3
set interfaces fe-1/2/0 unit 5 family inet address 13.13.13.3/24
set interfaces fe-1/2/1 unit 6 family inet address 34.34.34.3/24
set interfaces lo0 unit 3 family inet address 192.168.3.1/32
set protocols bgp group internal type internal
set protocols bgp group internal local-address 192.168.3.1
set protocols bgp group internal export send-direct
set protocols bgp group internal neighbor 192.168.1.1
set protocols bgp group internal neighbor 192.168.2.1
set protocols bgp group external type external
set protocols bgp group external export send-direct
set protocols bgp group external peer-as 4
set protocols bgp group external neighbor 34.34.34.4
set protocols ospf area 0.0.0.0 interface lo0.3 passive
set protocols ospf area 0.0.0.0 interface fe-1/2/0.5
set protocols ospf area 0.0.0.0 interface fe-1/2/1.6
set policy-options policy-statement send-direct term 1 from protocol direct
set policy-options policy-statement send-direct term 1 then accept
set routing-options autonomous-system 123
set routing-options router-id 192.168.3.1
デバイスR4
set interfaces fe-1/2/0 unit 7 family inet address 24.24.24.4/24
set interfaces fe-1/2/1 unit 8 family inet address 34.34.34.4/24
set interfaces lo0 unit 4 family inet address 192.168.4.1/32
set protocols bgp group external type external
set protocols bgp group external export send-direct
set protocols bgp group external peer-as 123
set protocols bgp group external neighbor 34.34.34.3
set protocols bgp group external neighbor 24.24.24.2
set policy-options policy-statement send-direct term 1 from protocol direct
set policy-options policy-statement send-direct term 1 then accept
set routing-options autonomous-system 4
set routing-options router-id 192.168.4.1
デバイスR1の設定
ステップバイステップの手順
次の例では、設定階層のさまざまなレベルに移動する必要があります。CLIのナビゲーションについては、『Junos OS CLIユーザーガイド』の「設定モードでのCLIエディタの使用」を参照してください。
デバイスR1を設定するには:
インターフェイスを設定します。
[edit interfaces fe-1/2/0 unit 1]
user@R1# set family inet address 12.12.12.1/24
[edit interfaces fe-1/2/1 unit 2]
user@R1# set family inet address 13.13.13.1/24
[edit interfaces lo0 unit 1]
user@R1# set family inet address 192.168.1.1/32
BGPを設定します。
[edit protocols bgp group internal]
user@R1# set type internal
user@R1# set local-address 192.168.1.1
user@R1# set export send-direct
user@R1# set neighbor 192.168.2.1
user@R1# set neighbor 192.168.3.1
OSPFを設定します。
[edit protocols ospf area 0.0.0.0]
user@R1# set interface lo0.1 passive
user@R1# set interface fe-1/2/0.1
user@R1# set interface fe-1/2/1.2
直接ルートを受け入れるポリシーを設定します。
注:このシナリオの他の有用なオプションは、OSPFまたはローカルルートで学習したルートを受け入れることかもしれません。
[edit policy-options policy-statement send-direct term 1]
user@R1# set from protocol direct
user@R1# set then accept
ルーターIDと自律システム(AS)番号を設定します。
[edit routing-options]
user@R1# set autonomous-system 123
user@R1# set router-id 192.168.1.1
結果
設定モードから、 show interfaces、 show policy-options、 show protocols、および show routing-options コマンドを入力して設定を確認します。出力に意図した設定が表示されない場合は、この例の手順を繰り返して設定を修正します。
user@R1# show interfaces
fe-1/2/0 {
    unit 1 {
        family inet {
            address 12.12.12.1/24;
        }
    }
}
fe-1/2/1 {
    unit 2 {
        family inet {
            address 13.13.13.1/24;
        }
    }
}
lo0 {
    unit 1 {
        family inet {
            address 192.168.1.1/32;
        }
    }
}
user@R1# show policy-options
policy-statement send-direct {
    term 1 {
        from protocol direct;
        then accept;
    }
}
user@R1# show protocols
bgp {
    group internal {
        type internal;
        local-address 192.168.1.1;
        export send-direct;
        neighbor 192.168.2.1;
        neighbor 192.168.3.1;
    }
}
ospf {
    area 0.0.0.0 {
        interface lo0.1 {
            passive;
        }
        interface fe-1/2/0.1;
        interface fe-1/2/1.2;
    }
}
user@R1# show routing-options
autonomous-system 123;
router-id 192.168.1.1;
デバイスの設定が完了したら、設定モードから commit を入力します。
デバイスR2の設定
ステップバイステップの手順
次の例では、設定階層のさまざまなレベルに移動する必要があります。CLIのナビゲーションについては、『Junos OS CLIユーザーガイド』の「設定モードでのCLIエディタの使用」を参照してください。
デバイスR2を設定するには:
インターフェイスを設定します。
[edit interfaces fe-1/2/0 unit 3]
user@R2# set family inet address 12.12.12.21/24
[edit interfaces fe-1/2/1 unit 4]
user@R2# set family inet address 24.24.24.2/24
[edit interfaces lo0 unit 2]
user@R2# set family inet address 192.168.2.1/32
BGPを設定します。
[edit protocols bgp group internal]
user@R2# set type internal
user@R2# set local-address 192.168.2.1
user@R2# set export send-direct
user@R2# set neighbor 192.168.1.1
user@R2# set neighbor 192.168.3.1
[edit protocols bgp group external]
user@R2# set type external
user@R2# set export send-direct
user@R2# set peer-as 4
user@R2# set neighbor 24.24.24.4
OSPFを設定します。
[edit protocols ospf area 0.0.0.0]
user@R2# set interface lo0.2 passive
user@R2# set interface fe-1/2/0.3
user@R2# set interface fe-1/2/1.4
直接ルートを受け入れるポリシーを設定します。
注:このシナリオの他の有用なオプションは、OSPFまたはローカルルートで学習したルートを受け入れることかもしれません。
[edit policy-options policy-statement send-direct term 1]
user@R2# set from protocol direct
user@R2# set then accept
ルーターIDと自律システム(AS)番号を設定します。
[edit routing-options]
user@R2# set autonomous-system 123
user@R2# set router-id 192.168.2.1
結果
設定モードから、 show interfaces、 show policy-options、 show protocols、および show routing-options コマンドを入力して設定を確認します。出力に意図した設定が表示されない場合は、この例の手順を繰り返して設定を修正します。
user@R2# show interfaces
fe-1/2/0 {
    unit 3 {
        family inet {
            address 12.12.12.2/24;
        }
    }
}
fe-1/2/1 {
    unit 4 {
        family inet {
            address 24.24.24.2/24;
        }
    }
}
lo0 {
    unit 2 {
        family inet {
            address 192.168.2.1/32;
        }
    }
}
user@R2# show policy-options
policy-statement send-direct {
    term 1 {
        from protocol direct;
        then accept;
    }
}
user@R2# show protocols
bgp {
    group internal {
        type internal;
        local-address 192.168.2.1;
        export send-direct;
        neighbor 192.168.1.1;
        neighbor 192.168.3.1;
    }
    group external {
        type external;
        export send-direct;
        peer-as 4;
        neighbor 24.24.24.4;
    }
}
ospf {
    area 0.0.0.0 {
        interface lo0.2 {
            passive;
        }
        interface fe-1/2/0.3;
        interface fe-1/2/1.4;
    }
}
user@R2# show routing-options
autonomous-system 123;
router-id 192.168.2.1;
デバイスの設定が完了したら、設定モードから commit を入力します。
デバイスR3の設定
ステップバイステップの手順
次の例では、設定階層のさまざまなレベルに移動する必要があります。CLIのナビゲーションについては、『Junos OS CLIユーザーガイド』の「設定モードでのCLIエディタの使用」を参照してください。
デバイスR3を設定するには:
インターフェイスを設定します。
[edit interfaces fe-1/2/0 unit 5]
user@R3# set family inet address 13.13.13.3/24
[edit interfaces fe-1/2/1 unit 6]
user@R3# set family inet address 34.34.34.3/24
[edit interfaces lo0 unit 3]
user@R3# set family inet address 192.168.3.1/32
BGPを設定します。
[edit protocols bgp group internal]
user@R3# set type internal
user@R3# set local-address 192.168.3.1
user@R3# set export send-direct
user@R3# set neighbor 192.168.1.1
user@R3# set neighbor 192.168.2.1
[edit protocols bgp group external]
user@R3# set type external
user@R3# set export send-direct
user@R3# set peer-as 4
user@R3# set neighbor 34.34.34.4
OSPFを設定します。
[edit protocols ospf area 0.0.0.0]
user@R3# set interface lo0.3 passive
user@R3# set interface fe-1/2/0.5
user@R3# set interface fe-1/2/1.6
直接ルートを受け入れるポリシーを設定します。
注:このシナリオの他の有用なオプションは、OSPFまたはローカルルートで学習したルートを受け入れることかもしれません。
[edit policy-options policy-statement send-direct term 1]
user@R3# set from protocol direct
user@R3# set then accept
ルーターIDと自律システム(AS)番号を設定します。
[edit routing-options]
user@R3# set autonomous-system 123
user@R3# set router-id 192.168.3.1
結果
設定モードから、 show interfaces、 show policy-options、 show protocols、および show routing-options コマンドを入力して設定を確認します。出力に意図した設定が表示されない場合は、この例の手順を繰り返して設定を修正します。
user@R3# show interfaces
fe-1/2/0 {
    unit 5 {
        family inet {
            address 13.13.13.3/24;
        }
    }
}
fe-1/2/1 {
    unit 6 {
        family inet {
            address 34.34.34.3/24;
        }
    }
}
lo0 {
    unit 3 {
        family inet {
            address 192.168.3.1/32;
        }
    }
}
user@R3# show policy-options
policy-statement send-direct {
    term 1 {
        from protocol direct;
        then accept;
    }
}
user@R3# show protocols
bgp {
    group internal {
        type internal;
        local-address 192.168.3.1;
        export send-direct;
        neighbor 192.168.1.1;
        neighbor 192.168.2.1;
    }
    group external {
        type external;
        export send-direct;
        peer-as 4;
        neighbor 34.34.34.4;
    }
}
ospf {
    area 0.0.0.0 {
        interface lo0.3 {
            passive;
        }
        interface fe-1/2/0.5;
        interface fe-1/2/1.6;
    }
}
user@R3# show routing-options
autonomous-system 123;
router-id 192.168.3.1;
デバイスの設定が完了したら、設定モードから commit を入力します。
デバイスR4の設定
ステップバイステップの手順
次の例では、設定階層のさまざまなレベルに移動する必要があります。CLIのナビゲーションについては、『Junos OS CLIユーザーガイド』の「設定モードでのCLIエディタの使用」を参照してください。
デバイスR4を設定するには:
インターフェイスを設定します。
[edit interfaces fe-1/2/0 unit 7]
user@R4# set family inet address 24.24.24.4/24
[edit interfaces fe-1/2/1 unit 8]
user@R4# set family inet address 34.34.34.4/24
[edit interfaces lo0 unit 4]
user@R4# set family inet address 192.168.4.1/32
BGPを設定します。
[edit protocols bgp group external]
user@R4# set type external
user@R4# set export send-direct
user@R4# set peer-as 123
user@R4# set neighbor 34.34.34.3
user@R4# set neighbor 24.24.24.2
直接ルートを受け入れるポリシーを設定します。
注:このシナリオの他の有用なオプションは、OSPFまたはローカルルートで学習したルートを受け入れることかもしれません。
[edit policy-options policy-statement send-direct term 1]
user@R4# set from protocol direct
user@R4# set then accept
ルーターIDと自律システム(AS)番号を設定します。
[edit routing-options]
user@R4# set autonomous-system 4
user@R4# set router-id 192.168.4.1
結果
設定モードから、 show interfaces、 show policy-options、 show protocols、 show routing-options コマンドを入力して設定を確認します。出力に意図した設定が表示されない場合は、この例の手順を繰り返して設定を修正します。
user@R4# show interfaces
fe-1/2/0 {
    unit 7 {
        family inet {
            address 24.24.24.4/24;
        }
    }
}
fe-1/2/1 {
    unit 8 {
        family inet {
            address 34.34.34.4/24;
        }
    }
}
lo0 {
    unit 4 {
        family inet {
            address 192.168.4.1/32;
        }
    }
}
user@R4# show policy-options
policy-statement send-direct {
    term 1 {
        from protocol direct;
        then accept;
    }
}
user@R4# show protocols
bgp {
    group external {
        type external;
        export send-direct;
        peer-as 123;
        neighbor 34.34.34.3;
        neighbor 24.24.24.2;
    }
}
user@R4# show routing-options
autonomous-system 4;
router-id 192.168.4.1;
デバイスの設定が完了したら、設定モードから commit を入力します。
検証
設定が正常に機能していることを確認します。
デバイスR1からデバイスR4へのアクティブパスの確認
目的
デバイスR1からデバイスR4へのアクティブパスがデバイスR2を経ることを確認します。
アクション
動作モードから、 show route protocol bgp コマンドを入力します。
user@R1> show route protocol bgp
inet.0: 11 destinations, 18 routes (11 active, 0 holddown, 0 hidden)
+ = Active Route, - = Last Active, * = Both

12.12.12.0/24       [BGP/170] 00:11:48, localpref 100, from 192.168.2.1
                      AS path: I
                    > to 12.12.12.2 via fe-1/2/0.1
13.13.13.0/24       [BGP/170] 00:11:48, localpref 100, from 192.168.3.1
                      AS path: I
                    > to 13.13.13.3 via fe-1/2/1.2
24.24.24.0/24       [BGP/170] 00:11:48, localpref 100, from 192.168.2.1
                      AS path: I
                    > to 12.12.12.2 via fe-1/2/0.1
34.34.34.0/24       [BGP/170] 00:11:48, localpref 100, from 192.168.3.1
                      AS path: I
                    > to 13.13.13.3 via fe-1/2/1.2
192.168.2.1/32      [BGP/170] 00:11:48, localpref 100, from 192.168.2.1
                      AS path: I
                    > to 12.12.12.2 via fe-1/2/0.1
192.168.3.1/32      [BGP/170] 00:11:48, localpref 100, from 192.168.3.1
                      AS path: I
                    > to 13.13.13.3 via fe-1/2/1.2
192.168.4.1/32     *[BGP/170] 00:05:14, localpref 100, from 192.168.2.1
                      AS path: 4 I
                    > to 12.12.12.2 via fe-1/2/0.1
                    [BGP/170] 00:05:14, localpref 100, from 192.168.3.1
                      AS path: 4 I
                    > to 13.13.13.3 via fe-1/2/1.2
意味
アスタリスク(*)は、優先パスがデバイスR2を経由していることを示しています。デフォルト設定では、デバイスR2のルーターIDはデバイスR3よりも低くなります。ルーターIDは、パス選択を制御しています。
ローカルプリファレンスを変更してパス選択を変更する
目的
デバイスR3を通過するようにパスを変更します。
アクション
設定モードから、 set local-preference 300 コマンドを入力します。
[edit protocols bgp group internal]
user@R3# set local-preference 300
user@R3# commit
デバイスR1からデバイスR4へのアクティブパスの再確認
目的
デバイスR1からデバイスR4へのアクティブパスがデバイスR3を経由していることを確認します。
アクション
動作モードから、 show route protocol bgp コマンドを入力します。
user@R1> show route protocol bgp
inet.0: 11 destinations, 17 routes (11 active, 0 holddown, 0 hidden)
+ = Active Route, - = Last Active, * = Both

12.12.12.0/24       [BGP/170] 00:16:48, localpref 100, from 192.168.2.1
                      AS path: I
                    > to 12.12.12.2 via fe-1/2/0.1
13.13.13.0/24       [BGP/170] 00:00:22, localpref 300, from 192.168.3.1
                      AS path: I
                    > to 13.13.13.3 via fe-1/2/1.2
24.24.24.0/24       [BGP/170] 00:16:48, localpref 100, from 192.168.2.1
                      AS path: I
                    > to 12.12.12.2 via fe-1/2/0.1
34.34.34.0/24       [BGP/170] 00:00:22, localpref 300, from 192.168.3.1
                      AS path: I
                    > to 13.13.13.3 via fe-1/2/1.2
192.168.2.1/32      [BGP/170] 00:16:48, localpref 100, from 192.168.2.1
                      AS path: I
                    > to 12.12.12.2 via fe-1/2/0.1
192.168.3.1/32      [BGP/170] 00:00:22, localpref 300, from 192.168.3.1
                      AS path: I
                    > to 13.13.13.3 via fe-1/2/1.2
192.168.4.1/32     *[BGP/170] 00:00:21, localpref 300, from 192.168.3.1
                      AS path: 4 I
                    > to 13.13.13.3 via fe-1/2/1.2
意味
アスタリスク(*)は、優先パスがデバイスR3を経由していることを示しています。変更された設定では、デバイスR3の方がデバイスR2よりもローカルプリファレンスが高くなります。ローカルなプリファレンスがパス選択を制御しています。
例:非アクティブなルートをアドバタイズするための BGP の設定
デフォルトでは、BGPはアクティブなルートのみを再アドバタイズします。アクティブなルートとして選択しなかった場合でも、BGPによって学習された最適なルートをBGPするようにルーティングテーブルエクスポートするには、 advertise-inactive Junos OSステートメントを含めます。
advertise-inactive;
Junos OSでは、BGPはインストール済みまたはアクティブなBGPルートをアドバタイズします。これは、BGPパス選択ルールに基づいて最適として選択されたBGPルートです。 advertise-inactive ステートメントにより、非アクティブなBGPルートを他のピアにアドバタイズできます。
ルーティングテーブルに2つのBGPルートがあり、一方がアクティブでもう一方が非アクティブである場合、 advertise-inactive ステートメントは非アクティブなBGPプレフィックスをアドバタイズしません。このステートメントは、別のアクティブなBGPルートが存在する場合、非アクティブなBGPルートをアドバタイズしません。ただし、アクティブなルートがスタティックルートである場合、 advertise-inactive ステートメントは非アクティブなBGPルートをアドバタイズします。
advertise-inactiveステートメントは、ルーターがルートリフレクタとして設定されている場合、VRFからの非アクティブなルートをアドバタイズするのに役立ちません。
Junos OS は、アドバタイズされたルートの状態に一致する BGP エクスポート ポリシーの設定もサポートしています。以下のように、アクティブまたは非アクティブなルートのいずれかをマッチングできます。
policy-options {
    policy-statement name{
        from state (active|inactive);
    }
}
この修飾子は、エクスポートポリシーのコンテキストで使用される場合にのみマッチします。非アクティブなルートBGPをアドバタイズできるプロトコルによってルートがアドバタイズされている場合、 state inactive は advertise-inactive (または advertise-external)ステートメントの結果としてアドバタイズされたルートに一致します。
例えば、以下の設定は、ユーザー定義コミュニティーとの advertise-inactive 設定によりアドバタイズされたルートをマークするためのBGPエクスポートポリシーとして使用できます。そのコミュニティーは、受信ルーターが後で使用して、転送テーブルからそのようなルートをフィルタリングすることができます。このようなメカニズムを使用して、送信者によって転送に使用されないアドバタイズパスが転送ループにつながるのではないかという懸念に対処できます。
user@host# show policy-options
policy-statement mark-inactive {
    term inactive {
        from state inactive;
        then {
            community set comm-inactive;
        }
    }
    term default {
        from protocol bgp;
        then accept;
    }
    then reject;
}
community comm-inactive members 65536:65284;
要件
この例を設定する前に、デバイスの初期化以外の特別な設定を行う必要はありません。
概要
この例では、デバイスR2には、デバイスR1とデバイスR3の2つの外部BGP(EBGP)ピアがあります。
デバイスR1には172.16.5/24へのスタティックルートがあります。同様に、デバイスR2にも172.16.5/24へのスタティックルートがあります。デバイスR1は、BGPを介して、静的ルートに関する情報をデバイスR2に送信します。デバイスR2は、自身の静的ルートとデバイスR1から受信したBGP学習ルートの2つのソースから172.16.5/24に関する情報を持つようになりました。静的ルートは BGP で学習したルートよりも優先されるため、デバイス R2 では BGP ルートが非アクティブになります。通常、デバイスR2はBGPで学習した情報をデバイスR3に送信しますが、BGPルートが非アクティブであるため、デバイスR2はこれを行いません。したがって、デバイスR2で advertise-inactive コマンドを有効にしない限り、デバイスR3には172.16.5/24に関する情報がありません。デバイスR2はBGP学習をデバイスR3に送信します。
トポロジー
図4 は、サンプルネットワークを示しています。
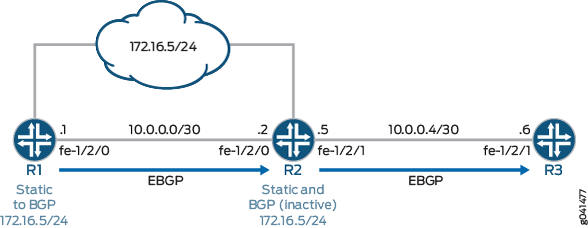 のBGPトポロジー
CLIクイックコンフィグレーション は、 図4に示すすべてのデバイスの構成を示しています。
セクション #d14e128__d14e255 では、デバイスR2の手順を説明しています。
設定
CLIクイックコンフィグレーション
この例をすばやく設定するには、以下のコマンドをコピーしてテキスト ファイルに貼り付け、改行を削除して、ネットワーク構成に合わせて必要な詳細を変更し、 [edit] 階層レベルのCLIにコマンドをコピー アンド ペーストします。
デバイスR1
set interfaces fe-1/2/0 unit 0 family inet address 10.0.0.1/30
set interfaces lo0 unit 0 family inet address 192.168.0.1/32
set protocols bgp group to_R2 type external
set protocols bgp group to_R2 export send-static
set protocols bgp group to_R2 neighbor 10.0.0.2 peer-as 200
set policy-options policy-statement send-static term 1 from protocol static
set policy-options policy-statement send-static term 1 then accept
set routing-options static route 172.16.5.0/24 discard
set routing-options static route 172.16.5.0/24 install
set routing-options autonomous-system 100
デバイスR2
set interfaces fe-1/2/0 unit 0 family inet address 10.0.0.2/30
set interfaces fe-1/2/1 unit 0 family inet address 10.0.0.5/30
set interfaces lo0 unit 0 family inet address 192.168.0.2/32
set protocols bgp group to_R1 type external
set protocols bgp group to_R1 neighbor 10.0.0.1 peer-as 100
set protocols bgp group to_R3 type external
set protocols bgp group to_R3 advertise-inactive
set protocols bgp group to_R3 neighbor 10.0.0.6 peer-as 300
set routing-options static route 172.16.5.0/24 discard
set routing-options static route 172.16.5.0/24 install
set routing-options autonomous-system 200
デバイスR3
set interfaces fe-1/2/1 unit 0 family inet address 10.0.0.6/30
set interfaces fe-1/2/0 unit 9 family inet address 10.0.0.9/30
set interfaces lo0 unit 0 family inet address 192.168.0.3/32
set protocols bgp group ext type external
set protocols bgp group ext peer-as 200
set protocols bgp group ext neighbor 10.0.0.5
set routing-options autonomous-system 300
手順
ステップバイステップの手順
次の例では、設定階層内のさまざまなレベルに移動する必要があります。CLIのナビゲーションについては、『Junos OS CLIユーザーガイド』の「構成モードでのCLIエディターの使用」を参照してください。
デバイスR2を設定するには:
デバイスインターフェイスを設定します。
[edit interfaces]
user@R2# set fe-1/2/0 unit 0 family inet address 10.0.0.2/30
user@R2# set fe-1/2/1 unit 0 family inet address 10.0.0.5/30
user@R2# set lo0 unit 0 family inet address 192.168.0.2/32
デバイスR1へのEBGP接続を設定します。
[edit protocols bgp group to_R1]
user@R2# set type external
user@R2# set neighbor 10.0.0.1 peer-as 100
デバイスR3へのEBGP接続を設定します。
[edit protocols bgp group to_R3]
user@R2# set type external
user@R2# set neighbor 10.0.0.6 peer-as 300
デバイスR3とのEBGPグループピアリングセッションに
advertise-inactiveステートメントを追加します。[edit protocols bgp group to_R3] user@R2# set advertise-inactive
172.16.5.0/24ネットワークへの静的ルートを設定します。
[edit routing-options static]
user@R2# set route 172.16.5.0/24 discard
user@R2# set route 172.16.5.0/24 install
自律システム(AS)番号を設定します。
[edit routing-options]
user@R2# set autonomous-system 200
結果
設定モードから、 show interfaces、 show protocols、 show policy-options、および show routing-options コマンドを入力して設定を確認します。出力に意図した設定が表示されない場合は、この例の手順を繰り返して設定を修正します。
user@R2# show interfaces
fe-1/2/0 {
    unit 0 {
        family inet {
            address 10.0.0.2/30;
        }
    }
}
fe-1/2/1 {
    unit 0 {
        family inet {
            address 10.0.0.5/30;
        }
    }
}
lo0 {
    unit 0 {
        family inet {
            address 192.168.0.2/32;
        }
    }
}
user@R2# show protocols
bgp {
    group to_R1 {
        type external;
        neighbor 10.0.0.1 {
            peer-as 100;
        }
    }
    group to_R3 {
        type external;
        advertise-inactive;
        neighbor 10.0.0.6 {
            peer-as 300;
        }
    }
}
user@R2# show routing-options
static {
    route 172.16.5.0/24 {
        discard;
        install;
    }
}
autonomous-system 200;
デバイスの設定が完了したら、設定モードから commit を入力します。
検証
設定が正常に機能していることを確認します。
BGPアクティブパスの検証
目的
デバイスR2で、172.16.5.0/24プレフィックスがルーティングテーブルに存在し、予想されるアクティブパスがあることを確認します。
アクション
user@R2> show route 172.16.5

inet.0: 7 destinations, 8 routes (7 active, 0 holddown, 0 hidden)
+ = Active Route, - = Last Active, * = Both

172.16.5.0/24      *[Static/5] 21:24:38
                      Discard
                    [BGP/170] 21:21:41, localpref 100
                      AS path: 100 I, validation-state: unverified
                    > to 10.0.0.1 via fe-1/2/0.0
意味
デバイスR2は、デバイスR1と独自の静的に設定されたルートの両方から172.16.5.0/24ルートを受信します。静的ルートは、アスタリスク(*)で指定されたアクティブパスです。静的ルートパスは、BGP優先度(170)と比較して、ルート優先度(5)が最も低くなっています。したがって、スタティック ルートがアクティブになります。
外部ルートアドバタイズメントの検証
目的
デバイスR2では、172.16.5.0/24ルートがデバイスR3に対してアドバタイズされていることを確認します。
アクション
user@R2> show route advertising-protocol bgp 10.0.0.6


inet.0: 6 destinations, 7 routes (6 active, 0 holddown, 0 hidden)
  Prefix                  Nexthop              MED     Lclpref    AS path
  172.16.5.0/24           Self                                    100 I
意味
デバイスR2は、デバイスR3に対して172.16.5.0/24ルートをアドバタイズしています
デバイスR3でのルートの検証
目的
172.16.6.0/24プレフィックスがデバイスR3のルーティングテーブルに存在することを確認します。
アクション
user@R3> show route 172.16.5.0/24

inet.0: 5 destinations, 5 routes (5 active, 0 holddown, 0 hidden)
+ = Active Route, - = Last Active, * = Both

172.16.5.0/24      *[BGP/170] 00:01:19, localpref 100
                      AS path: 200 100 I, validation-state: unverified
                    > to 10.0.0.5 via fe-1/2/1.0
意味
デバイスR3には、172.16.5.0/24のBGP学習ルートがあります。
advertise-inactiveステートメントを試す
目的
デバイスR2のBGP設定から advertise-inactive ステートメントを削除するとどうなるかを確認します。
アクション
デバイスR2で、
advertise-inactiveステートメントを無効にします。[edit protocols bgp group to_R3] user@R2# deactivate advertise-inactive user@R2# commit
デバイスR2で、172.16.5.0/24ルートがデバイスR3に対してアドバタイズされているかどうかを確認します。
user@R2> show route advertising-protocol bgp 10.0.0.6
予想通り、ルートはもうアドバタイズされなくなります。
デバイスR3で、172.16.5/24ルートがルーティングテーブルにないことを確認します。
user@R3> show route 172.16.5/24
意味
デバイスR1はデバイスR2にルート172.16.5/24をアドバタイズしますが、デバイスR2にはこのプレフィックス用に手動設定された静的ルートがあります。静的ルートは BGP ルートよりも優先されるため、デバイス R2 は BGP ルートを非アクティブなルートとしてインストールします。BGPルートがアクティブではないため、デバイスR2はデバイスR3にBGPルートを再アドバタイズしません。これは Junos OS のデフォルトの動作です。デバイスR2のBGP設定に advertise-inactive ステートメントを追加すると、デバイスR2は非アクティブなルートを再アドバタイズします。
変更履歴テーブル
サポートされる機能は、使用しているプラットフォームとリリースによって決まります。 機能エクスプローラー を使用して、機能がお使いのプラットフォームでサポートされているかどうかを確認します。
static-label-switched-path を設定する場合のデフォルトのプリファレンス値は6です。