交换机配置选项
本页介绍 Mist 交换机模板中的配置字段,并作为 使用模板配置交换机中的过程的参考。
您可以在组织级别或站点级别配置交换机设置。
-
若要配置组织范围的设置,请从瞻博网络Mist门户的左侧菜单中选择 组织 > 交换机模板 。然后创建模板并将其应用到一个或多个网站或网站组。
-
要在站点级别配置交换机设置,请从 瞻博网络 Mist 门户 的左侧菜单中选择站点> 交换机配置 。然后选择要设置的站点,然后输入交换机设置。
如果已将组织级交换机模板分配给站点,则站点配置将以仅查看模式显示。您可以保留模板中的设置或进行调整。在页面的每个部分中,您可以选择“ 覆盖配置模板” ,然后输入更改。这些更改仅适用于此站点,不适用于模板。
在组织和站点级别,交换机设置都按多个部分分组,如下所述。
所有交换机配置
Configure these options in the All Switches section of the Organization > Switch Templates page and the Site > Switch Configuration page.
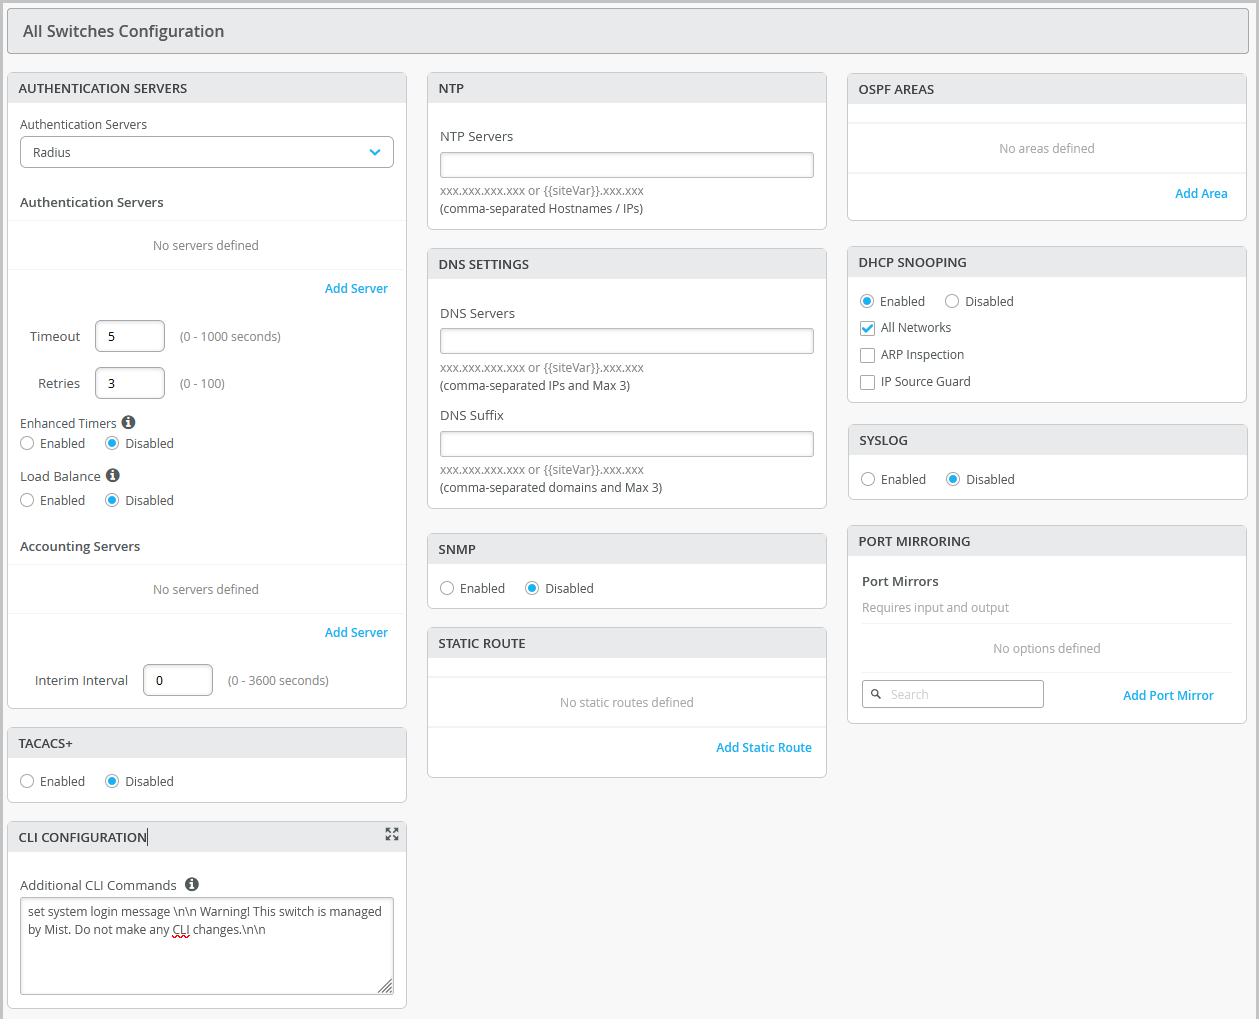
| Field/Section | Description |
|---|---|
| AUTHENTICATION SERVERS |
Choose an authentication server for validating usernames and passwords, certificates, or other authentication factors provided by users.
After selecting an authentication server, configure additional details for the selected server as required. You can configure information that include:
Note:
(Applicable to Junos switches) If you want to set up RADIUS authentication for Switch Management access (for the switch CLI login), you need to include the following CLI commands in the Additional CLI Commands section in the template (applicable to Junos devices): set system authentication-order radius set system radius-server radius-server-IP port 1812 set system radius-server radius-server-IP secret secret-code set system radius-server radius-server-IP source-address radius-Source-IP set system login user remote class class (Applicable to Junos switches) For RADIUS or TACACS+ local authentication to a Switch, it is necessary to create a remote user account or a different login class. To use different login classes for different RADIUS-authenticated users on a switch running Junos OS, create multiple user templates in the Junos configuration by using the following CLI commands in the Additional CLI Commands section: set system login user RO class read-only set system login user OP class operator set system login user SU class super-user set system login user remote full-name "default remote access user template" set system login user remote class read-only CX switches do not use login classes or user templates. The RADIUS server returns Aruba VSAs (Aruba-Admin-Role or Aruba-Priv-Admin-User) that AOS-CX maps to a local user-group. No switch-side role configuration is required. Three built-in user-groups already exist for CX switches — administrators, operators, auditors. These are equivalent to the following Junos user roles: super-user, operator, and other read-only roles. Custom user-groups are optional.
Note: Unlike EX or QFX switches, CX switches have no default 'remote user' role. If no VSA or Service-Type criterion resolves to a role, authentication fails - there is no catch-all role to configure.
|
| RADIUS FOR SWITCH AUTHENTICATION | Enable RADIUS-based admin authentication for switches. RADIUS-based authentication enables switch administrator logins to be authenticated against RADIUS servers configured at the device, site, or organization level.
RADIUS authentication provides the following configuration options, enabling organizations to either use their existing authentication infrastructure or implement dedicated RADIUS servers specifically for switch authentication.
Note:
You can enable either RADIUS or TACACS+; both options cannot be enabled at the same time. |
| TACACS+ | Enable TACACS+ for centralized user authentication on network devices.
To use TACACS+ authentication on the device, you must configure information about one or more TACACS+ servers on the network. You can also configure TACACS+ accounting on the device to collect statistical data about the users logging in to or out of a LAN and send the data to a TACACS+ accounting server. In addition, you can specify a user role for TACACS+ authenticated users within switch configuration. The following user roles are available: None, Admin, Read, Helpdesk. When the TACACs+ authenticated users do not have a user account configured locally on a switch running Junos OS, these users are assigned a user account named 'remote' by default. The port range supported for TACACS+ and accounting servers is 1 to 65535.
Note:
For TACACS+ to authenticate into the Switch, a similar login user as defined in the RADIUS section above needs to be created. |
| NTP | Specify the IP address or hostname of the Network Time Protocol (NTP) server. NTP is used to synchronize the clocks of the switch and other hardware devices on the Internet. |
| DNS SETTINGS |
Configure the domain name server (DNS) settings. You can configure up to three DNS IP addresses and suffixes in comma separated format. |
| SNMP |
Configure Simple Network Management Protocol (SNMP) on the switch to support network management and monitoring. You can configure the SNMPv2 or SNMPv3. Here are the SNMP options that you can configure:
For more information, see Configure SNMP on Switches. |
| STATIC ROUTE |
Configure static routes. The switch uses static routes when:
Mist supports IPv4 and IPv6 addresses for static routes. The IPv6 support is available for destination and next hop addresses. Types of static routes supported:
After specifying the details, click the check mark (✓) on the upper right of the Add Static Route window to add the configuration to the template. |
| CLI CONFIGURATION—Additional CLI Commands EX / QFX |
(Applicable to devices running Junos OS.) To configure any additional settings that are not available in the template's GUI, use set CLI commands. For instance, you can set up a custom login message to display a warning to users, advising them not to make any CLI changes directly on the switch. Here's an example of how you can do it: set system login message \n\n Warning! This switch is managed by Mist. Do not make any CLI changes. To delete a CLI command that was already added, use the delete system login message \n\n Warning! This switch is managed by Mist. Do not make any CLI changes.
Note:
Ensure that you enter the complete CLI command for the configuration to be successful. If configurations entered using CLI commands contain errors, a warning appears on the switch details page (Switches > Switch Name). For more information, refer to Add or Delete a CLI Configuration. |
|
CLI CONFIGURATION—Additional CLI Commands CX |
(Applicable to devices running AOS-CX.) To configure any additional settings that are not available in the template's GUI, use AOS-CX CLI commands. For example, you can configure custom banners to display informational or legal messages to users either before or after they log in. The following example shows how to configure a banner that is displayed to users before authentication (login): For more information, refer to Add or Delete a CLI Configuration. |
| OSPF | From this tile, you can:
For more information on how to configure OSPF through Mist, refer to OSPF Configuration for Switches. |
| VRRP |
(Applicable only to EX and QFX Series switches.) From this tile you can add a VRRP group by assigning a group number, authentication type, and network(s). For more information, see Add a VRRP Group to a Configuration (EX and QFX Series Switches). |
| DHCP SNOOPING |
Juniper EX series and QFX series switches provide excellent port security, including DHCP snooping, Address Resolution Protocol (ARP) inspection, and IP Source Guard. You can enable these options for all or selected VLANs on the switch from the Mist portal. DHCP snooping must be enabled for DHCP issues to be included in the Wired Successful Connect SLE. DHCP Snooping monitors DHCP messages from untrusted devices connected to the switch. When enabled, DHCP snooping extracts the IP address and lease information from the DHCP packets and stores it in a snooping database. Port security on the EX switches uses this information to verify DHCP requests and block DHCPOFFERs received on untrusted ports (DHCP DISCOVER and DHCP REQUEST are not affected).
By default, the DHCP protocol considers all trunk ports as trusted and all access ports as untrusted. We recommend that you only connect a DHCP server to the switch using a trunk port, or, if you must use an access port, be sure to explicitly configure that port as trusted in the port profile or DHCP will not work. Note that if you connect a device configured with a static IP address to an untrusted port on the switch, the MAC-IP binding may not exist in the DHCP snooping database; the packets will be dropped. You can use this command |
| SYSLOG |
Configure SYSLOG settings to set up how system log messages are handled. You can configure settings to send the system log messages to files, remote destinations, user terminals, or to the system console. For help with the configuration options, see Configure the System Log. |
|
PORT MIRRORING |
Configure port mirroring. Port mirroring is the ability of a router to send a copy of a packet to an external host address or a packet analyzer for analysis. Mist supports both local and remote port mirroring. CX Series switches do not support remote port mirroring. In local port mirroring, the source ports and the destination ports (monitor port) are located on the same network switch. In remote port mirroring, the source ports and destination ports are not on the same switch. In this case, the source port forwards the packet copy to the remote destination port through the connection achieved by the ports between the two switches. In the port mirroring configuration, you can specify the following:
Note: CX Series switches do not support Network and IP Address as output options.
|
|
Routing Policy |
Applicable to EX and QFX Switches. Configure routing policies for the entire organization (Organization > Switch Templates) or for a site (Site > Switch Configuration). Configuration involves defining terms, which consist of match conditions and actions to apply to matching routes. A routing policy framework is composed of default rules for each routing protocol. These rules determine which routes the protocol places in the routing table and advertises from the routing table. Routing policies are tied to protocols such as BGP or OSPF. A routing policy will only be pushed to the switch configuration if it is tied to the BGP Routing Protocol. The routing policies that are already defined inside the BGP tab of a switch will appear on the Routing Policy tab. To configure a routing policy:
|
管理
Configure these options in the Management section of the Organization > Switch Templates page and the Site > Switch Configuration page.
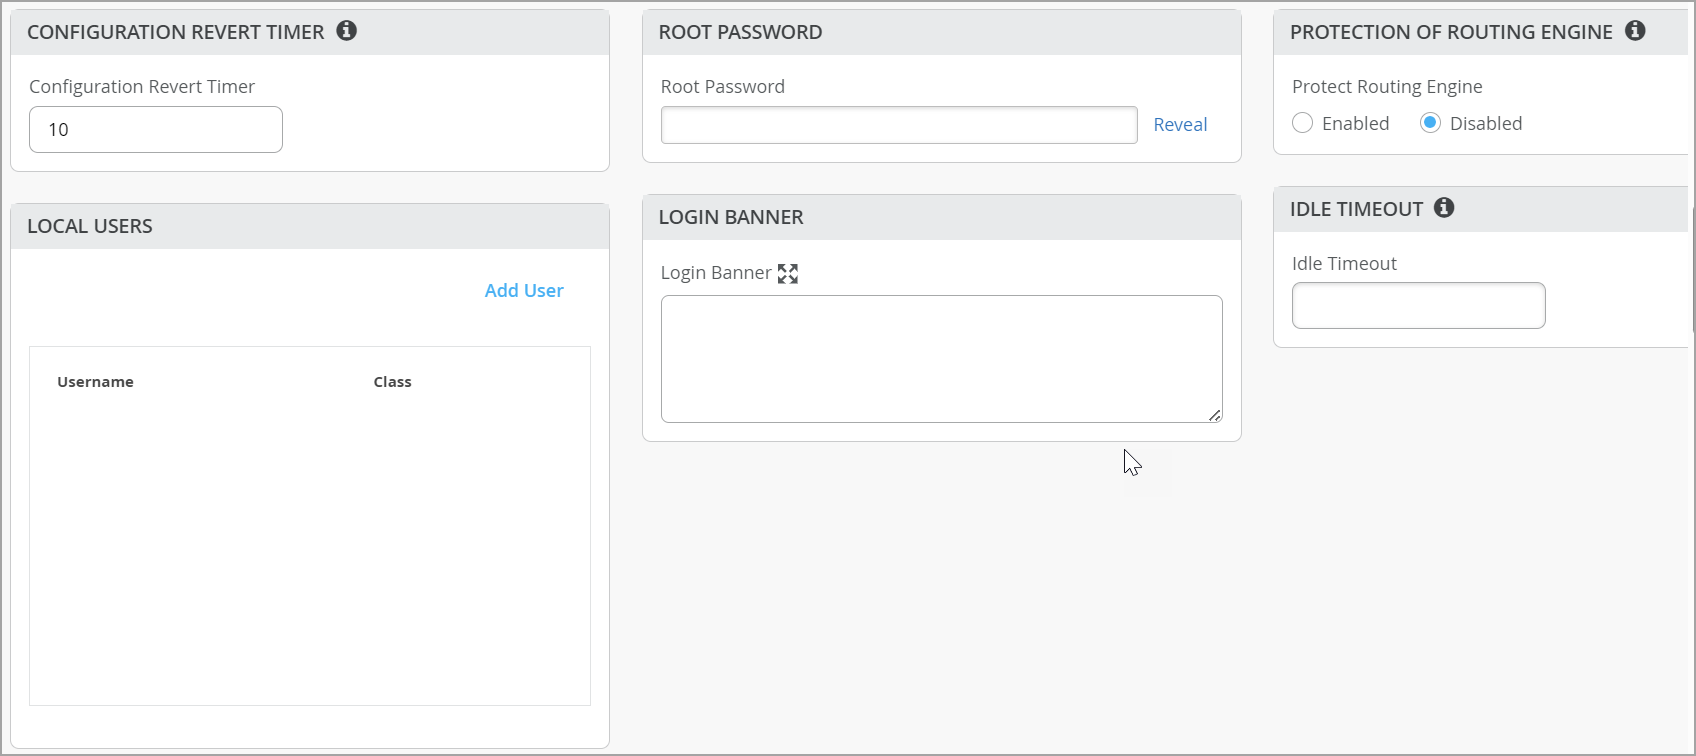
| Option | Notes |
|---|---|
|
Configuration Revert Timer |
This feature helps restore connectivity between a switch and the Mist cloud if a configuration change causes the switch to lose connection. It automatically reverts the changes made by a user and reconnects to the cloud within a specified time duration. By default, this time duration is set to 10 minutes for EX Series switches. You can specify a different time duration. Range: 3 to 30 minutes. In case of a configuration revert event, you can check the switch events page to get specific insight into why the switch configuration was reverted. |
|
Root/Admin Password |
Enter a plain-text password for the root user on EX and QFX Series switches or the admin user on CX Series switches. |
|
Protection of Routing Engine |
(Applicable only to EX and QFX Series switches.) Enable this feature to ensure that the Routing Engine accepts traffic only from trusted systems. This configuration creates a stateless firewall filter that discards all traffic destined for the Routing Engine, except packets from specified trusted sources. Protecting the Routing Engine involves filtering incoming traffic on the router’s lo0 interface. Enabling Protection of Routing Engine on Juniper Switches is suggested as the best practice. When Protection of Routing Engine is enabled, Mist by default ensures that the following services (if configured) are allowed to communicate with the switch: BGP, BFD, NTP, DNS, SNMP, TACACS, and RADIUS. If you need additional services that need access to the switch, you can use the Trusted Networks or Services section. If you want to set up access to the switch via ssh, select the ssh option under Trusted Services. If you need to allow switch to respond to pings, select the icmp option under Trusted Services. If you have other segments that you would like to reach the switch from, you can add them under Trusted Networks or Trusted IP/Port/Protocol. For more information, refer to Example: Configuring a Stateless Firewall Filter to Accept Traffic from Trusted Sources and Example: Configuring a Stateless Firewall Filter to Protect Against TCP and ICMP Floods. |
|
Local Users |
Create a local user account on the switch for device management purposes. To create a user account, click Add User and then define a username, login class (Operator, Read-only, Super User, or Unauthorized), and a password. |
|
Idle Timeout |
The maximum number of minutes that a remote shell session can be idle. When this limit is reached, users are logged out. (Valid Range: 1-60). |
|
Login Banner |
Enter text that you want users to see when they log in to the switch. Example: “Warning! This switch is managed by Juniper Mist. Do not make any CLI changes.” You can enter up to 2048 characters. |
|
DHCP Option 81 (For Dynamic DNS) |
(Applicable to EX and QFX Series switches.) Enable switches with DHCP option 81 support. When this option is enabled on a switch, the clients connected to that switch can send their fully qualified domain name (FQDN) to the DHCP server while requesting an IP address. This allows the DHCP server to update DNS records accordingly. You can enable the DHCP option 81 at the site level (Site > Switch Configuration) and device level (Switches > Switch Name) as well. |
|
Switch Timezone |
Applicable to EX and QFX Series switches. Enable the Use Site Timezone option to configure the switch to automatically align its time zone with the associated site’s configured time zone. When this option is enabled and saved, the effective time zone is displayed on both the site and switch detail pages and is pushed to the device. If Use Site Timezone is disabled, the switch defaults to UTC. Note that the switch time zone configured via the additional CLI commands takes precedence over the time zone configured using the Use Site Timezone option. This configuration is available at the organization or site level and at the switch level. |
|
Use Port Description From Port Profile |
Enable this option to push port descriptions defined in port profiles directly to your switches.
Note: If a port-level description is also configured for an individual port, it takes precedence over the port profile description.
|
共享元素
共享元素 — 网络
在此部分中,您可以添加或更新可在端口配置文件中使用的 VLAN。
对于每个 VLAN,输入名称、VLAN ID 和子网。您可以为子网指定 IPv4 或 IPv6 地址。有关更多提示,请参阅屏幕上的信息。
您还可以创建专用 VLAN 进行交换机管理。专用 VLAN 可直接从瞻博网络 Mist 门户实现精细的第 2 层微分段。专用 VLAN 将客户端流量隔离在同一 VLAN 中,无需额外分配第 3 层子网或 IP 地址空间。设备保留在同一网络上,可以访问网关、DHCP 服务器和防火墙等共享服务,而设备之间的通信将被阻止。要创建专用 VLAN,请选中“启用隔离”复选框,然后在网络配置窗口的“隔离网络 VLAN ID”字段中指定 VLAN ID。有关更多信息,请参阅配置专用 VLAN(EX 和 QFX 系列交换机)。
在此磁贴上,您可以选择隐藏用户定义的端口配置文件或 L3 子接口中未使用的网络。此功能可帮助您快速识别正在使用和未使用的网络。
共享元素 - 端口配置文件
有关配置文件的常规信息,请参阅 静态和动态端口配置文件。
如果您在站点级别工作,则可能会在端口配置文件名称旁边看到星号 (*)。这些端口配置文件是在交换机模板中创建的。如果单击它们,您将在仅查看模式下看到设置。要进行特定于站点的更改(仅影响此站点,而不影响交换机模板本身),请选择覆盖 模板定义的配置文件 ,然后编辑设置。
单击 “添加配置文件” 以配置端口配置文件,字段说明请参阅下表。
| 选项 | 注释 |
|---|---|
| 名称、已启用的端口和说明 |
用于识别和启用端口的基本设置。 |
|
产品系列 |
从以下选项中进行选择:
可用的配置选项因所选产品系列而异。 |
| 模式 |
|
| 端口网络(未标记/本机 VLAN) | 指定端口网络或本机 VLAN。 |
| VoIP 网络 | 指定 VoIP 网络(如果适用)。 |
|
允许与隔离网络通信 |
适用于 EX 和 QFX 系列交换机。 使此端口上的客户端能够与专用 VLAN(隔离网络)通信。有关更多信息,请参阅配置专用 VLAN(EX 和 QFX 系列交换机)。 |
| 中继网络 | 如果您选择了模式,请指定中继网络 中继。您可以选择所有或特定网络。 |
|
交换机间隔离链路 |
适用于 EX 和 QFX 系列交换机。 对于在中继模式下配置的配置文件,如果选择包括所有中继网络或包含专用 VLAN(隔离网络)的网络,请选中此复选框以将隔离扩展到上游交换机或互连交换机。必须在交换机到交换机链路的两端配置此选项。 |
| 使用 dot1x 身份验证 |
选择此选项可为基于端口的网络访问控制启用 IEEE 802.1X 身份验证。属于专用 VLAN (PVLAN) 成员的接口支持 802.1X 身份验证。 如果在端口上启用 dot1x 身份验证,则可以使用以下选项:
您还需要执行以下操作才能使 dot1x 身份验证正常工作:
|
|
速度 |
保留默认设置“自动”或选择速度 |
|
双工 |
保留默认设置“自动”,或选择“半”或“满”。 |
| MAC 限制 | 配置接口可动态获知的最大 MAC 地址数。当接口超过配置的 MAC 限制时,将丢弃帧。MAC 限制还会导致日志条目。配置的值在被替换或清除之前一直处于活动状态,并在设备重新启动后一直保持不变。
默认值:0 EX 和 QFX 交换机支持范围:0 到 16383 CX 交换机支持范围:0 到 32
注意:当 802.1X/MAC 身份验证配置了多个请求方时,CX 交换机不支持无限的 MAC 地址。在这种情况下,必须配置 MAC 地址限制,最大值为 32。
|
| PoE |
支持以太网供电 (PoE) 的端口可以包括以下选项:
将鼠标悬停在“交换机”页面上的接口图标上时,将显示以下 PoE 状态信息:
|
| 按 VLAN STP |
使用 VLAN 生成树协议 (VSTP) 或按 VLAN 生成树配置交换机。VSTP 有助于基于每个 VLAN 防止第 2 层网络中的环路。每个 VLAN 一个生成树可实现细粒度负载平衡。Mist 建议为其他供应商的设备(例如 Cisco)启用此功能,这些设备默认运行按 VLAN 生成树。 此设置也可用于站点和交换机级别。 |
| STP 边缘 |
如果要在端口上启用网桥协议数据单元 (BPDU) 保护,请将端口配置为生成树协议 (STP) 边缘端口。在未加入 STP 的客户端连接到的端口上启用 STP Edge。此设置可确保将端口视为边缘端口,并防止接收 BPDU。如果将非边缘设备插入配置了 STP 边缘的端口,则该端口将被禁用。此外,Switch Insights 页面还会生成端口 BPDU 阻止事件。 交换机详细信息 上的前面板还将显示此端口的BPDU错误。 您可以通过在前面板上选择端口,然后单击清除 BPDU错误来清除BPDU错误的端口。 您不应在上行链路端口上启用 STP Edge。 您还可以从交换机详细信息页面上的端口配置文件部分在交换机级别配置 STP Edge。 |
|
STP 点对点 |
此配置会将接口模式更改为点对点。点对点链路是两个网络节点(或交换机)之间的专用链路,用于将一个端口连接到另一个端口。 |
|
STP 无根端口 |
此配置可防止接口变为根端口。 |
|
块 STP BPDU |
通常在不需要 BPDU 的边缘或接入端口上启用。启用此选项后,如果收到 BPDU,端口将立即关闭,有助于防止潜在的环路或配置错误。 如果启用 STP Edge,则会自动禁用阻止 STP BPDU。但是,仍可配置BPDU活跃度检查。如果启用阻止 STP BPDU,则 STP Edge 和 BPDU 活跃度检查都会自动禁用。 |
| STP BPDU 活跃度检查 | 通常在需要 BPDU 的上行链路或中继端口上启用。此功能会监控 BPDU 接收并阻止端口,如果在 20 秒内未收到 BPDU,则会发出告警,帮助快速检测故障或配置错误。 |
| QoS |
为端口启用服务质量 (QoS),以便将延迟敏感型流量(例如语音)优先于端口上的其他流量。
注意:
为获得最佳结果,必须为下游(传入)和上游(传出)流量启用服务质量 (QoS)。这样可以确保网络能够有效地双向流量优先级排序和管理,从而提高性能和改善整体服务质量。 您可以选择覆盖 WLAN 设置页面上的QoS配置(站点 > WLAN > WLAN名称)。要覆盖 QoS 配置,请选中 覆盖 QoS 复选框,然后选择无线接入等级。下行流量(接入点>客户端)将使用指定的覆盖访问类值进行标记。覆盖配置不支持上游流量(客户端>接入点)。 另请参阅: QoS 配置。 |
| 风暴控制 |
启用风暴控制以监控流量级别,并在流量超过流量级别(以百分比指定)时自动丢弃广播、组播和未知单播数据包。此指定的流量级别称为风暴控制级别。此功能可主动防止数据包扩散并保持 LAN 的性能。 启用风暴控制后,您还可以选择从监控中排除广播、组播和未知单播数据包。 您还可以选中“对阈值采取行动”下的“ 关闭端口 ”复选框,将交换机配置为在流量超过用户定义的风暴控制阈值时自动关闭端口。 有关详细信息,请参阅 了解风暴控制。 |
| 持久(粘性)MAC 学习 |
启用 持久(粘性)MAC 以保留接口获知的可信工作站和服务器的 MAC 地址,即使在设备重新启动后也是如此。您可以为静态有线客户端配置粘性 MAC。粘性 MAC 不适用于瞻博网络 Mist 接入点接口,也不支持中继端口或配置了 802.1X 身份验证的端口。 粘性 MAC 与 MAC 限制(如上文所述)结合使用,可防止第 2 层拒绝服务 (DoS) 攻击、对以太网交换表的溢出攻击和 DHCP 饥饿攻击,同时仍允许接口动态学习 MAC 地址。在 Mist 门户中,“洞察”页面会将这些事件报告为 MAC Limit Exceeded 。 您可以将粘性 MAC 和 MAC 限制配置为交换机端口配置文件的一部分。此视频演示了一般过程: Port profiles provide a convenient way to manually or automatically provision EX switch interfaces. Going into the EX4300, we'll first create VLANs. We'll make a camera network with VLAN ID 30 and an IoT network with VLAN ID 29. You can create as many networks as needed. You can create the profiles, for example, a camera, and map it to the camera network that we just created. Customize the settings as desired, such as PoE and STP. We'll repeat this process to create profiles for a corporate device enabling 802.1x authentication, an IoT device configured with PoE, and an access point configured as a trunk port. It's very simple to modify profiles to meet your specific requirements. Then we go into the port configuration section to associate the configurations with port profiles. Here we map ports 1 through 5 to be with an AP profile, ports 6 through 10 with a corporate device profile, ports 11 through 15 with IoT profiles, and ports 16 to 20 with the camera profile. This is how to create port profiles. We can also create port aggregation uplinks to be associated with the appropriate profiles. When you save all of your changes, this pushes the configuration to the particular switch. This covers how EX switches are manually provisioned with port profiles from the Juniper MIST Cloud. 您必须显式启用位于端口配置文件配置文件底部的 持久(粘性)MAC 学习 选项,才能将粘性 MAC 包含在与接口关联的端口配置文件中。对于 MAC 限制,默认值为 0(无限制,即禁用),但您可以通过设置最多允许 16383 个唯一 MAC 地址的值来启用它。 要在 Mist 门户中查看为 MAC 限制或 MAC 计数设置的值,请从 交换机 页面选择一台交换机,然后将鼠标悬停在交换机端口上。您可以查看将哪个(端口)配置文件应用于接口,并通过扩展了解其粘性MAC状态。
图 2:显示粘性 MAC
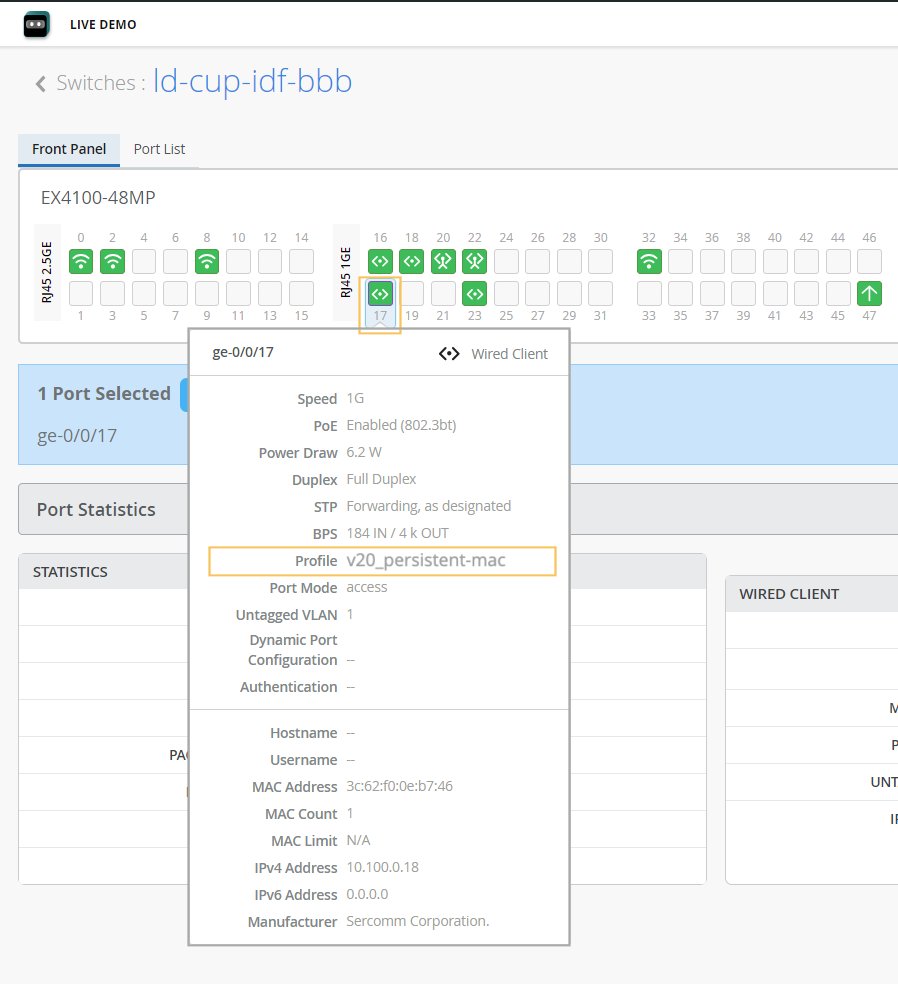 的端口详细信息 的端口详细信息
配置的 MAC 限制和已学习的 MAC 数将在几分钟后显示,因为接口上的动态学习正在进行。在 Mist 仪表板中,仅显示最大 MAC 地址计数。但是,您可以通过打开交换机的 远程 Shell 并运行以下Junos CLI命令(适用于 EX 和 QFX 系列 交换机),查看给定接口已学习的每个MAC 地址:
MAC 计数是一个持久值,一直保留到清除 MAC 地址为止(或直到在端口配置文件中禁用该值,然后将该配置推送到交换机)。 要查看在CX系列交换机上特定接口上学习的所有MAC地址,请在交换机CLI(AOS-CX)上运行
注意:CX 交换机不提供仅显示 MAC 地址表中的永久或粘性 MAC 地址的命令,MAC 地址。此外,超过配置的客户端限制的 MAC 地址不包括在客户端状态输出中;用于
show port-access port-security violation client-limit-exceeded interface interface查看相应的违规计数器。
要从 Mist 仪表板清除给定接口上的 MAC 地址,您需要以网络管理员或超级用户的身份登录。然后,只需从交换机前面板中选择所需的端口(如图 1 所示),然后单击出现的 清除 MAC [动态/持久] 按钮。 在 Switch Insights 页面上,该事件显示为一个 MAC Limit Reset 事件。 有关前面板的更多信息,请参阅 交换机详细信息。 |
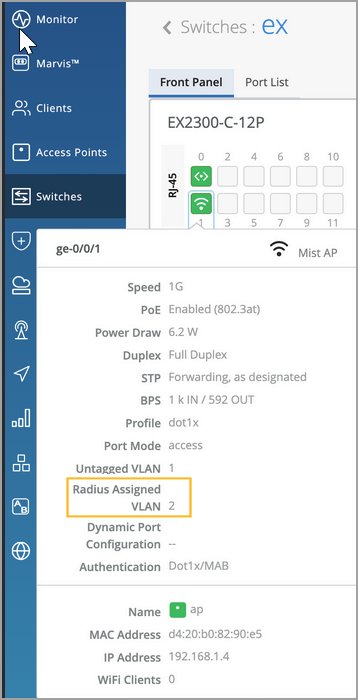
在端口配置文件磁贴上,您可以选择隐藏用户定义的任何静态或动态端口配置中未使用的端口配置文件。此功能可帮助您快速识别正在使用和未使用的端口配置文件。
共享元素 — 动态端口配置
动态端口分析使用所连接客户端设备的一组设备属性,自动将预配置的端口和网络设置与接口关联。
动态端口配置文件配置概括包括以下两个步骤:-
配置动态端口配置文件规则(详见此处)。
-
指定要用作动态端口的端口。可通过选中端口配置选项卡、交换机模板的选择交换机部分或交换机详细信息页面的端口配置部分上的启用 动态配置 复选框来执行此操作。有关更多信息,请参阅 “选择交换机配置 - 端口配置选项卡中的启用动态配置”行。
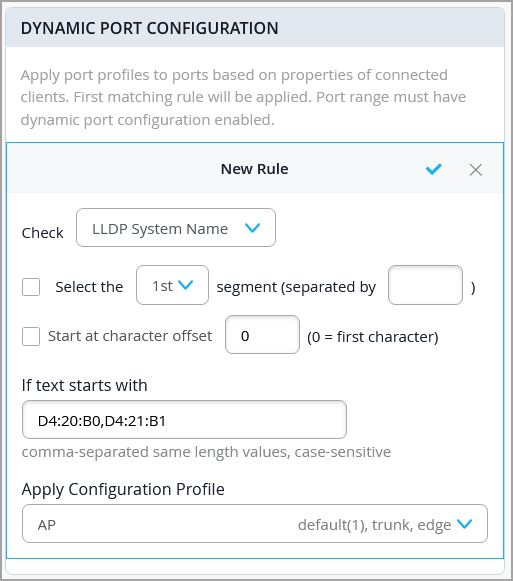
您可以使用以下参数配置动态端口配置文件规则:
-
LLDP 系统名称
-
LLDP 说明
-
LLDP 机箱 ID
-
Radius 用户名
-
Radius 过滤器 ID
-
MAC(以太网 MAC 地址)
在此示例中,当交换机端口连接到具有与配置参数匹配的 LLDP 系统名称的任何设备时,该交换机端口将被分配给启用了动态配置的交换机端口。
-
如果在 DPC 规则中的“ 如果文本开头为 ”字段中使用多个值,请用逗号分隔它们,并确保它们都具有相同的长度。如果任何值的长度不同,则必须为其创建单独的规则。
-
当设备支持 LLDP 时,优先选择基于 LLDP 的匹配,而不是基于 MAC 的匹配。
-
请勿在启用了 802.1X 身份验证的端口上使用基于 MAC 的匹配。
-
避免使用
Filter-ID属性。在端口上启用 802.1X 后,应通过 RADIUS 处理 VLAN 分配,而不依赖Filter-ID。
有关更多信息,请参阅 配置动态端口配置文件分配。
共享元素 - VRF
借助 VRF,您可以将 EX 系列交换机划分为多个虚拟路由实例,从而有效地隔离网络中的流量。您可以为 VRF 定义一个名称,指定与之关联的网络,并包括所需的任何其他路由。您可以为附加路由指定 IPv4 或 IPv6 地址。
-
您无法将默认网络 (VLAN ID = 1) 分配给 VRF。
-
Mist 建议在需要流量隔离和重叠 IP 地址空间的网段中使用 VRF。
选择交换机配置
In the Select Switches Configuration section, you can create rules to apply configuration settings based on the name, role, or model of the switch.
Click an existing rule to edit it, or click Add Rule to create a new one. Then complete each tabbed page. As you enter settings, click the checkmark at the top right to save your changes. You can also create a switch rule entry by cloning an existing rule. To do that, you just need to click the clone button and name the new rule.
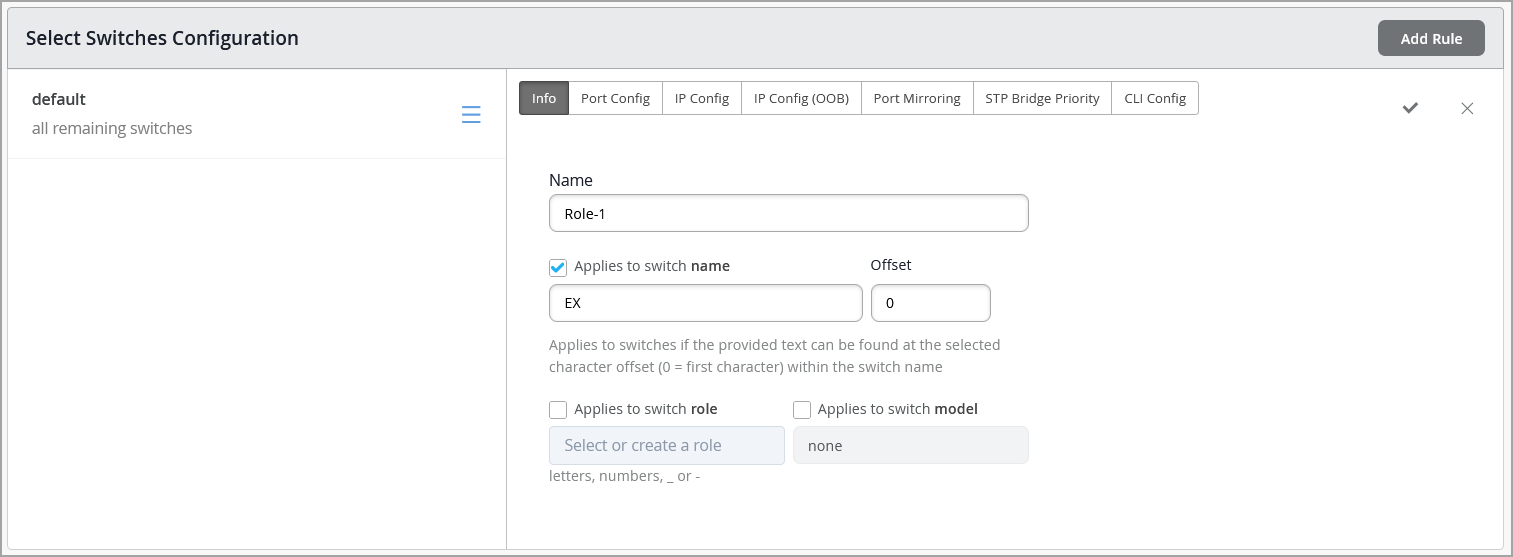
The various tabs are described in separate sections below.
- 选择交换机配置 - 信息选项卡
- 选择交换机配置 — Port Config 选项卡
- 选择交换机配置 — IP 配置选项卡
- 选择交换机配置 — IP 配置 (OOB) 选项卡
- 选择交换机配置 — STP 网桥优先级
- 选择交换机配置 — 端口镜像选项卡
- 选择交换机配置 — CLI 配置选项卡
选择交换机配置 - 信息选项卡
| 选项 | 注释 |
|---|---|
|
姓名 |
输入名称以标识此规则。 |
|
产品系列 |
从以下选项中选择适用的产品系列:
|
|
适用于交换机名称 |
如果您希望此规则应用于与指定名称匹配的所有交换机,请启用此选项。然后输入文本和偏移字符数。例如,如果输入偏移量为 0 的 abc ,则规则适用于名称以 abc 开头的交换机。如果偏移量为 5,则规则将忽略交换机名称的前 5 个字符。 |
|
适用于交换机角色 |
如果您希望此规则应用于具有相同角色的所有交换机,请启用此选项。使用小写字母、数字、下划线 (_) 或破折号 (-) 输入角色。 |
|
适用于 交换机型号 |
如果您希望此规则应用于具有相同型号的所有交换机,请启用此选项。然后选择模型。 |
选择交换机配置 — Port Config 选项卡
| 选项 | 注释 |
|---|---|
| 配置列表 |
单击 添加端口配置,或选择要编辑的端口配置。 |
|
端口 ID |
输入要配置的端口。 |
| 配置文件 | 选择要应用于指定端口的配置文件。
注意:
如果要使用 Q-in-Q 隧道配置交换机端口,请从此下拉列表中选择 Q-in-Q。有关更多信息,请参阅 在交换机端口上配置 Q-in-Q 隧道。 |
|
端口网络 (S-VLAN) |
如果端口使用 Q-in-Q 隧道,请指定服务 VLAN (S-VLAN)。S-VLAN 是一个外部附加 VLAN 标记,用于在客户站点之间扩展第 2 层以太网连接。当客户的 VLAN ID 重叠时,此功能特别有用。 |
|
速度 |
(仅当您选择了 Q-in-Q 作为配置文件时才适用。) 保留默认设置“自动”或选择速度。 |
|
双工 |
(仅当您选择了 Q-in-Q 作为配置文件时才适用。) 保留默认设置“自动”,或选择“半”或“满”。 |
|
PoE |
(仅当您选择了 Q-in-Q 作为配置文件时才适用。) 使端口支持以太网供电 (PoE)。 |
|
MTU |
(仅当您选择了 Q-in-Q 作为配置文件时才适用。) 指定端口的介质最大传输单元 (MTU)。 默认值:1514。 范围:
接口的介质最大传输单元 (MTU) 是可以通过 该接口转发而 不会发生分段的最大数据单元。 |
|
风暴控制 |
(仅当您选择了 Q-in-Q 作为配置文件时才适用。) 启用风暴控制以监控流量级别,并在流量超过流量级别(以百分比指定)时自动丢弃广播、组播和未知单播数据包。此指定的流量级别称为风暴控制级别。此功能可主动防止数据包扩散并保持 LAN 的性能。 启用风暴控制后,您还可以选择从监控中排除广播、组播和未知单播数据包。 您还可以选中“对阈值采取行动”下的“ 关闭端口 ”复选框,将交换机配置为在流量超过用户定义的风暴控制阈值时自动关闭端口。 有关详细信息,请参阅 了解风暴控制。 |
| 描述 | 提供端口的描述。 |
|
启用动态配置 |
(如果已选择 Q-in-Q 作为配置文件,则不适用。)
注意:
确保已创建受限 VLAN 和网络配置文件,可将其分配给连接到启用了动态端口配置但与动态端口分配规则不匹配的交换机端口的未知设备。 使交换机端口能够用作动态端口。当设备连接到动态端口时,它会根据动态端口配置文件分配规则中定义的属性自动接收端口配置文件。这些规则在共享元素 - 动态端口配置的动态端口配置行中进行了描述。 如果设备与属性不匹配,则会为其分配指定的 VLAN,最好是受限 VLAN(端口配置文件)。 在以下示例中,端口启用了动态端口分配,并分配了受限 VLAN。在这种情况下,如果连接的设备与动态分析属性不匹配,则会将其放入受限 VLAN(如不可路由 VLAN 或访客 VLAN)中。启用了端口聚合的接口不支持动态端口配置。 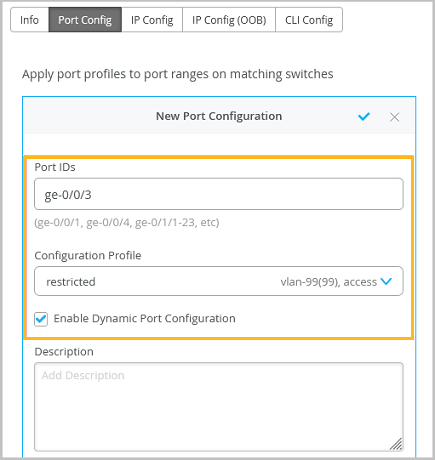
交换机上的动态端口配置用于建立与 IoT 设备、接入点和用户端口端点的连接。 有关更多信息,请参阅 配置动态端口配置文件分配。 |
|
端口上/下机警报 |
启用此功能后,瞻博网络 Mist 会监控这些端口上的正常和关闭状态之间的转换。如果启用此功能,还要在“监控>警报”>“警报配置”页面上启用关键交换机端口正常/关闭。 |
|
端口聚合 |
(如果已选择 Q-in-Q 作为配置文件,则不适用。) 启用此功能后,指定的以太网接口将分组形成单个链路层接口。此接口也称为链路聚合组 (LAG) 或捆绑包。 可分组到 LAG 中的接口数和交换机支持的 LAG 总数因交换机型号而异。您可以在启用或不启用 LACP 的情况下使用 LAG。如果另一端的设备不支持 LACP,您可以在此处禁用 LACP。 您还可以进行以下配置:
有关如何使用 Wired Assurance 配置链路聚合组 (LAG) 的更多信息,请观看以下视频: |
|
允许交换机端口操作员修改端口配置文件 |
启用此功能后,具有交换机端口操作员管理员角色的用户可以查看和管理此配置。 |
选择交换机配置 — IP 配置选项卡
| 选项 | 注释 |
|---|---|
|
网络 (VLAN) 列表 |
选择带内管理流量的网络。或者单击 添加网络 并填写新建网络字段,如此表的其余行中的说明。 |
|
姓名 |
输入名称以标识此网络。 |
|
VLAN ID |
输入 1-4094 之间的 VLAN ID,或输入站点变量以动态输入 ID。 |
|
子网 |
输入子网或站点变量。 |
选择交换机配置 — IP 配置 (OOB) 选项卡
| 选项 | 注释 |
|---|---|
| 专用管理 VRF |
适用于 EX 和 QFX 系列交换机。 启用或禁用 专用管理 VRF (带外)。 对于运行 Junos 21.4 或更高版本的所有独立设备或虚拟机箱,此功能会将管理接口限制为非默认虚拟路由和转发 (VRF) 实例。管理流量不再需要与其他控制流量或协议流量共享一个路由表。 |
选择交换机配置 — STP 网桥优先级
在交换机模板(组织)级别配置 网桥优先级 。此配置可以在站点级别和设备级别覆盖,从而提供额外的灵活性。
使用其他 CLI 命令配置的网桥优先级优先于在 UI 中选择的值。
选择交换机配置 — 端口镜像选项卡
此选项卡显示已添加的端口镜像配置列表。单击条目进行编辑。或者,单击 添加端口镜像 以启用端口镜像。此功能允许您根据规则中指定的参数(例如交换机角色、交换机名称和交换机型号)在交换机上动态应用端口镜像。此功能通常用于监控和故障排除。启用端口镜像后,交换机会将网络数据包的副本从镜像端口发送到监控端口。
Mist 支持本地和远程端口镜像。CX 系列交换机不支持远程端口镜像。
在本地端口镜像中,源端口和目的端口(监控端口)位于同一网络交换机上。在远程端口镜像中,源端口和目标端口不在同一交换机上。在这种情况下,源端口通过两个交换机之间的端口实现的连接将数据包副本转发到远程目标端口。
配置选项包括:
-
输入 — 要监控的流量的源(接口或网络)。除了输入,您还可以指定是希望 Mist 监控某个接口的入口流量还是出口流量。如果您希望同时监控入口和出口流量,请为同一接口添加两个输入条目——一个带有入口标志,另一个带有出口标志。
-
输出 — 要将流量镜像到的目标。您可以指定接口、网络或 IP 地址(如果是远程目标)。您不能在输入和输出字段中指定相同的接口或网络。
注意:CX 系列交换机不支持将网络和 IP 地址作为输出选项。
选择交换机配置下的规则优先于全局端口镜像配置。此外,如果配置了全局端口镜像,则该镜像将作为默认规则显示在“选择交换机配置”部分中,并显示为只读。您可以在全局级别对其进行编辑。
选择交换机配置 — CLI 配置选项卡
使用此部分要配置模板 GUI 中不可用的任何其他设置,您可以使用 set CLI 命令。
例如,您可以设置自定义登录消息以向用户显示警告,建议他们不要直接在交换机上进行任何 CLI 更改。下面是一个示例,说明如何做到这一点:
set system login message \n\n Warning! This switch is managed by Mist. Do not make any CLI changes.
要删除已添加的 CLI 命令,请使用命令 delete ,如以下示例所示:
delete system login message \n\n Warning! This switch is managed by Mist. Do not make any CLI changes.交换机策略标签、GBP 标记和交换机策略
Use this section to create Access Control Lists (ACLs) (also known as firewall filters) and Group-Based Policies (GBP).
-
Source/Destination labels—Create labels to identify the source/destination IP addresses for Access Control List (ACL) policies (RADIUS-based firewall filters). For more information, see Switch Policies.
-
GBP tags—(Applicable only to EX and QFX Series switches) Create tags for Group-Based Policies (GBP), which leverage VXLAN technology. GBP simplifies configuration and provides endpoint access control across your campus. For more information, see Group-Based Policies (EX and QFX Series Switches).