使用 NAT-T 的基于路由的 VPN
阅读本主题可了解使用 NAT-T 的 IPsec VPN。
网络地址转换遍历 (NAT-T) 是一种用于管理受 IPsec 保护的数据通过配置了地址转换 NAT 的设备时遇到的 IP 地址转换相关问题的方法。
使用 功能资源管理器 确认平台和版本对特定功能的支持。
查看具有 IPsec VPN 的平台特定 NAT-T 行为 部分,了解与您的平台相关的注意事项。
了解 NAT-T
网络地址转换遍历 (NAT-T) 是一种绕过受 IPsec 保护的数据通过 NAT 设备进行地址转换时遇到的 NAT 地址转换问题的方法。对 IP 寻址(NAT 的功能)进行的任何更改都会导致 IKE 丢弃数据包。在第 1 阶段交换期间检测到数据路径上的一个或多个 NAT 设备后,NAT-T 会为 IPsec 数据包添加一层用户数据报协议 (UDP) 封装,以便在地址转换后不会将其丢弃。NAT-T 将 IKE 和 ESP 流量封装到 UDP 中,并将端口 4500 用作源端口和目标端口。由于 NAT 设备会使过时的 UDP 转换,因此对等方之间需要激活消息。
默认情况下,NAT-T 处于启用状态,因此您必须在层次结构级别使用[edit security ike gateway gateway-name该no-nat-traversal语句来禁用 NAT-T。
NAT 分为两大类:
-
静态 NAT,其中私有地址和公共地址之间存在一对一关系。静态 NAT 适用于入站和出站方向。
-
动态 NAT,其中私有地址和公共地址之间存在多对一或多对多关系。动态 NAT 仅适用于出站方向。
NAT 设备的位置可以是:
-
只有 IKEv1 或 IKEv2 发起方位于 NAT 设备后面。多个发起方可以位于单独的 NAT 设备后面。发起方还可通过多个 NAT 设备连接到响应方。
-
只有 IKEv1 或 IKEv2 响应方位于 NAT 设备后面。
-
IKEv1 或 IKEv2 发起方和响应方均位于 NAT 设备后面。
动态端点 VPN 涵盖发起方的 IKE 外部地址不是固定的,因此响应方不知道的情况。当发起方的地址由 ISP 动态分配时,或者当发起方的连接通过从动态地址池分配地址的动态 NAT 设备时,可能会发生这种情况。
对于只有响应方位于 NAT 设备后面的拓扑,以及发起方和响应方都位于 NAT 设备后面的拓扑,提供了 NAT-T 的配置示例。发起方和响应方都支持用于 NAT-T 的站点到站点 IKE 网关配置。远程IKE ID 用于在IKE隧道协商的第 1 阶段验证对等方的本地 IKE ID。发起方和响应方都需要 a local-identity 和 a remote-identity 设置。
也可以看看
示例:通过 NAT 设备后面的响应方配置基于路由的 VPN
此示例说明如何在分支机构和企业办公室之间的 NAT 设备后面配置具有响应方的基于路由的 VPN。
要求
开始之前,请阅读 IPsec 概述。
概述
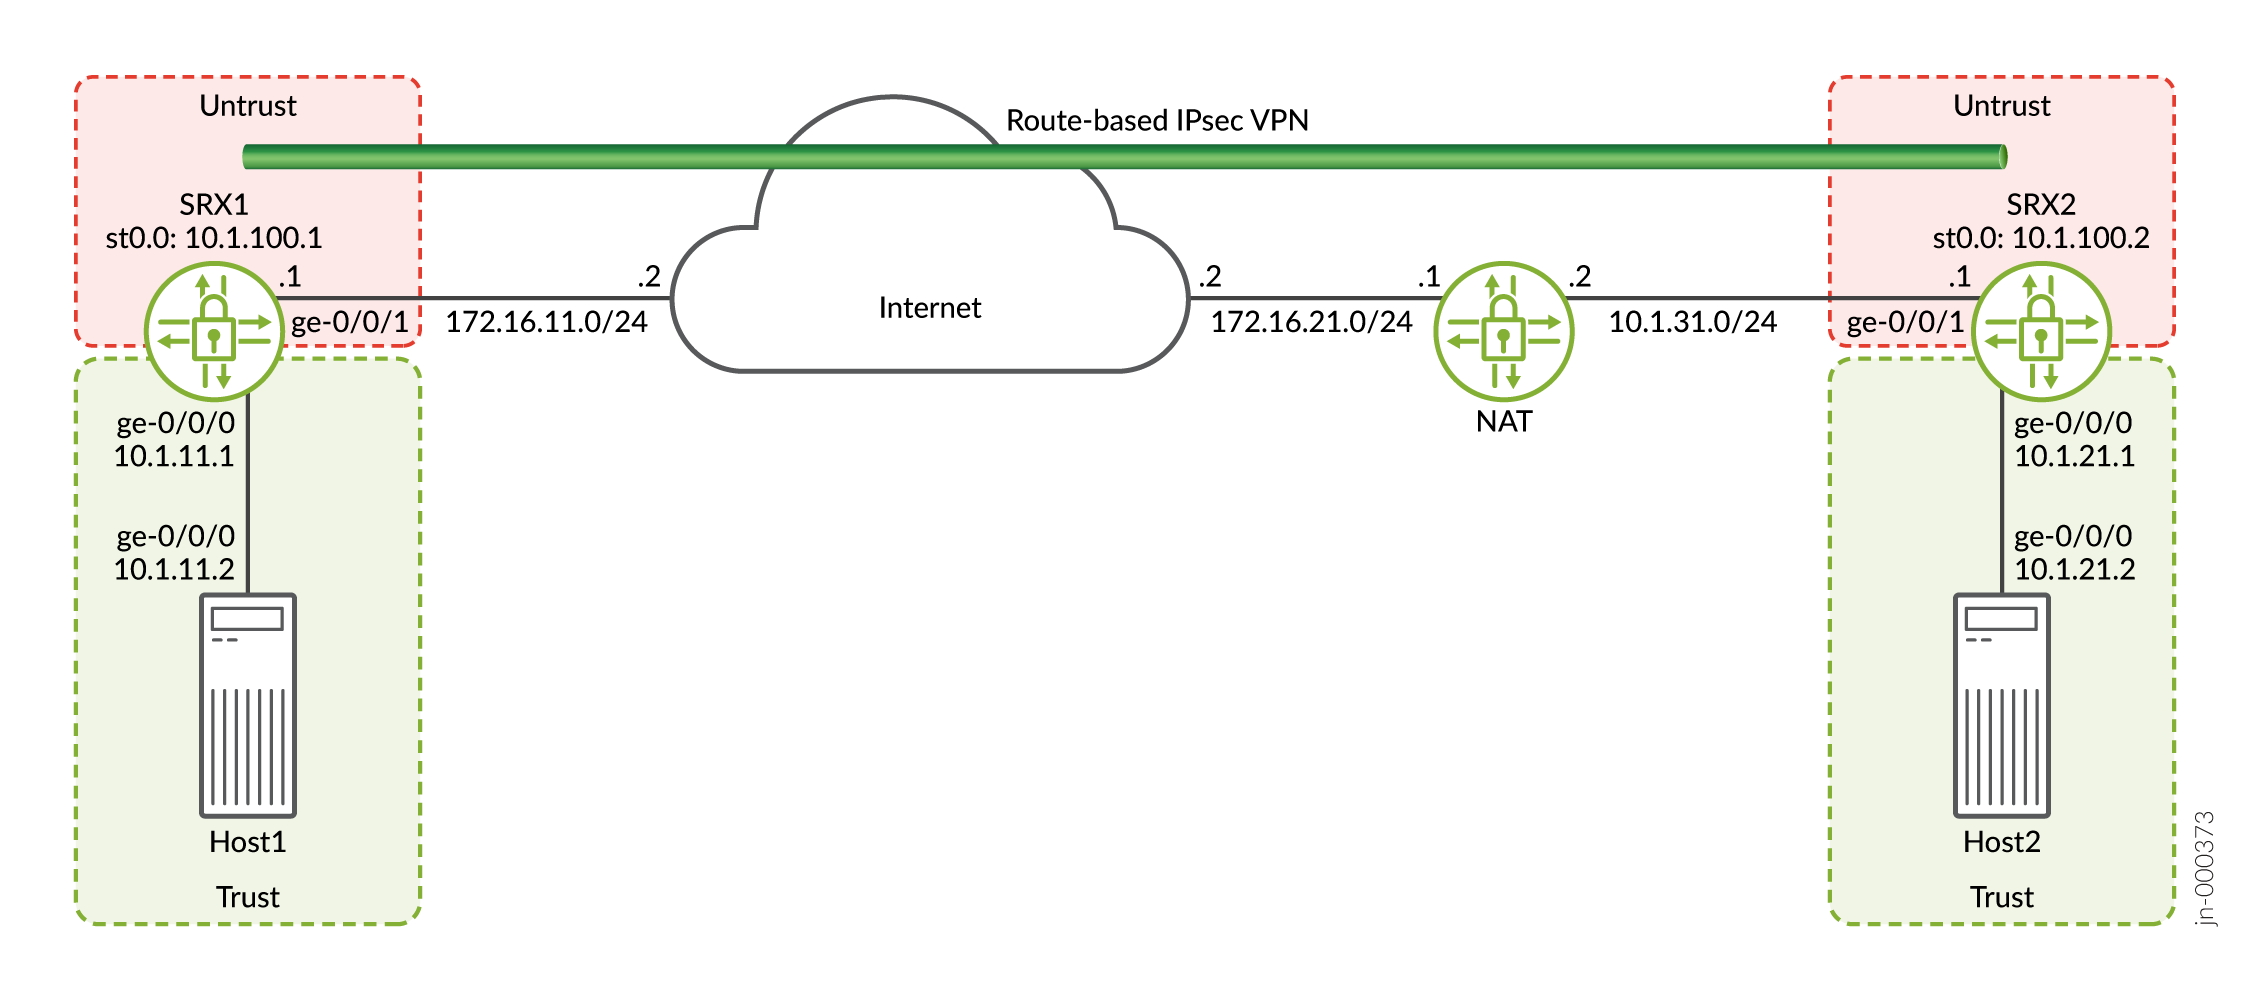
在此示例中,您将配置一个基于路由的 VPN。Host1 将使用 VPN 连接到 SRX2 上的公司总部。
图 1 显示了基于路由的 VPN 拓扑示例,其中只有响应方位于 NAT 设备后方。
 后面
后面
在此示例中,您将为 SRX1 中的发起方和 SRX2 中的响应方配置接口、IPsec 和安全策略。然后,配置 IKE 第 1 阶段和 IPsec 第 2 阶段参数。
SRX1 发送目标地址为 172.16.21.1 的数据包以建立 VPN。NAT 设备将目标地址转换为 10.1.31.1。
有关示例中用于发起方的特定配置参数,请参阅 表 1 至 表 3 。
|
功能 |
姓名 |
配置参数 |
|---|---|---|
|
接口 |
ge-0/0/1 |
172.16.11.1/24 |
|
ge-0/0/0 |
10.1.11.1/24 |
|
|
st0.0(隧道接口) |
10.1.100.1/24 |
|
|
静态路由 |
10.1.21.0/24 |
下一跃点为 st0.0。 |
|
172.16.21.1/32 |
下一跃点为 172.16.11.2。 |
|
|
安全性区域 |
不信任 |
|
|
信任 |
|
|
|
安全性策略 |
到 SRX2 |
允许从信任区域中的 10.1.11.0/24 到非信任区域中的 10.1.21.0/24 的流量。 |
|
from-SRX2 |
允许从不信任区域中的 10.1.21.0/24 到信任区域中的 10.1.11.0/24 的流量。 |
|
功能 |
姓名 |
配置参数 |
|---|---|---|
|
提议 |
ike_prop |
|
|
策略 |
ike_pol |
|
|
网关 |
GW1 |
|
|
功能 |
姓名 |
配置参数 |
|---|---|---|
|
提议 |
ipsec_prop |
|
|
策略 |
ipsec_pol |
|
|
VPN |
VPN1 |
|
有关示例中用于响应方的特定配置参数,请参阅 表 4 到 表 6 。
|
功能 |
姓名 |
配置参数 |
|---|---|---|
|
接口 |
ge-0/0/1 |
10.1.31.1/24 |
|
ge-0/0/0 |
10.1.21.1/24 |
|
|
st0.0(隧道接口) |
10.1.100.2/24 |
|
|
静态路由 |
172.16.11.1/32 |
下一跃点为 10.1.31.2。 |
|
10.1.11.0/24 |
下一跃点为 st0.0。 |
|
|
安全性区域 |
不信任 |
|
|
信任 |
|
|
|
安全性策略 |
到 SRX1 |
允许从信任区域中的 10.1.21.0/24 到非信任区域中的 10.1.11.0/24 的流量。 |
|
from-SRX1 |
允许从非信任区域中的 10.1.11.0/24 到信任区域中的 10.1.21.0/24 的流量。 |
|
功能 |
姓名 |
配置参数 |
|---|---|---|
|
提议 |
ike_prop |
|
|
策略 |
ike_pol |
|
|
网关 |
GW1 |
|
|
功能 |
姓名 |
配置参数 |
|---|---|---|
|
提议 |
ipsec_prop |
|
|
策略 |
ipsec_pol |
|
|
VPN |
VPN1 |
|
配置
- 为 SRX1 配置接口、路由选项和安全性参数
- 为 SRX1 配置 IKE
- 为 SRX1 配置 IPsec
- 为 SRX2 配置接口、路由选项和安全性参数
- 为 SRX2 配置 IKE
- 为 SRX2 配置 IPsec
- NAT 设备的配置
为 SRX1 配置接口、路由选项和安全性参数
CLI 快速配置
要快速配置此示例,请复制以下命令,将其粘贴到文本文件中,删除所有换行符,更改详细信息,以便与网络配置匹配,将命令复制并粘贴到层次结构级别的 [edit] CLI 中,然后从配置模式进入。commit
set security address-book book1 address Host1 10.1.11.0/24
set security address-book book1 attach zone trust
set security address-book book2 address Host2 10.1.21.0/24
set security address-book book2 attach zone untrust
set security policies from-zone trust to-zone untrust policy to-SRX2 match source-address Host1
set security policies from-zone trust to-zone untrust policy to-SRX2 match destination-address Host2
set security policies from-zone trust to-zone untrust policy to-SRX2 match application any
set security policies from-zone trust to-zone untrust policy to-SRX2 then permit
set security policies from-zone untrust to-zone trust policy from-SRX2 match source-address Host2
set security policies from-zone untrust to-zone trust policy from-SRX2 match destination-address Host1
set security policies from-zone untrust to-zone trust policy from-SRX2 match application any
set security policies from-zone untrust to-zone trust policy from-SRX2 then permit
set security zones security-zone untrust host-inbound-traffic system-services ike
set security zones security-zone untrust host-inbound-traffic system-services ping
set security zones security-zone untrust interfaces st0.0
set security zones security-zone untrust interfaces ge-0/0/1.0
set security zones security-zone trust host-inbound-traffic system-services all
set security zones security-zone trust host-inbound-traffic protocols all
set security zones security-zone trust interfaces ge-0/0/0.0
set interfaces ge-0/0/0 unit 0 family inet address 10.1.11.1/24
set interfaces ge-0/0/1 unit 0 family inet address 172.16.11.1/24
set interfaces st0 unit 0 family inet address 10.1.100.1/24
set routing-options static route 10.1.21.0/24 next-hop st0.0
set routing-options static route 172.16.21.1/32 next-hop 172.16.11.2
分步程序
下面的示例要求您在各个配置层级中进行导航。有关如何执行此操作的说明,请参阅《CLI 用户指南》中的在配置模式下使用 CLI 编辑器。
要配置接口、静态路由和安全参数,请执行以下操作:
-
配置连接到互联网的接口 Host1 和用于 VPN 的接口。
[edit]
user@SRX1# set interfaces ge-0/0/0 unit 0 family inet address 10.1.11.1/24
user@SRX1# set interfaces ge-0/0/1 unit 0 family inet address 172.16.11.1/24
user@SRX1# set interfaces st0 unit 0 family inet address 10.1.100.1/24
-
为将使用 VPN 和 SRX1 到达 NAT 设备的流量配置静态路由。
[edit]
user@SRX1# set routing-options static route 10.1.21.0/24 next-hop st0.0
user@SRX1# set routing-options static route 172.16.21.1/32 next-hop 172.16.11.2
-
配置不信任安全区域。
[edit]
user@SRX1# set security zones security-zone untrust host-inbound-traffic system-services ike
user@SRX1# set security zones security-zone untrust host-inbound-traffic system-services ping
user@SRX1# set security zones security-zone untrust interfaces st0.0
user@SRX1# set security zones security-zone untrust interfaces ge-0/0/1.0
-
配置信任安全区域。
[edit]
user@SRX1# set security zones security-zone trust host-inbound-traffic system-services all
user@SRX1# set security zones security-zone trust host-inbound-traffic protocols all
user@SRX1# set security zones security-zone trust interfaces ge-0/0/0.0
-
为安全策略中使用的网络配置地址簿。
[edit]
user@SRX1# set security address-book book1 address Host1 10.1.11.0/24
user@SRX1# set security address-book book1 attach zone trust
user@SRX1# set security address-book book2 address Host2 10.1.21.0/24
user@SRX1# set security address-book book2 attach zone untrust
-
创建安全策略以允许主机之间的流量。
[edit]
user@SRX1# set security policies from-zone trust to-zone untrust policy to-SRX2 match source-address Host1
user@SRX1# set security policies from-zone trust to-zone untrust policy to-SRX2 match destination-address Host2
user@SRX1# set security policies from-zone trust to-zone untrust policy to-SRX2 match application any
user@SRX1# set security policies from-zone trust to-zone untrust policy to-SRX2 then permit
user@SRX1# set security policies from-zone untrust to-zone trust policy from-SRX2 match source-address Host2
user@SRX1# set security policies from-zone untrust to-zone trust policy from-SRX2 match destination-address Host1
user@SRX1# set security policies from-zone untrust to-zone trust policy from-SRX2 match application any
user@SRX1# set security policies from-zone untrust to-zone trust policy from-SRX2 then permit
结果
在配置模式下,输入 show interfaces、 show routing-options和 show security 命令以确认您的配置。如果输出未显示预期的配置,请重复此示例中的说明以更正配置。
[edit]
user@SRX1# show interfaces
ge-0/0/0 {
    unit 0 {
        family inet {
            address 10.1.11.1/24;
        }
    }
}
ge-0/0/1 {
    unit 0 {
        family inet {
            address 172.16.11.1/24;
        }
    }
}
st0 {
    unit 0 {
        family inet {
            address 10.1.100.1/24;
        }
    }
}
[edit]
user@SRX1# show routing-options
static {
    route 10.1.21.0/24 next-hop st0.0;
    route 172.16.21.1/32 next-hop 172.16.11.2;
}
[edit]
user@SRX1# show security
address-book {
    book1 {
        address Host1 10.1.11.0/24;
        attach {
            zone trust;
        }
    }
    book2 {
        address Host2 10.1.21.0/24;
        attach {
            zone untrust;
        }
    }
}
policies {
    from-zone trust to-zone untrust {
        policy to-SRX2 {
            match {
                source-address Host1;
                destination-address Host2;
                application any;
            }
            then {
                permit;
            }
        }
    }
    from-zone untrust to-zone trust {
        policy from-SRX2 {
            match {
                source-address Host2;
                destination-address Host1;
                application any;
            }
            then {
                permit;
            }
        }
    }
}
zones {
    security-zone untrust {
        host-inbound-traffic {
            system-services {
                ike;
                ping;
            }
        }
        interfaces {
            st0.0;
            ge-0/0/1.0;
        }
    }
    security-zone trust {
        host-inbound-traffic {
            system-services {
                all;
            }
            protocols {
                all;
            }
        }
        interfaces {
            ge-0/0/0.0;
        }
    }
}
如果完成设备配置,请从配置模式进入。commit
为 SRX1 配置 IKE
CLI 快速配置
要快速配置此示例,请复制以下命令,将其粘贴到文本文件中,删除所有换行符,更改详细信息,以便与网络配置匹配,将命令复制并粘贴到层次结构级别的 [edit] CLI 中,然后从配置模式进入。commit
set security ike proposal ike_prop authentication-method pre-shared-keys
set security ike proposal ike_prop dh-group group2
set security ike proposal ike_prop authentication-algorithm sha1
set security ike proposal ike_prop encryption-algorithm 3des-cbc
set security ike policy ike_pol mode main
set security ike policy ike_pol proposals ike_prop
set security ike policy ike_pol pre-shared-key ascii-text “$ABC123”
set security ike gateway gw1 ike-policy ike_pol
set security ike gateway gw1 address 172.16.21.1
set security ike gateway gw1 local-identity user-at-hostname "srx1@example.com"
set security ike gateway gw1 remote-identity user-at-hostname "srx2@example.com"
set security ike gateway gw1 external-interface ge-0/0/1.0
分步程序
下面的示例要求您在各个配置层级中进行导航。有关如何执行此操作的说明,请参阅《CLI 用户指南》中的在配置模式下使用 CLI 编辑器。
要配置 IKE,请执行以下操作:
-
创建 IKE 第 1 阶段提议。
[edit]
user@SRX1# set security ike proposal ike_prop authentication-method pre-shared-keys
user@SRX1# set security ike proposal ike_prop dh-group group2
user@SRX1# set security ike proposal ike_prop authentication-algorithm sha1
user@SRX1# set security ike proposal ike_prop encryption-algorithm 3des-cbc
-
创建 IKE 第 1 阶段策略。
[edit]
user@SRX1# set security ike policy ike_pol mode main
user@SRX1# set security ike policy ike_pol proposals ike_prop
user@SRX1# set security ike policy ike_pol pre-shared-key ascii-text “$ABC123”
-
配置 IKE 第 1 阶段网关参数。网关地址应为 NAT 设备的 IP。
[edit security ike gateway gw1]
user@SRX1# set security ike gateway gw1 ike-policy ike_pol
user@SRX1# set security ike gateway gw1 address 172.16.21.1
user@SRX1# set security ike gateway gw1 local-identity user-at-hostname "srx1@example.com"
user@SRX1# set security ike gateway gw1 remote-identity user-at-hostname "srx2@example.com"
user@SRX1# set security ike gateway gw1 external-interface ge-0/0/1.0
结果
在配置模式下,输入 show security ike 命令以确认您的配置。如果输出未显示预期的配置,请重复此示例中的说明以更正配置。
[edit]
user@SRX1# show security ike
proposal ike_prop {
    authentication-method pre-shared-keys;
    dh-group group2;
    authentication-algorithm sha1;
    encryption-algorithm 3des-cbc;
}
policy ike_pol {
    mode main;
    proposals ike_prop;
    pre-shared-key ascii-text “$9$xPn7-VwsgaJUHqp01IcSs2g”; ## SECRET-DATA
}
gateway gw1 {
    ike-policy ike_pol;
    address 172.16.21.1;
    local-identity user-at-hostname "srx1@example.com";
    remote-identity user-at-hostname "srx2@example.com";
    external-interface ge-0/0/1.0;
}
如果完成设备配置,请从配置模式进入。commit
为 SRX1 配置 IPsec
CLI 快速配置
要快速配置此示例,请复制以下命令,将其粘贴到文本文件中,删除所有换行符,更改详细信息,以便与网络配置匹配,将命令复制并粘贴到层次结构级别的 [edit] CLI 中,然后从配置模式进入。commit
set security ipsec proposal ipsec_prop protocol esp
set security ipsec proposal ipsec_prop authentication-algorithm hmac-sha1-96
set security ipsec proposal ipsec_prop encryption-algorithm 3des-cbc
set security ipsec policy ipsec_pol perfect-forward-secrecy keys group2
set security ipsec policy ipsec_pol proposals ipsec_prop
set security ipsec vpn vpn1 bind-interface st0.0
set security ipsec vpn vpn1 ike gateway gw1
set security ipsec vpn vpn1 ike ipsec-policy ipsec_pol
set security ipsec vpn vpn1 establish-tunnels immediately
分步程序
下面的示例要求您在各个配置层级中进行导航。有关如何执行此操作的说明,请参阅《CLI 用户指南》中的在配置模式下使用 CLI 编辑器。
要配置 IPsec:
-
创建 IPsec 第 2 阶段提议。
[edit]
user@SRX1# set security ipsec proposal ipsec_prop protocol esp
user@SRX1# set security ipsec proposal ipsec_prop authentication-algorithm hmac-sha1-96
user@SRX1# set security ipsec proposal ipsec_prop encryption-algorithm 3des-cbc
-
创建 IPsec 第 2 阶段策略。
[edit]
user@SRX1# set security ipsec policy ipsec_pol perfect-forward-secrecy keys group2
user@SRX1# set security ipsec policy ipsec_pol proposals ipsec_prop
-
配置 IPsec VPN 参数。
[edit]
user@SRX1# set security ipsec vpn vpn1 bind-interface st0.0
user@SRX1# set security ipsec vpn vpn1 ike gateway gw1
user@SRX1# set security ipsec vpn vpn1 ike ipsec-policy ipsec_pol
user@SRX1# set security ipsec vpn vpn1 establish-tunnels immediately
结果
在配置模式下,输入 show security ipsec 命令以确认您的配置。如果输出未显示预期的配置,请重复此示例中的说明以更正配置。
[edit]
user@SRX1# show security ipsec
proposal ipsec_prop {
    protocol esp;
    authentication-algorithm hmac-sha1-96;
    encryption-algorithm 3des-cbc;
}
policy ipsec_pol {
    perfect-forward-secrecy {
        keys group2;
    }
    proposals ipsec_prop;
}
vpn vpn1 {
    bind-interface st0.0;
    ike {
        gateway gw1;
        ipsec-policy ipsec_pol;
    }
    establish-tunnels immediately;
}
如果完成设备配置,请从配置模式进入。commit
为 SRX2 配置接口、路由选项和安全性参数
CLI 快速配置
要快速配置此示例,请复制以下命令,将其粘贴到文本文件中,删除所有换行符,更改详细信息,以便与网络配置匹配,将命令复制并粘贴到层次结构级别的 [edit] CLI 中,然后从配置模式进入。commit
set security address-book book1 address Host2 10.1.21.0/24
set security address-book book1 attach zone trust
set security address-book book2 address Host1 10.1.11.0/24
set security address-book book2 attach zone untrust
set security policies from-zone trust to-zone untrust policy to-SRX1 match source-address Host2
set security policies from-zone trust to-zone untrust policy to-SRX1 match destination-address Host1
set security policies from-zone trust to-zone untrust policy to-SRX1 match application any
set security policies from-zone trust to-zone untrust policy to-SRX1 then permit
set security policies from-zone untrust to-zone trust policy from-SRX1 match source-address Host1
set security policies from-zone untrust to-zone trust policy from-SRX1 match destination-address Host2
set security policies from-zone untrust to-zone trust policy from-SRX1 match application any
set security policies from-zone untrust to-zone trust policy from-SRX1 then permit
set security zones security-zone untrust host-inbound-traffic system-services ike
set security zones security-zone untrust host-inbound-traffic system-services ping
set security zones security-zone untrust interfaces ge-0/0/1.0
set security zones security-zone untrust interfaces st0.0
set security zones security-zone trust host-inbound-traffic system-services all
set security zones security-zone trust host-inbound-traffic protocols all
set security zones security-zone trust interfaces ge-0/0/0.0
set interfaces ge-0/0/0 unit 0 family inet address 10.1.21.1/24
set interfaces ge-0/0/1 unit 0 family inet address 10.1.31.1/24
set interfaces st0 unit 0 family inet address 10.1.100.2/24
set routing-options static route 172.16.11.1/32 next-hop 10.1.31.2
set routing-options static route 10.1.11.0/24 next-hop st0.0
分步程序
下面的示例要求您在各个配置层级中进行导航。有关如何执行此操作的说明,请参阅《CLI 用户指南》中的在配置模式下使用 CLI 编辑器。
要配置接口、静态路由和安全参数,请执行以下操作:
-
配置连接到互联网的接口、Host2 以及用于 VPN 的接口。
[edit]
user@SRX2# set interfaces ge-0/0/0 unit 0 family inet address 10.1.21.1/24
user@SRX2# set interfaces ge-0/0/1 unit 0 family inet address 10.1.31.1/24
user@SRX2# set interfaces st0 unit 0 family inet address 10.1.100.2/24
-
为将使用 VPN 的流量和 SRX2 到达 SRX1 的流量配置静态路由。
[edit]
user@SRX2# set routing-options static route 172.16.11.1/32 next-hop 10.1.31.2
user@SRX2# set routing-options static route 10.1.11.0/24 next-hop st0.0
-
配置不信任安全区域。
[edit]
user@SRX2# set security zones security-zone untrust host-inbound-traffic system-services ike
user@SRX2# set security zones security-zone untrust host-inbound-traffic system-services ping
user@SRX2# set security zones security-zone untrust interfaces ge-0/0/1.0
user@SRX2# set security zones security-zone untrust interfaces st0.0
-
配置信任安全区域。
[edit]
user@SRX2# set security zones security-zone trust host-inbound-traffic system-services all
user@SRX2# set security zones security-zone trust host-inbound-traffic protocols all
user@SRX2# set security zones security-zone trust interfaces ge-0/0/0.0
-
为安全策略中使用的网络配置地址簿。
[edit]
user@SRX2# set security address-book book1 address Host2 10.1.21.0/24
user@SRX2# set security address-book book1 attach zone trust
user@SRX2# set security address-book book2 address Host1 10.1.11.0/24
user@SRX2# set security address-book book2 attach zone untrust
-
创建安全策略以允许主机之间的流量。
[edit]
user@SRX2# set security policies from-zone trust to-zone untrust policy to-SRX1 match source-address Host2
user@SRX2# set security policies from-zone trust to-zone untrust policy to-SRX1 match destination-address Host1
user@SRX2# set security policies from-zone trust to-zone untrust policy to-SRX1 match application any
user@SRX2# set security policies from-zone trust to-zone untrust policy to-SRX1 then permit
user@SRX2# set security policies from-zone untrust to-zone trust policy from-SRX1 match source-address Host1
user@SRX2# set security policies from-zone untrust to-zone trust policy from-SRX1 match destination-address Host2
user@SRX2# set security policies from-zone untrust to-zone trust policy from-SRX1 match application any
user@SRX2# set security policies from-zone untrust to-zone trust policy from-SRX1 then permit
结果
在配置模式下,输入 show interfaces、 show routing-options和 show security 命令以确认您的配置。如果输出未显示预期的配置,请重复此示例中的说明以更正配置。
[edit]
user@SRX2# show interfaces
ge-0/0/0 {
    unit 0 {
        family inet {
            address 10.1.21.1/24;
        }
    }
}
ge-0/0/1 {
    unit 0 {
        family inet {
            address 10.1.31.1/24;
        }
    }
}
st0 {
    unit 0 {
        family inet {
            address 10.1.100.2/24;
        }
    }
}
[edit]
user@SRX2# show routing-options
static {
    route 172.16.11.1/32 next-hop 10.1.31.2;
    route 10.1.11.0/24 next-hop st0.0;
}
[edit]
user@SRX2# show security
address-book {
    book1 {
        address Host2 10.1.21.0/24;
        attach {
            zone trust;
        }
    }
    book2 {
        address Host1 10.1.11.0/24;
        attach {
            zone untrust;
        }
    }
}
policies {
    from-zone trust to-zone untrust {
        policy to-SRX1 {
            match {
                source-address Host2;
                destination-address Host1;
                application any;
            }
            then {
                permit;
            }
        }
    }
    from-zone untrust to-zone trust {
        policy from-SRX1 {
            match {
                source-address Host1;
                destination-address Host2;
                application any;
            }
            then {
                permit;
            }
        }
    }
}
zones {
    security-zone untrust {
        host-inbound-traffic {
            system-services {
                ike;
                ping;
            }
        }
        interfaces {
            ge-0/0/1.0;
            st0.0;
        }
    }
    security-zone trust {
        host-inbound-traffic {
            system-services {
                all;
            }
            protocols {
                all;
            }
        }
        interfaces {
            ge-0/0/0.0;
        }
    }
}
如果完成设备配置,请从配置模式进入。commit
为 SRX2 配置 IKE
CLI 快速配置
要快速配置此示例,请复制以下命令,将其粘贴到文本文件中,删除所有换行符,更改详细信息,以便与网络配置匹配,将命令复制并粘贴到层次结构级别的 [edit] CLI 中,然后从配置模式进入。commit
set security ike proposal ike_prop authentication-method pre-shared-keys
set security ike proposal ike_prop dh-group group2
set security ike proposal ike_prop authentication-algorithm sha1
set security ike proposal ike_prop encryption-algorithm 3des-cbc
set security ike policy ike_pol mode main
set security ike policy ike_pol proposals ike_prop
set security ike policy ike_pol pre-shared-key ascii-text “$ABC123”
set security ike gateway gw1 ike-policy ike_pol
set security ike gateway gw1 address 172.16.11.1
set security ike gateway gw1 local-identity user-at-hostname "srx2@example.com"
set security ike gateway gw1 remote-identity user-at-hostname "srx1@example.com"
set security ike gateway gw1 external-interface ge-0/0/1.0
分步程序
下面的示例要求您在各个配置层级中进行导航。有关如何执行此操作的说明,请参阅《CLI 用户指南》中的在配置模式下使用 CLI 编辑器。
要配置 IKE,请执行以下操作:
-
创建 IKE 第 1 阶段提议。
[edit]
user@SRX2# set security ike proposal ike_prop authentication-method pre-shared-keys
user@SRX2# set security ike proposal ike_prop dh-group group2
user@SRX2# set security ike proposal ike_prop authentication-algorithm sha1
user@SRX2# set security ike proposal ike_prop encryption-algorithm 3des-cbc
-
创建 IKE 第 1 阶段策略。
[edit]
user@SRX2# set security ike policy ike_pol mode main
user@SRX2# set security ike policy ike_pol proposals ike_prop
user@SRX2# set security ike policy ike_pol pre-shared-key ascii-text “$ABC123”
-
配置 IKE 第 1 阶段网关参数。网关地址应为 SRX1 的 IP。
[edit]
user@SRX2# set security ike gateway gw1 ike-policy ike_pol
user@SRX2# set security ike gateway gw1 address 172.16.11.1
user@SRX2# set security ike gateway gw1 local-identity user-at-hostname "srx2@example.com"
user@SRX2# set security ike gateway gw1 remote-identity user-at-hostname "srx1@example.com"
user@SRX2# set security ike gateway gw1 external-interface ge-0/0/1.0
结果
在配置模式下,输入 show security ike 命令以确认您的配置。如果输出未显示预期的配置,请重复此示例中的说明以更正配置。
[edit]
user@SRX2# show security ike
proposal ike_prop {
    authentication-method pre-shared-keys;
    dh-group group2;
    authentication-algorithm sha1;
    encryption-algorithm 3des-cbc;
}
policy ike_pol {
    mode main;
    proposals ike_prop;
    pre-shared-key ascii-text "$9$mP5QF3/At0IE-VsYoa36/"; ## SECRET-DATA
}
gateway gw1 {
    ike-policy ike_pol;
    address 172.16.11.1;
    local-identity user-at-hostname "srx2@example.com";
    remote-identity user-at-hostname "srx1@example.com";
    external-interface ge-0/0/1.0;
}
如果完成设备配置,请从配置模式进入。commit
为 SRX2 配置 IPsec
CLI 快速配置
要快速配置此示例,请复制以下命令,将其粘贴到文本文件中,删除所有换行符,更改详细信息,以便与网络配置匹配,将命令复制并粘贴到层次结构级别的 [edit] CLI 中,然后从配置模式进入。commit
set security ipsec proposal ipsec_prop protocol esp
set security ipsec proposal ipsec_prop authentication-algorithm hmac-sha1-96
set security ipsec proposal ipsec_prop encryption-algorithm 3des-cbc
set security ipsec policy ipsec_pol perfect-forward-secrecy keys group2
set security ipsec policy ipsec_pol proposals ipsec_prop
set security ipsec vpn vpn1 bind-interface st0.0
set security ipsec vpn vpn1 ike gateway gw1
set security ipsec vpn vpn1 ike ipsec-policy ipsec_pol
set security ipsec vpn vpn1 establish-tunnels immediately
分步程序
下面的示例要求您在各个配置层级中进行导航。有关如何执行此操作的说明,请参阅《CLI 用户指南》中的在配置模式下使用 CLI 编辑器。
要配置 IPsec:
-
创建 IPsec 第 2 阶段提议。
[edit]
user@SRX2# set security ipsec proposal ipsec_prop protocol esp
user@SRX2# set security ipsec proposal ipsec_prop authentication-algorithm hmac-sha1-96
user@SRX2# set security ipsec proposal ipsec_prop encryption-algorithm 3des-cbc
-
创建 IPsec 第 2 阶段策略。
[edit]
user@SRX2# set security ipsec policy ipsec_pol perfect-forward-secrecy keys group2
user@SRX2# set security ipsec policy ipsec_pol proposals ipsec_prop
-
配置 IPsec VPN 参数。
[edit]
user@SRX2# set security ipsec vpn vpn1 bind-interface st0.0
user@SRX2# set security ipsec vpn vpn1 ike gateway gw1
user@SRX2# set security ipsec vpn vpn1 ike ipsec-policy ipsec_pol
user@SRX2# set security ipsec vpn vpn1 establish-tunnels immediately
结果
在配置模式下,输入 show security ipsec 命令以确认您的配置。如果输出未显示预期的配置,请重复此示例中的说明以更正配置。
[edit]
user@SRX2# show security ipsec
proposal ipsec_prop {
    protocol esp;
    authentication-algorithm hmac-sha1-96;
    encryption-algorithm 3des-cbc;
}
policy ipsec_pol {
    perfect-forward-secrecy {
        keys group2;
    }
    proposals ipsec_prop;
}
vpn vpn1 {
    bind-interface st0.0;
    ike {
        gateway gw1;
        ipsec-policy ipsec_pol;
    }
    establish-tunnels immediately;
}
如果完成设备配置,请从配置模式进入。commit
NAT 设备的配置
CLI 快速配置
示例中使用了静态 NAT。静态 NAT 是双向的,这意味着从 10.1.31.1 到 172.16.11.1 的流量也将使用相同的 NAT 配置。
要快速配置此示例,请复制以下命令,将其粘贴到文本文件中,删除所有换行符,更改详细信息,以便与网络配置匹配,将命令复制并粘贴到层次结构级别的 [edit] CLI 中,然后从配置模式进入。commit
set security nat static rule-set rule1 from zone untrust
set security nat static rule-set rule1 rule ipsec match source-address 172.16.11.1/32
set security nat static rule-set rule1 rule ipsec match destination-address 172.16.21.1/32
set security nat static rule-set rule1 rule ipsec then static-nat prefix 10.1.31.1/32
set security policies from-zone trust to-zone untrust policy allow-out match source-address any
set security policies from-zone trust to-zone untrust policy allow-out match destination-address any
set security policies from-zone trust to-zone untrust policy allow-out match application any
set security policies from-zone trust to-zone untrust policy allow-out then permit
set security policies from-zone untrust to-zone trust policy allow-out-in match source-address any
set security policies from-zone untrust to-zone trust policy allow-out-in match destination-address any
set security policies from-zone untrust to-zone trust policy allow-out-in match application any
set security policies from-zone untrust to-zone trust policy allow-out-in then permit
set security zones security-zone trust host-inbound-traffic system-services ping
set security zones security-zone trust interfaces ge-0/0/1.0
set security zones security-zone untrust host-inbound-traffic system-services ping
set security zones security-zone untrust interfaces ge-0/0/0.0
set interfaces ge-0/0/0 unit 0 family inet address 172.16.21.1/24
set interfaces ge-0/0/1 unit 0 family inet address 10.1.31.2/24
set routing-options static route 172.16.11.0/24 next-hop 172.16.21.2
验证
要确认配置工作正常,请执行以下任务:
- 验证 SRX1 上的 IKE 第 1 阶段状态
- 验证 SRX1 上的 IPsec 安全性关联
- 验证 SRX2 上的 IKE 第 1 阶段状态
- 验证 SRX2 上的 IPsec 安全性关联
- 验证主机到主机的可达性
验证 SRX1 上的 IKE 第 1 阶段状态
目的
验证 IKE 第 1 阶段状态。
行动
在操作模式下,输入命令 show security ike security-associations 。要获得更详细的输出,请使用命令 show security ike security-associations detail 。
user@SRX1> show security ike security-associations
Index   State  Initiator cookie  Responder cookie  Mode           Remote Address
302301  UP     84e8fc61d0750278  ea9a07ef032805b6  Main           172.16.21.1
user@SRX1> show security ike security-associations detail
IKE peer 172.16.21.1, Index 302301, Gateway Name: gw1
  Role: Initiator, State: UP
  Initiator cookie: 84e8fc61d0750278, Responder cookie: ea9a07ef032805b6
  Exchange type: Main, Authentication method: Pre-shared-keys
  Local: 172.16.11.1:4500, Remote: 172.16.21.1:4500
  Lifetime: Expires in 19657 seconds
  Reauth Lifetime: Disabled
  IKE Fragmentation: Disabled, Size: 0
  Remote Access Client Info: Unknown Client
  Peer ike-id: srx2@example.com
  AAA assigned IP: 0.0.0.0
  Algorithms:
   Authentication        : hmac-sha1-96
   Encryption            : 3des-cbc
   Pseudo random function: hmac-sha1
   Diffie-Hellman group  : DH-group-2
  Traffic statistics:
   Input  bytes  :                 1780
   Output bytes  :                 2352
   Input  packets:                    7
   Output packets:                   14
   Input  fragmentated packets:       0
   Output fragmentated packets:       0
  IPSec security associations: 4 created, 0 deleted
  Phase 2 negotiations in progress: 1

    Negotiation type: Quick mode, Role: Initiator, Message ID: 0
    Local: 172.16.11.1:4500, Remote: 172.16.21.1:4500
    Local identity: srx1@example.com
    Remote identity: srx2@example.com
    Flags: IKE SA is created
意义
该 show security ike security-associations 命令会列出所有活动的 IKE 第 1 阶段 SA。如果未列出任何 SA,则说明第 1 阶段建立存在问题。检查配置中的 IKE 策略参数和外部接口设置。
如果列出了 SA,请查看以下信息:
-
索引 — 此值对于每个 IKE SA 都是唯一的,您可以在命令中使用
show security ike security-associations index detail该值来获取有关 SA 的更多信息。 -
远程地址 — 验证远程 IP 地址是否正确,以及端口 4500 是否用于对等通信。请记住,NAT-T 使用端口 4500 将 IKE 和 ESP 流量封装在 UDP 中。
-
角色发起方状态
-
启动 — 建立第 1 阶段 SA。
-
关闭 — 建立第 1 阶段 SA 时出现问题。
-
IPsec SA 对中的两个对等方都在使用端口 4500。
-
对等方 IKE ID — 验证远程地址是否正确。
-
本地身份和远程身份 — 验证这些是否正确。
-
-
模式 — 验证正在使用正确的模式。
验证配置中的以下各项是否正确:
-
外部接口(接口必须是接收 IKE 数据包的接口)
-
IKE 策略参数
-
预共享密钥信息
-
第 1 阶段提议参数(必须在两个对等方上匹配)
该 show security ike security-associations 命令会列出有关安全关联的其他信息:
-
使用的身份验证和加密算法
-
第 1 阶段生存期
-
流量统计(可用于验证流量是否在两个方向上正常流动)
-
角色信息
最好使用响应方角色在对等方上执行故障排除。
-
发起方和响应方信息
-
创建的 IPsec SA 数
-
正在进行的第 2 阶段协商数
验证 SRX1 上的 IPsec 安全性关联
目的
验证 IPsec 状态。
行动
在操作模式下,输入命令 show security ipsec security-associations 。要获得更详细的输出,请使用命令 show security ipsec security-associations detail 。
user@SRX1> show security ipsec security-associations
  Total active tunnels: 1     Total Ipsec sas: 1
  ID    Algorithm       SPI      Life:sec/kb  Mon lsys Port  Gateway
  <131073 ESP:3des/sha1   fc5dbac4 2160/ unlim  -   root 4500  172.16.21.1
  >131073 ESP:3des/sha1   45fed9d8 2160/ unlim  -   root 4500  172.16.21.1
user@SRX1> show security ipsec security-associations detail
ID: 131073 Virtual-system: root, VPN Name: vpn1
  Local Gateway: 172.16.11.1, Remote Gateway: 172.16.21.1
  Local Identity: ipv4_subnet(any:0,[0..7]=0.0.0.0/0)
  Remote Identity: ipv4_subnet(any:0,[0..7]=0.0.0.0/0)
  Version: IKEv1
  DF-bit: clear, Copy-Outer-DSCP Disabled, Bind-interface: st0.0
  Port: 4500, Nego#: 7, Fail#: 0, Def-Del#: 0 Flag: 0x600a29
  Multi-sa, Configured SAs# 1, Negotiated SAs#: 1
  Tunnel events:
    Fri Jul 22 2022 11:07:40 -0700: IPSec SA rekey successfully completed (3 times)
    Fri Jul 22 2022 08:38:41 -0700: IPSec SA negotiation successfully completed (1 times)
    Fri Jul 22 2022 08:38:41 -0700: User cleared IPSec SA from CLI (1 times)
    Fri Jul 22 2022 08:38:41 -0700: IKE SA negotiation successfully completed (3 times)
    Fri Jul 22 2022 08:38:26 -0700: IPSec SA negotiation successfully completed (1 times)
    Fri Jul 22 2022 08:38:26 -0700: User cleared IPSec SA from CLI (1 times)
    Fri Jul 22 2022 08:38:25 -0700: IPSec SA negotiation successfully completed (1 times)
    Fri Jul 22 2022 08:38:24 -0700: User cleared IPSec SA from CLI (1 times)
    Fri Jul 22 2022 08:37:37 -0700: IPSec SA negotiation successfully completed (1 times)
  Direction: inbound, SPI: fc5dbac4, AUX-SPI: 0
                              , VPN Monitoring: -
    Hard lifetime: Expires in 2153 seconds
    Lifesize Remaining:  Unlimited
    Soft lifetime: Expires in 1532 seconds
    Mode: Tunnel(0 0), Type: dynamic, State: installed
    Protocol: ESP, Authentication: hmac-sha1-96, Encryption: 3des-cbc
    Anti-replay service: counter-based enabled, Replay window size: 64
  Direction: outbound, SPI: 45fed9d8, AUX-SPI: 0
                              , VPN Monitoring: -
    Hard lifetime: Expires in 2153 seconds
    Lifesize Remaining:  Unlimited
    Soft lifetime: Expires in 1532 seconds
    Mode: Tunnel(0 0), Type: dynamic, State: installed
    Protocol: ESP, Authentication: hmac-sha1-96, Encryption: 3des-cbc
    Anti-replay service: counter-based enabled, Replay window size: 64
意义
命令 show security ipsec security-associations 输出列出以下信息:
-
远程网关的地址为 172.16.21.1。
-
IPsec SA 对中的两个对等方都在使用端口 4500。
-
两个方向都会显示 SPI、生存期(以秒为单位)和使用限制(或生存大小,以 KB 为单位)。2160/unlim 值表示第 2 阶段生存期将在 2160 秒后过期,未指定生存大小,表示没有限制。第 2 阶段生存期可以不同于第 1 阶段生存期,因为在建立 VPN 后,第 2 阶段不依赖于第 1 阶段。
-
如 Mon 列中的连字符所示,没有为此 SA 启用 VPN 监控。如果启用 VPN 监控,U 表示监控已开启,而 D 表示监控已关闭。
-
虚拟系统 (vsys) 是根系统,始终列出 0。
验证 SRX2 上的 IKE 第 1 阶段状态
目的
验证 IKE 第 1 阶段状态。
行动
在操作模式下,输入命令 show security ike security-associations 。要获得更详细的输出,请使用命令 show security ike security-associations detail 。
user@SRX2> show security ike security-associations
Index   State  Initiator cookie  Responder cookie  Mode           Remote Address
5567091 UP     84e8fc61d0750278  ea9a07ef032805b6  Main           172.16.11.1
user@SRX2> show security ike security-associations detail
IKE peer 172.16.11.1, Index 5567091, Gateway Name: gw1
  Role: Responder, State: UP
  Initiator cookie: 84e8fc61d0750278, Responder cookie: ea9a07ef032805b6
  Exchange type: Main, Authentication method: Pre-shared-keys
  Local: 10.1.31.1:4500, Remote: 172.16.11.1:4500
  Lifetime: Expires in 18028 seconds
  Reauth Lifetime: Disabled
  IKE Fragmentation: Disabled, Size: 0
  Remote Access Client Info: Unknown Client
  Peer ike-id: srx1@example.com
  AAA assigned IP: 0.0.0.0
  Algorithms:
   Authentication        : hmac-sha1-96
   Encryption            : 3des-cbc
   Pseudo random function: hmac-sha1
   Diffie-Hellman group  : DH-group-2
  Traffic statistics:
   Input  bytes  :                 2352
   Output bytes  :                 1780
   Input  packets:                   14
   Output packets:                    7
   Input  fragmentated packets:       0
   Output fragmentated packets:       0
  IPSec security associations: 4 created, 3 deleted
  Phase 2 negotiations in progress: 1

    Negotiation type: Quick mode, Role: Responder, Message ID: 0
    Local: 10.1.31.1:4500, Remote: 172.16.11.1:4500
    Local identity: srx2@example.com
    Remote identity: srx1@example.com
    Flags: IKE SA is created
意义
该 show security ike security-associations 命令会列出所有活动的 IKE 第 1 阶段 SA。如果未列出任何 SA,则说明第 1 阶段建立存在问题。检查配置中的 IKE 策略参数和外部接口设置。
如果列出了 SA,请查看以下信息:
-
索引 — 此值对于每个 IKE SA 都是唯一的,您可以在命令中使用
show security ike security-associations detail该值来获取有关 SA 的更多信息。 -
远程地址 — 验证远程 IP 地址是否正确,以及端口 4500 是否用于对等通信。
-
角色响应方状态
-
已启动 — 第 1 阶段 SA 已建立。
-
关闭 — 建立第 1 阶段 SA 时出现问题。
-
对等方 IKE ID — 验证地址是否正确。
-
本地身份和远程身份 — 验证这些地址是否正确。
-
-
模式 — 验证正在使用正确的模式。
验证配置中的以下各项是否正确:
-
外部接口(接口必须是接收 IKE 数据包的接口)
-
IKE 策略参数
-
预共享密钥信息
-
第 1 阶段提议参数(必须在两个对等方上匹配)
该 show security ike security-associations 命令会列出有关安全关联的其他信息:
-
使用的身份验证和加密算法
-
第 1 阶段生存期
-
流量统计(可用于验证流量是否在两个方向上正常流动)
-
角色信息
最好使用响应方角色在对等方上执行故障排除。
-
发起方和响应方信息
-
创建的 IPsec SA 数
-
正在进行的第 2 阶段协商数
验证 SRX2 上的 IPsec 安全性关联
目的
验证 IPsec 状态。
行动
在操作模式下,输入命令 show security ipsec security-associations 。要获得更详细的输出,请使用命令 show security ipsec security-associations detail 。
user@SRX2> show security ipsec security-associations
  Total active tunnels: 1     Total Ipsec sas: 1
  ID    Algorithm       SPI      Life:sec/kb  Mon lsys Port  Gateway
  <131073 ESP:3des/sha1   45fed9d8 1526/ unlim  -   root 4500  172.16.11.1
  >131073 ESP:3des/sha1   fc5dbac4 1526/ unlim  -   root 4500  172.16.11.1
user@SRX2> show security ipsec security-associations detail
ID: 131073 Virtual-system: root, VPN Name: vpn1
  Local Gateway: 10.1.31.1, Remote Gateway: 172.16.11.1
  Local Identity: ipv4_subnet(any:0,[0..7]=0.0.0.0/0)
  Remote Identity: ipv4_subnet(any:0,[0..7]=0.0.0.0/0)
  Version: IKEv1
  DF-bit: clear, Copy-Outer-DSCP Disabled, Bind-interface: st0.0
  Port: 4500, Nego#: 25, Fail#: 0, Def-Del#: 0 Flag: 0x600a29
  Multi-sa, Configured SAs# 1, Negotiated SAs#: 1
  Tunnel events:
    Fri Jul 22 2022 11:07:40 -0700: IPSec SA negotiation successfully completed (4 times)
    Fri Jul 22 2022 08:38:41 -0700: Initial-Contact received from peer. Stale IKE/IPSec SAs cleared (1 times)
    Fri Jul 22 2022 08:38:41 -0700: IKE SA negotiation successfully completed (5 times)
    Fri Jul 22 2022 08:38:26 -0700: IPSec SA negotiation successfully completed (1 times)
    Fri Jul 22 2022 08:38:26 -0700: IPSec SA delete payload received from peer, corresponding IPSec SAs cleared (1 times)
    Fri Jul 22 2022 08:38:25 -0700: IPSec SA negotiation successfully completed (1 times)
    Fri Jul 22 2022 08:38:25 -0700: Initial-Contact received from peer. Stale IKE/IPSec SAs cleared (1 times)
    Fri Jul 22 2022 08:37:37 -0700: IPSec SA negotiation successfully completed (1 times)
    Fri Jul 22 2022 08:37:37 -0700: IPSec SA delete payload received from peer, corresponding IPSec SAs cleared (1 times)
    Thu Jul 21 2022 17:57:09 -0700: Peer's IKE-ID validation failed during negotiation (1 times)
    Thu Jul 21 2022 17:49:30 -0700: IKE SA negotiation successfully completed (4 times)
  Direction: inbound, SPI: 45fed9d8, AUX-SPI: 0
                              , VPN Monitoring: -
    Hard lifetime: Expires in 1461 seconds
    Lifesize Remaining:  Unlimited
    Soft lifetime: Expires in 885 seconds
    Mode: Tunnel(0 0), Type: dynamic, State: installed
    Protocol: ESP, Authentication: hmac-sha1-96, Encryption: 3des-cbc
    Anti-replay service: counter-based enabled, Replay window size: 64
  Direction: outbound, SPI: fc5dbac4, AUX-SPI: 0
                              , VPN Monitoring: -
    Hard lifetime: Expires in 1461 seconds
    Lifesize Remaining:  Unlimited
    Soft lifetime: Expires in 885 seconds
    Mode: Tunnel(0 0), Type: dynamic, State: installed
    Protocol: ESP, Authentication: hmac-sha1-96, Encryption: 3des-cbc
    Anti-replay service: counter-based enabled, Replay window size: 64
意义
命令 show security ipsec security-associations 输出列出以下信息:
-
远程网关的 IP 地址为 172.16.11.1。
-
IPsec SA 对中的两个对等方都在使用端口 4500。
-
两个方向都会显示 SPI、生存期(以秒为单位)和使用限制(或生存大小,以 KB 为单位)。1562/unlim 值表示第 2 阶段生存期将在 1562 秒后过期,未指定生存大小,表示没有限制。第 2 阶段生存期可以不同于第 1 阶段生存期,因为在建立 VPN 后,第 2 阶段不依赖于第 1 阶段。
-
如 Mon 列中的连字符所示,没有为此 SA 启用 VPN 监控。如果启用 VPN 监控,U 表示监控已开启,而 D 表示监控已关闭。
-
虚拟系统 (vsys) 是根系统,始终列出 0。
命令 show security ipsec security-associations index index_iddetail 输出列出以下信息:
-
本地身份和远程身份组成 SA 的代理 ID。
代理 ID 不匹配是导致第 2 阶段故障的最常见原因之一。如果未列出 IPsec SA,请确认第 2 阶段提议(包括代理 ID 设置)对于两个对等方都是正确的。对于基于路由的 VPN,默认代理 ID 为本地 = 0.0.0.0/0,远程 = 0.0.0.0/0,服务 = any。来自相同对等方 IP 的多个基于路由的 VPN 可能会出现问题。在这种情况下,必须为每个 IPsec SA 指定唯一的代理 ID。对于某些第三方供应商,必须手动输入代理 ID 以进行匹配。
-
第 2 阶段失败的另一个常见原因是未指定 ST 接口绑定。如果 IPsec 无法完成,请检查 kmd 日志或设置追踪选项。
验证主机到主机的可达性
目的
验证 Host1 是否可以访问 Host2。
行动
从 Host1 ping Host2。要验证流量是否使用 VPN,请对 SRX1 使用命令 show security ipsec statistics 。在运行 ping 命令之前,请先使用该命令 clear security ipsec statistics 清除统计信息。
user@Host1> ping 10.1.21.2 count 10 rapid
PING 10.1.21.2 (10.1.21.2): 56 data bytes
!!!!!!!!!!
--- 10.1.21.2 ping statistics ---
10 packets transmitted, 10 packets received, 0% packet loss
round-trip min/avg/max/stddev = 3.437/4.270/7.637/1.158 ms
user@SRX1> show security ipsec statistics
ESP Statistics:
  Encrypted bytes:             1360
  Decrypted bytes:              840
  Encrypted packets:             10
  Decrypted packets:             10
AH Statistics:
  Input bytes:                    0
  Output bytes:                   0
  Input packets:                  0
  Output packets:                 0
Errors:
  AH authentication failures: 0, Replay errors: 0
  ESP authentication failures: 0, ESP decryption failures: 0
  Bad headers: 0, Bad trailers: 0
意义
输出显示 Host1 可以对 Host2 执行 ping 操作,并且流量正在使用 VPN。
示例:使用动态端点 VPN 配置 NAT-T
此示例说明如何配置基于路由的 VPN,其中 IKEv2 发起方是 NAT 设备后面的动态端点。
要求
此示例使用以下硬件和软件组件:
-
在一个机箱群集中配置了两个防火墙
-
一台提供 NAT 的防火墙
-
一道防火墙,为分支机构提供网络访问
-
支持 IKEv2 NAT-T 的 Junos OS 版本
概述
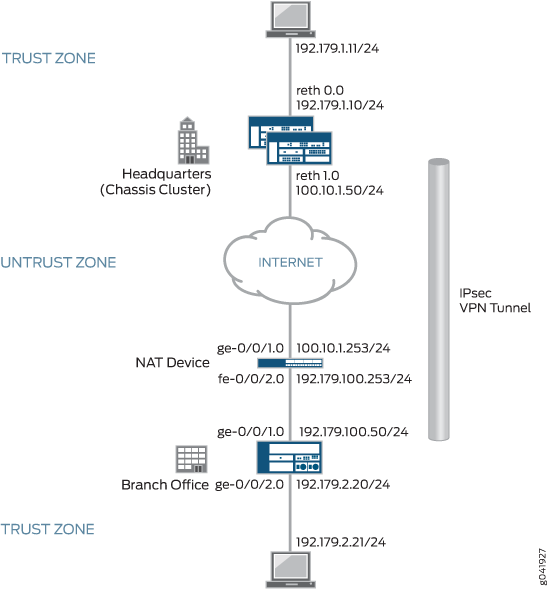
在此示例中,在分支机构(IKEv2 发起方)和总部(IKEv2 响应方)之间配置了 IPsec VPN,以保护两个位置之间的网络流量。分支机构位于 NAT 设备后面。分支机构地址是动态分配的,响应方不知道。发起方配置了响应方的远程身份,以便进行隧道协商。此配置将在 NAT 设备上的对等方之间建立动态端点 VPN。
图 2 显示了使用 NAT 遍历 (NAT-T) 和动态端点 VPN 的拓扑示例。
 的 NAT-T
在此示例中,发起方的 IP 地址 192.179.100.50(已动态分配给设备)被 NAT 设备隐藏并转换为 100.10.1.253。
以下配置选项在此示例中适用:
-
在发起方上配置的本地身份必须与在响应方上配置的远程网关身份匹配。
-
第 1 阶段和第 2 阶段选项必须在发起方和响应方之间匹配。
在此示例中,所有设备都使用了允许所有流量的默认安全策略。应为生产环境配置更严格的安全策略。请参阅 安全性策略概述。
配置
配置分支机构设备(IKEv2 发起器)
CLI 快速配置
要快速配置此示例,请复制以下命令,将其粘贴到文本文件中,删除所有换行符,更改详细信息,以便与网络配置匹配,将命令复制并粘贴到层次结构级别的 [edit] CLI 中,然后从配置模式进入。commit
set interfaces ge-0/0/1 unit 0 family inet address 192.179.100.50/24
set interfaces ge-0/0/2 unit 0 family inet address 192.179.2.20/24
set interfaces st0 unit 0 family inet address 172.168.100.1/16
set routing-options static route 192.179.1.0/24 next-hop st0.0
set security zones security-zone trust host-inbound-traffic system-services all
set security zones security-zone trust host-inbound-traffic protocols all
set security zones security-zone trust interfaces ge-0/0/2.0
set security zones security-zone untrust host-inbound-traffic system-services all
set security zones security-zone untrust host-inbound-traffic protocols all
set security zones security-zone untrust interfaces ge-0/0/1.0
set security zones security-zone untrust interfaces st0.0
set security ike proposal IKE_PROP authentication-method pre-shared-keys
set security ike proposal IKE_PROP dh-group group5
set security ike proposal IKE_PROP authentication-algorithm sha1
set security ike proposal IKE_PROP encryption-algorithm aes-256-cbc
set security ike policy IKE_POL proposals IKE_PROP
set security ike policy IKE_POL pre-shared-key ascii-text "$ABC123"
set security ike gateway HQ_GW ike-policy IKE_POL
set security ike gateway HQ_GW address 100.10.1.50
set security ike gateway HQ_GW local-identity hostname branch.example.net
set security ike gateway HQ_GW external-interface ge-0/0/1.0
set security ike gateway HQ_GW version v2-only
set security ipsec proposal IPSEC_PROP protocol esp
set security ipsec proposal IPSEC_PROP authentication-algorithm hmac-sha1-96
set security ipsec proposal IPSEC_PROP encryption-algorithm aes-256-cbc
set security ipsec policy IPSEC_POL perfect-forward-secrecy keys group5
set security ipsec policy IPSEC_POL proposals IPSEC_PROP
set security ipsec vpn HQ_VPN bind-interface st0.0
set security ipsec vpn HQ_VPN ike gateway HQ_GW
set security ipsec vpn HQ_VPN ike ipsec-policy IPSEC_POL
set security ipsec vpn HQ_VPN establish-tunnels immediately
set security policies default-policy permit-all
分步程序
下面的示例要求您在各个配置层级中进行导航。有关如何执行此操作的说明,请参阅《CLI 用户指南》中的在配置模式下使用 CLI 编辑器。
要配置分支机构设备,请执行以下操作:
-
配置接口。
[edit interfaces]
user@host# set ge-0/0/1 unit 0 family inet address 192.179.100.50/24
user@host# set ge-0/0/2 unit 0 family inet address 192.179.2.20/24
user@host# set st0 unit 0 family inet address 172.168.100.1/16
-
配置路由选项。
[edit routing-options]
user@host# set static route 192.179.1.0/24 next-hop st0.0
-
配置区域。
[edit security zones security-zones trust]
user@host# set host-inbound-traffic system-services all
user@host# set host-inbound-traffic protocols all
user@host# set interfaces ge-0/0/2.0
[edit security zones security-zones untrust]
user@host# set host-inbound-traffic system-services all
user@host# set host-inbound-traffic protocols all
user@host# set interfaces ge-0/0/1.0
user@host#set interfaces st0.0
-
配置第 1 阶段选项。
[edit security ike proposal IKE_PROP]
user@host# set authentication-method pre-shared-keys
user@host# set dh-group group5
user@host# set authentication-algorithm sha1
user@host# set encryption-algorithm aes-256-cbc
[edit security ike policy IKE_POL]
user@host# set proposals IKE_PROP
user@host# set pre-shared-key ascii-text "$ABC123"
 [edit security ike gateway HQ_GW]
user@host# set ike-policy IKE_POL
user@host# set address 100.10.1.50
user@host# set local-identity hostname branch.example.net
user@host# set external-interface ge-0/0/1.0
user@host# set version v2-only
-
配置第 2 阶段选项。
[edit security ipsec proposal IPSEC_PROP]
user@host# set protocol esp
user@host# set authentication-algorithm hmac-sha1-96
user@host# set encryption-algorithm aes-256-cbc
[edit security ipsec policy IPSEC_POL]
user@host# set proposals IPSEC_PROP
user@host# set perfect-forward-secrecy keys group5
[edit security ipsec vpn HQ_VPN]
user@host# set bind-interface st0.0
user@host# set ike gateway HQ_GW
user@host# set ike ipsec-policy IPSEC_POL
user@host# set establish-tunnels immediately
-
配置安全策略。
[edit security policies]
user@host# set default-policy permit-all
结果
在配置模式下,输入 show interfaces、 show routing-options、 show security ipsecshow security zonesshow security ike、 和show security policies命令以确认您的配置。如果输出未显示预期的配置,请重复此示例中的配置说明进行更正。
[edit]
user@host# show interfaces
ge-0/0/1 {
    unit 0 {
        family inet {
            address 192.179.100.50/24;
        }
    }
}
ge-0/0/2 {
    unit 0 {
        family inet {
            address 192.179.2.20/24;
        }
    }
}
st0 {
    unit 0 {
        family inet {
            address 172.168.100.1/16;
        }
    }
}
[edit]
user@host# show routing-options
static {
    route 192.179.1.0/24 next-hop st0.0;
}
[edit]
user@host# show security zones
security-zone trust {
    host-inbound-traffic {
        system-services {
            all;
        }
        protocols {
            all;
        }
    }
    interfaces {
        ge-0/0/2.0;
    }
}
security-zone untrust {
    host-inbound-traffic {
        system-services {
            all;
        }
        protocols {
            all;
        }
    }
    interfaces {
        ge-0/0/1.0;
        st0.0;
    }
}
[edit]
user@host# show security ike
proposal IKE_PROP {
    authentication-method pre-shared-keys;
    dh-group group5;
    authentication-algorithm sha1;
    encryption-algorithm aes-256-cbc;
}
policy IKE_POL {
    proposals IKE_PROP;
    pre-shared-key ascii-text "$ABC123”
}
gateway HQ_GW{
    ike-policy IKE_POL;
    address 100.10.1.50;
    local-identity hostname branch.example.net;
    external-interface ge-0/0/1.0;
    version v2-only;
}
[edit]
user@host# show security ipsec
proposal IPSEC_PROP {
    protocol esp;
    authentication-algorithm hmac-sha1-96;
    encryption-algorithm aes-256-cbc;
}
policy IPSEC_POL {
    perfect-forward-secrecy {
        keys group5;
    }
    proposals IPSEC_PROP;
}
vpn HQ_VPN {
    bind-interface st0.0;
    ike {
        gateway HQ_GW;
        ipsec-policy IPSEC_POL;
    }
    establish-tunnels immediately;
}
[edit]
user@host# show security policies
default-policy {
    permit-all;
}
如果完成设备配置,请从配置模式进入。commit
配置 NAT 设备
CLI 快速配置
要快速配置此示例,请复制以下命令,将其粘贴到文本文件中,删除所有换行符,更改详细信息,以便与网络配置匹配,将命令复制并粘贴到层次结构级别的 [edit] CLI 中,然后从配置模式进入。commit
set interfaces ge-0/0/1 unit 0 family inet address 100.10.1.253/24
set interfaces fe-0/0/2 unit 0 family inet address 192.179.100.253/24
set security zones security-zone untrust host-inbound-traffic system-services all
set security zones security-zone untrust host-inbound-traffic protocols all
set security zones security-zone untrust interfaces ge-0/0/1.0
set security zones security-zone trust host-inbound-traffic system-services all
set security zones security-zone trust host-inbound-traffic protocols all
set security zones security-zone trust interfaces fe-0/0/2.0
set security nat source rule-set DYNAMIC from zone trust
set security nat source rule-set DYNAMIC to zone untrust
set security nat source rule-set DYNAMIC rule R2R3 match source-address 0.0.0.0/0
set security nat source rule-set DYNAMIC rule R2R3 then source-nat interface
set security policies default-policy permit-all
分步程序
下面的示例要求您在各个配置层级中进行导航。有关如何执行此操作的说明,请参阅《CLI 用户指南》中的在配置模式下使用 CLI 编辑器。
要配置提供 NAT 的中间路由器,请执行以下操作:
-
配置接口。
[edit interfaces]
user@host# set ge-0/0/1 unit 0 family inet address 100.10.1.253/24
user@host# set fe-0/0/2 unit 0 family inet address 192.179.100.253/24
-
配置区域。
[edit security zones security-zone untrust]
user@host# set host-inbound-traffic system-services all
user@host# set host-inbound-traffic protocols all
user@host# set interfaces ge-0/0/1.0
[edit security zones security-zone trust]
user@host# set host-inbound-traffic system-services all
user@host# set host-inbound-traffic protocols all
user@host# set interfaces fe-0/0/2.0
-
配置 NAT。
[edit security nat source rule-set DYNAMIC]
user@host# set from zone trust
user@host# set to zone untrust
user@host# set rule R2R3 match source-address 0.0.0.0/0
user@host# set rule R2R3 then source-nat interface
-
配置默认安全策略。
[edit security policies]
user@host# set default-policy permit-all
结果
在配置模式下,输入 show interfaces、 show security zones、 show security nat source和 show security policies 命令以确认您的配置。如果输出未显示预期的配置,请重复此示例中的配置说明进行更正。
[edit]
user@host# show interfaces
ge-0/0/1 {
    unit 0 {
        family inet {
            address 100.10.1.253/24;
        }
    }
}
fe-0/0/2 {
    unit 0 {
        family inet {
            address 192.179.100.253/24;
        }
    }
}
[edit]
user@host# show security zones
security-zone trust {
    host-inbound-traffic {
        system-services {
            all;
        }
        protocols {
            all;
        }
    }
    interfaces {
        ge-0/0/1.0;
    }
}
security-zone untrust {
    host-inbound-traffic {
        system-services {
            all;
        }
        protocols {
            all;
        }
    }
    interfaces {
        fe-0/0/2.0;
    }
}
[edit]
user@host# show security nat source
rule-set DYNAMIC {
    from zone untrust;
    to zone trust;
    rule R2R3 {
        match {
            source-address 0.0.0.0/0;
        }
        then {
            source-nat {
                interface;
            }
        }
    }
}
[edit]
user@host# show security policies
default-policy {
    permit-all;
}
如果完成设备配置,请从配置模式进入。commit
配置总部设备(IKEv2 响应方)
CLI 快速配置
要快速配置此示例,请复制以下命令,将其粘贴到文本文件中,删除所有换行符,更改详细信息,以便与网络配置匹配,将命令复制并粘贴到层次结构级别的 [edit] CLI 中,然后从配置模式进入。commit
set chassis cluster reth-count 5
set chassis cluster redundancy-group 1 node 0 priority 220
set chassis cluster redundancy-group 1 node 1 priority 149
set chassis cluster redundancy-group 1 interface-monitor ge-0/0/1 weight 255
set chassis cluster redundancy-group 1 interface-monitor ge-8/0/1 weight 255
set chassis cluster redundancy-group 1 interface-monitor ge-0/0/2 weight 255
set chassis cluster redundancy-group 1 interface-monitor ge-8/0/2 weight 255
set interfaces ge-0/0/1 gigether-options redundant-parent reth0
set interfaces ge-0/0/2 gigether-options redundant-parent reth1
set interfaces ge-8/0/1 gigether-options redundant-parent reth0
set interfaces ge-8/0/2 gigether-options redundant-parent reth1
set interfaces reth0 redundant-ether-options redundancy-group 1
set interfaces reth0 unit 0 family inet address 192.179.1.10/24
set interfaces reth1 redundant-ether-options redundancy-group 1
set interfaces reth1 unit 0 family inet address 100.10.1.50/24
set interfaces st0 unit 0 family inet address 172.168.100.2/16
set routing-options static route 192.179.2.0/24 next-hop st0.0
set routing-options static route 192.179.100.0/24 next-hop 100.10.1.253
set security zones security-zone untrust host-inbound-traffic system-services all
set security zones security-zone untrust host-inbound-traffic protocols all
set security zones security-zone untrust interfaces st0.0
set security zones security-zone untrust interfaces reth1.0
set security zones security-zone trust host-inbound-traffic system-services all
set security zones security-zone trust host-inbound-traffic protocols all
set security zones security-zone trust interfaces reth0.0
set security ike proposal IKE_PROP authentication-method pre-shared-keys
set security ike proposal IKE_PROP dh-group group5
set security ike proposal IKE_PROP authentication-algorithm sha1
set security ike proposal IKE_PROP encryption-algorithm aes-256-cbc
set security ike policy IKE_POL proposals IKE_PROP
set security ike policy IKE_POL pre-shared-key ascii-text "$ABC123"
set security ike gateway Branch_GW ike-policy IKE_POL
set security ike gateway Branch_GW dynamic hostname branch.example.net
set security ike gateway Branch_GW dead-peer-detection optimized
set security ike gateway Branch_GW external-interface reth1.0
set security ike gateway Branch_GW version v2-only
set security ipsec proposal IPSEC_PROP protocol esp
set security ipsec proposal IPSEC_PROP authentication-algorithm hmac-sha1-96
set security ipsec proposal IPSEC_PROP encryption-algorithm aes-256-cbc
set security ipsec policy IPSEC_POL perfect-forward-secrecy keys group5
set security ipsec policy IPSEC_POL proposals IPSEC_PROP
set security ipsec vpn Branch_VPN bind-interface st0.0
set security ipsec vpn Branch_VPN ike gateway Branch_GW
set security ipsec vpn Branch_VPN ike ipsec-policy IPSEC_POL
set security policies default-policy permit-all
分步程序
下面的示例要求您在各个配置层级中进行导航。有关如何执行此操作的说明,请参阅《CLI 用户指南》中的在配置模式下使用 CLI 编辑器。
-
将两个节点配置为机箱群集。
[edit chassis cluster]
user@host# set reth-count 5
user@host# set redundancy-group 1 node 0 priority 220
user@host# set redundancy-group 1 node 1 priority 149
user@host# set redundancy-group 1 interface-monitor ge-0/0/1 weight 255
user@host# set redundancy-group 1 interface-monitor ge-8/0/1 weight 255
user@host# set redundancy-group 1 interface-monitor ge-0/0/2 weight 255
user@host# set redundancy-group 1 interface-monitor ge-8/0/2 weight 255
-
配置接口。
[edit interfaces]
user@host# set ge-0/0/1 gigether-options redundant-parent reth0
user@host# set ge-0/0/2 gigether-options redundant-parent reth1
user@host# set ge-8/0/1 gigether-options redundant-parent reth0
user@host# set ge-8/0/2 gigether-options redundant-parent reth1
user@host# set reth0 redundant-ether-options redundancy-group 1
user@host# set reth0 unit 0 family inet address 192.179.1.10/24
user@host# set reth1 redundant-ether-options redundancy-group 1
user@host# set reth1 unit 0 family inet address 100.10.1.50/24
user@host# set st0 unit 0 family inet address 172.168.100.2/16
-
配置路由选项。
[edit routing-options]
user@host# set static route 192.179.2.0/24 next-hop st0.0
user@host# set static route 192.179.100.0/24 next-hop 100.10.1.253
-
配置区域。
[edit security zones security-zone untrust]
user@host# set host-inbound-traffic protocols all
user@host# set host-inbound-traffic system-services all
user@host# set interfaces st0.0
user@host# set interfaces reth1.0
[edit security zones security-zone trust]
user@host# set host-inbound-traffic system-services all
user@host# set host-inbound-traffic protocols all
user@host# set interfaces reth0.0
-
配置第 1 阶段选项。
[edit security ike proposal IKE_PROP]
user@host# set authentication-method pre-shared-keys
user@host# set dh-group group5
user@host# set authentication-algorithm sha1
user@host# set encryption-algorithm aes-256-cbc
[edit security ike policy IKE_POL]
user@host# set proposals IKE_PROP
user@host# set pre-shared-key ascii-text "$ABC123"
[edit security ike gateway Branch_GW]
user@host# set ike-policy IKE_POL
user@host# set dynamic hostname branch.example.net
user@host# set dead-peer-detection optimized
user@host# set external-interface reth1.0
user@host# set version v2-only
-
配置第 2 阶段选项。
[edit security ipsec proposal IPSEC_PROP]
user@host# set protocol esp
user@host# set authentication-algorithm hmac-sha1-96
user@host# set encryption-algorithm aes-256-cbc
[edit security ipsec policy IPSEC_POL]
user@host# set perfect-forward-secrecy keys group5
user@host# set proposals IPSEC_PROP
[edit security ipsec vpn Branch_VPN]
user@host# set bind-interface st0.0
user@host# set ike gateway Branch_GW
user@host# set ike ipsec-policy IPSEC_POL
-
配置默认安全策略。
[edit security policies]
user@host# set default-policy permit-all
结果
在配置模式下,输入 show chassis cluster、 show interfaces、 show security ikeshow security ipsecshow routing-optionsshow security zones和show security policies命令以确认您的配置。如果输出未显示预期的配置,请重复此示例中的配置说明进行更正。
[edit]
user@host# show chassis cluster
reth-count 5;
redundancy-group 1 {
    node 0 priority 220;
    node 1 priority 149;
    interface-monitor {
        ge-0/0/1 weight 255;
        ge-8/0/1 weight 255;
        ge-0/0/2 weight 255;
        ge-8/0/2 weight 255;
    }
}
[edit]
user@host# show interfaces
ge-0/0/1 {
    gigether-options {
        redundant-parent reth0;
    }
}
ge-0/0/2 {
    gigether-options {
        redundant-parent reth1;
    }
}
ge-8/0/1 {
    gigether-options {
        redundant-parent reth0;
    }
}
ge-8/0/2 {
    gigether-options {
        redundant-parent reth1;
    }
}
reth0 {
    redundant-ether-options {
        redundancy-group 1;
    }
    unit 0 {
        family inet {
            address 192.179.1.10/24;
        }
    }
}
reth1 {
    redundant-ether-options {
        redundancy-group 1;
    }
    unit 0 {
        family inet {
            address 100.10.1.50/24;
        }
    }
}
st0 {
    unit 0{
        family inet {
            address 172.168.100.2/16;
        }
    }
}
[edit]
user@host# show routing-options
static {
    route 192.179.2.0/24 next-hop st0.0;
    route 192.179.100.0/24 next-hop 100.10.1.253;
}
[edit]
user@host# show security zones
security-zone trust {
    host-inbound-traffic {
        system-services {
            all;
        }
        protocols {
            all;
        }
    }
    interfaces {
        reth0.0;
    }
}
security-zone untrust {
    host-inbound-traffic {
        system-services {
            all;
        }
        protocols {
            all;
        }
    }
    interfaces {
        st0.0;
        reth1.0;
    }
}
[edit]
user@host# show security ike
proposal IKE_PROP {
    authentication-method pre-shared-keys;
    dh-group group5;
    authentication-algorithm sha1;
    encryption-algorithm aes-256-cbc;
}
policy IKE_POL {
    proposals IKE_PROP;
    pre-shared-key ascii-text “$ABC123”
}
gateway Branch_GW {
    ike-policy IKE_POL;

    dynamic hostname branch.example.net;
    dead-peer-detection optimized;
    external-interface reth1.0;
    version v2-only;
}
[edit]
user@host# show security ipsec
proposal IPSEC_PROP {
    protocol esp;
    authentication-algorithm hmac-sha1-96;
    encryption-algorithm aes-256-cbc;
}
policy IPSEC_POL {
    perfect-forward-secrecy {
        keys group5;
    }
    proposals IPSEC_PROP;
}
vpn Branch_VPN {
    bind-interface st0.0;
    ike {
        gateway Branch_GW;
        ipsec-policy IPSEC_POL;
    }
}
[edit]
user@host# show security policies
default-policy {
    permit-all;
}
验证
确认配置工作正常。
验证响应方的 IKE 第 1 阶段状态
目的
验证 IKE 第 1 阶段状态。
行动
在节点 0 上的操作模式下,输入 show security ike security-associations 命令。从命令获取索引号后,请使用命令 show security ike security-associations detail 。
user@host# show security ike security-associations
node0:
Index      State  Initiator cookie   Responder cookie  Mode    Remote Address
1367024684 UP     f82c54347e2f3fb1   020e28e1e4cae003  IKEv2    100.10.1.253
user@host# show security ike security-associations detail
node0:
IKE peer 100.10.1.253, Index 1367024684, Gateway Name: Branch_GW
  Location: FPC 5, PIC 0, KMD-Instance 2
  Role: Responder, State: UP
  Initiator cookie: f82c54347e2f3fb1, Responder cookie: 020e28e1e4cae003
  Exchange type: IKEv2, Authentication method: Pre-shared-keys
  Local: 100.10.1.50:4500, Remote: 100.10.1.253:2541
  Lifetime: Expires in 3593 seconds
  Peer ike-id: branch.example.net
  Xauth assigned IP: 0.0.0.0
  Algorithms:
   Authentication        : hmac-sha1-96
   Encryption            : aes256-cbc
   Pseudo random function: hmac-sha1
   Diffie-Hellman group  : DH-group-5
  Traffic statistics:
   Input  bytes  :                  683
   Output bytes  :                  400
   Input  packets:                    2
   Output packets:                    1
  IPSec security associations: 0 created, 0 deleted
  Phase 2 negotiations in progress: 1
意义
该 show security ike security-associations 命令会列出所有活动的 IKE 第 1 阶段 SA。如果未列出任何 SA,则说明第 1 阶段建立存在问题。检查配置中的 IKE 策略参数和外部接口设置。
如果列出了 SA,请查看以下信息:
-
索引 — 此值对于每个 IKE SA 都是唯一的,您可以在命令中使用
show security ike security-associations index index_id detail该值来获取有关 SA 的更多信息。 -
远程地址 — 验证本地 IP 地址是否正确,以及端口 4500 是否用于对等通信。
-
角色响应方状态
-
已启动 — 第 1 阶段 SA 已建立。
-
关闭 — 建立第 1 阶段 SA 时出现问题。
-
对等方 IKE ID — 验证地址是否正确。
-
本地身份和远程身份 — 验证这些地址是否正确。
-
-
模式 — 验证正在使用正确的模式。
验证配置中的以下各项是否正确:
-
外部接口(接口必须是发送 IKE 数据包的接口)
-
IKE 策略参数
-
预共享密钥信息
-
第 1 阶段提议参数(必须在两个对等方上匹配)
该 show security ike security-associations 命令会列出有关安全关联的其他信息:
-
使用的身份验证和加密算法
-
第 1 阶段生存期
-
流量统计(可用于验证流量是否在两个方向上正常流动)
-
角色信息
最好使用响应方角色在对等方上执行故障排除。
-
发起方和响应方信息
-
创建的 IPsec SA 数
-
正在进行的第 2 阶段协商数
验证响应方的 IPsec 安全性关联
目的
验证 IPsec 状态。
行动
在节点 0 上的操作模式下,输入 show security ipsec security-associations 命令。从命令获取索引号后,请使用命令 show security ipsec security-associations detail 。
user@host# show security ipsec security-associations
node0
  Total active tunnels: 1
  ID        Algorithm            SPI      Life:sec/kb  Mon lsys Port Gateway
  <77856771 ESP:aes-cbc-256/sha1 4ad5af40 7186/unlim   - root   2541 100.10.1.253
  >77856771 ESP:aes-cbc-256/sha1 5bb0a5ee 7186/unlim   - root   2541 100.10.1.253
user@host# show security ipsec security-associations detail
node0
  ID: 77856771 Virtual-system: root, VPN Name: Branch_VPN
  Local Gateway: 100.10.1.50, Remote Gateway: 100.10.1.253
  Local Identity: ipv4_subnet(any:0,[0..7]=0.0.0.0/0)
  Remote Identity: ipv4_subnet(any:0,[0..7]=0.0.0.0/0)
  Version: IKEv2
    DF-bit: clear
    Bind-interface: st0.0

  Port: 2541, Nego#: 0, Fail#: 0, Def-Del#: 0 Flag: 608a29
  Tunnel Down Reason: SA not initiated
    Location: FPC 5, PIC 0, KMD-Instance 2
    Direction: inbound, SPI: 4ad5af40, AUX-SPI: 0
                              , VPN Monitoring: -
    Hard lifetime: Expires in 7182 seconds
    Lifesize Remaining:  Unlimited
    Soft lifetime: Expires in 6587 seconds
    Mode: Tunnel(0 0), Type: dynamic, State: installed
    Protocol: ESP, Authentication: hmac-sha1-96, Encryption: aes-cbc (256 bits)
    Anti-replay service: counter-based enabled, Replay window size: 64
意义
命令 show security ipsec security-associations 输出列出以下信息:
-
远程网关的 IP 地址为 100.10.1.253。
-
两个方向都会显示 SPI、生存期(以秒为单位)和使用限制(或生存大小,以 KB 为单位)。生存期值表示第 2 阶段生存期将在 7186 秒后过期,未指定生存大小,表示没有限制。第 2 阶段生存期可以不同于第 1 阶段生存期,因为在建立 VPN 后,第 2 阶段不依赖于第 1 阶段。
-
虚拟系统 (vsys) 是根系统,始终列出 0。
命令 show security ipsec security-associations index index_id detail 输出列出以下信息:
-
本地身份和远程身份组成 SA 的代理 ID。
代理 ID 不匹配是导致第 2 阶段故障的最常见原因之一。如果未列出 IPsec SA,请确认第 2 阶段提议(包括代理 ID 设置)与两个对等方匹配。对于基于路由的 VPN,默认代理 ID 为本地 = 0.0.0.0/0,远程 = 0.0.0.0/0,服务 = any。来自相同对等方 IP 的多个基于路由的 VPN 可能会出现问题。在这种情况下,必须为每个 IPsec SA 指定唯一的代理 ID。对于某些第三方供应商,必须手动输入代理 ID 以进行匹配。
-
第 2 阶段失败的另一个常见原因是未指定 ST 接口绑定。如果 IPsec 无法完成,请检查 kmd 日志或设置追踪选项。
具有 IPsec VPN 行为的平台特定 NAT-T
使用 功能资源管理器 确认平台和版本对特定功能的支持。
使用下表查看平台的特定于平台的行为。
| 平台 | 差异 |
|---|---|
| SRX 系列 |
|
变更历史表
是否支持某项功能取决于您使用的平台和版本。使用 功能资源管理器 确定您的平台是否支持某个功能。